Showing posts with label Shimmer Paints. Show all posts

Thursday, September 8, 2011

Wheel, Shimmer Paint & Simply Scored Technique Card

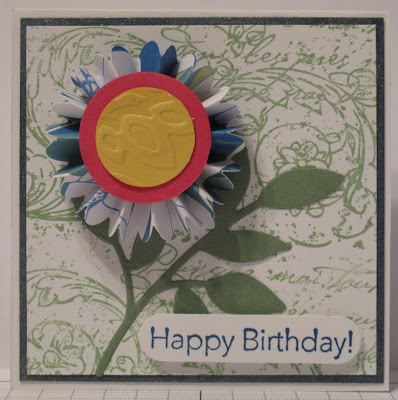
This little mini 3"x3" card is made to showcase a Stampin' Jumbo Wheel, the new Simply Scored Tool and Shimmer Paints.
I used the Very Vintage Jumbo Wheel and Wild Wasabi Classic Ink to create the background on this card.  I made the medallion flower out of a piece of Beyond The Garden designer series paper and the new Simply Scored tool by Stampin' Up!.  I also used the Scallop Edge Punch before I scored and folded the flower.  Here is a closer view of the flower ....
You can see the bling in the center of the flower.  I spritzed the Daffodil Delight circle with Champagne Mist Shimmer Spritz before I ran it though my Big Shot with a texture plate.  You can also see the bling on the Not Quite Navy layer between the two Whisper White layers.  I used a dauber to run some of the Champagne Mist Shimmer Paint right out of the bottle.  Oh the bling!!!!  The leaves are made using the Little Leaves Sizzlits Die.
I also made a bigger version of the medallion flower ...

I did not use the Scallop Edge Punch on this one, and it has a few more layers in the center.  But I still have bling on the Daffodil Delight center!

You can see a bit of the bling in this picture.
Thanks for visiting, and Happy Stampin' ....

Thursday, August 11, 2011

Pool Party Birthday Wishes

Today I have a card for you that uses some of the products in the new Stampin' Up! 2011-12 Idea Book and Catalogue.
   Pool Party In Colour cardstock - page 176; Item 122924; $8.50 pkg
   Lucky Limeade In Colour cardstock - page 176; Item 122926; $8.50 pkg
   Houndstooth Embossing Folder - page 218; Item 123134; $9.95
   In Colour Designer Printed Brads - page 199; Item 122940; $9.95 pkg
   Button Buddies stamp set - page 71; Wood Item 122735 - $36.95; CM Item 122737 - $26.95
Here's the card for you ....
I sure wish the Champagne Mist Shimmer Spritz showed in the pictures!  But oh my, it is so blingy.  I spritzed the entire cardfront as well as the flower image.  I am so excited that this flower image coordinates with the Scallop Circle punch, so you don't have to fussy cut it out!
Then I used the same layout and colours and just changed up the embossing folder to the new
   Stripes Embossing Folder - page 218; Item 123128; $9.95
I also stamped the flower image 3 times, and hand cut out two layers then used one of the
   Brights Designer Button - page 197; Item 119747; $10.95
And here is a closer view of the flower ....

Stamps:  Button Buddies, So Hapy For You (sentiment), Hugs & Wishes (sentiment)
Ink:  Wisteria Wonder, Perfect Plum, Basic Black
Cardstock:  Pool Party, Lucky Limeade, Whisper White
Other:  Scallop Circle punch, 1/16" punch, Designer Printed Brads, Brights Designer Button, Houndstooth and Stripes Embossing Folders, Champagne Mist Shimmer Spritz
Have a super day and Happy Stampin' .. ... ....  ........ ........... ......

Friday, July 22, 2011

My Friend Embossed card - CASEd

A while ago I saw a card similar to this one on someone's blog (sorry I searched but can't remember whose it was, if it belongs to you please email me so I can give you proper credit).  I changed it a bit by changing the punch used and adding Champagne Mist Shimmer Spritz to the front ....
You can't really see the bling of the spritz, but it IS there!
Stamps:  My Friend
Ink:  Versa Mark
Cardstock:  Basic Black, Melon Mambo
Other:  Melon Mambo Embossing Powder, Eyelette Border punch, Champagne Mist Shimmer Spritz
I love all the new embossing powders that Stampin' Up! has come out with now.  And they match our cardstock, inks and markers too!  Life can't get  much better. ....
Happy Stampin' ... ... ...

Friday, July 1, 2011

French Foliage Hello

I finally got some awesome time In My Craft Room to create a card.  I have been feeling withdrawal symptoms lately, LOL.
Here is the card I have for you today .....
I was doing the happy dance when I saw that this stamp set, French Foliage, was in the new Stampin' Up! Idea Book and Catalogue.  When it was in the mini I fell in love with this set, now I can continue to use it!  It is very versatile.  I cut 2 butterflies out using the Beautiful Butterflies die and Blushing Bride cardstock.  Then I spritzed them with Champagne Mist Shimmer Spritz and layered them.  Here's an upclose picture of the bling.....

I used the new Swirls & Curls Verses set from the Summer Mini catalogue (level 1 hostess set, but as of today you can purchase it with your Hostess Dollars for only $13.50 Wood or $10.00 Clear Mount.

I love the little bird on this stamp.
Stamps:  Swirls & Curls Verses, French Foliage
Ink:  Blushing Bride, Pear Pizzazz, Concord Crush
Cardstock:  Blushing Bride, Pear Pizzazz, Whisper White
Other:  Beautiful Butterflies Die, Basic Rhinestones, Movers & Shapers die, Scallop Oval punch
Thanks for visiting today, have a super day.  Happy Stampin' .....

Sunday, June 12, 2011

Fabulous Florets - and A Sparkley Sneak Peek

Today was the day to get out a couple of the new In Colours for 2011-13.  I used Island Indigo and Calypso Coral on this card.  The other day Sandi MacIver posted a card she made using Wild Wasabi Embossing Powder on Basic Black cardstock.  I loved the card and decided to case it, with a few changes of course....
I took another picture hoping you could see some of the bling I added to this card ....
I spritzed the Island Indigo layer with Champagne Mist Shimmer Spritz before I ran it through my Big Shot with one of the Backgrounds #1 Texture Plates, the flower is stamped on Shimmery White cardstock and fussy cut out, and the Wild Wasabi Embossing Powder also has a sheen to it.  I love bling no matter how I manage to get it onto a card!
Stamps:  Fabulous Florets, sentiment unknown what set it is from
Ink:  Island Indigo, Calypso Coral, VersaMark
Cardstock:  Basic Black, Island Indigo, Calypso Coral, Shimmery White
Other:  Wild Wasabi Embossing Powder, Champagen Mist Shimmer Spritz, Backgrounds #2 Texture Plate, Modern Label punch, Basic Black 3/8" Taffeta Ribbon
I will be MIA for a while, we have our Grandson, James, staying with us for a bit while Mom and Dad get a much needed (and deserved) vacation.  We have many exciting adventures planned.   I'll be back after our time together is over. 
Happy Stampin' ... ... ...

Tuesday, April 12, 2011

Black and Red Owl Birthday Card

This card came to me in the wee hours of the morning.   I had it in my mind using the Swirly Die instead of the branch from the 2 Step Bird Punch, but did not have it with me in the trailer.  So had to make do.
I used Basic Black for the main card, then spritzed some Champagne Mist Shimmer Spritz on it so that it looks like stars in the night sky.  I love every one of the owls I create from the 2 Step Owl Punch by Stampin' Up!  Every one is different, but they are all so cute.  This one makes a great masculine birthday card.
Stamps:  Messages For Mom
Ink:  Basic Black
Paper:  Neutrals Patterns Designer Series Paper
Cardstock:  Basic Black, Cherry Cobbler, Poppy Parade, Whisper White
Other:  2 Step Owl Punch, 2 Step Bird Punch, Wide Oval, Scallop Oval and Large Oval punches, Champagne Mist Shimmer Spritz, Basic Pearls
Thanks for visiting, I am home again and off and running with classses.
Happy Stampin' ................................................................................. 

Thursday, March 3, 2011

Thoughts and Prayers Sympathy Card

I have not had much of a chance to stamp In My Craft Room lately, but I just had to put all other things aside and create this card.  I pulled out a left over card kit from a previous class, used the colours and switched a few of them.  Then I pulled out Thoughts and Prayers, a set I love but it has been unloved lately!
I used some Vanilla Shimmer Smooch Spritz on the Crumb Cake cardfront, then some Champagne Mist Shimmer Spritz on the Baja Breeze piece at the bottom.  Lots of bling, LOL!  Here is an up close shot of the bling ....

For the Whisper White punched border strip I used the XL Snowflake punch.  Can you believe it????  Here's a bit of a tutorial for you.  Click on the pictures to make them bigger and easier to see.
I cut a piece of Whisper White cardstock 5-1/2 x 1-3/8, then I lined up the bottom edge in the first level of two of the spikes of the snowflake punch like this ....
Then you slide the cardstock over and line it up just past the part you punched previously, like this (notice you can just see the punched part in the very left hand side of the snowflake punch) ...
You continue punching like this until you have punched all along your cardstock.  You will end up with an edge like this ....
And here is a picture of it with the Baja Breeze piece mounted on it .....

Now isn't this something different?
Stamps:  Thoughts and Prayers, Fundamental Phrases
Ink:  Always Artichoke
Cardstock:  Crumb Cake, Whisper White, Baja Breeze, Regal Rose
Other:  Snowflake Punch, Trio Flower Punch, Vanilla Shimmer Smooch Spritz, Champagne Mist Shimmer Spritz, Basic Pearls, Texture Plate from Kit #4
Bye for now and Happy Stampin' ~   ~    ~    ~    ~    ~   

Wednesday, October 27, 2010

Sense Of Time Masculine Birthday

Another set for our trip is Sense Of Time.  This is a great masculine stamp set and I don't know why I don't use it more often.  Here is what I used it for ......
The card base is Very Vanilla and the dark layer is Early Espresso Patterns Designer Series Paper.  I sponged it a bit around the edges with Early Espresso Classic Ink, then spritzed it generously with Champagne Mist Shimmer Spritz.  The small clock face has Crystal Effects on it, and the sentiment piece is also spritzed. 
Here is a close up of the shimmer on the card ... ... ...

And a close up of the small clock face ... ...
Stamps:  Sense Of Time, On Your Birthday
Ink:  Early Espresso, Crumb Cake, So Saffron
Paper:  Early Espresso Patterns DSP
Cardstock:  Very Vanilla, Early Espresso
Other:  5/16" Vanilla Brad, 1-1/4" Early Espresso Striped Grosgrain Ribbon, Champage Shimmer Paint Spritz
Off now to create a card or two with another one of the stamp sets on my "to go to Peace River" list.
...................................  Glenda Mollet

Tuesday, October 12, 2010

Notably Ornate Top Note Birthday Card

Another creation using the Stampin' Up! set "Notably Ornate".  I discovered (and I am sure I am not the first one) that the big frame image fits inside the Top Note Die just perfectly ... ... ...
Stamps:  Notably Ornate, Sentiment (can't remember)
Ink:  Bravo Burgundy, Basic Black
Cardstock:  Bravo Burgundy, Basic Black, Whisper White
Other:  Always Artichoke Seam Binding, Champagne Mist Shimmer Paint, Basic Rhinestones, Modern Label Punch, Dimensionals
Some basic supplies and a great colour scheme.  This card is quick and easy to make.  You could step it up by using a background stamp or embossing folder for the Bravo Burgundy card base.

Here is a close up picture of the "Bling" on the card:

I inked up the oval frame image with Bravo Burgundy, then daubed Champagne Mist Shimmer Paint on the stamp and stamped it.  Oh my, its loverly!!!  Then I used the blingy dauber that had picked up the Bravo Burgundy ink and sponged around the Whisper White layer.  A couple of Basic Rhinestones, and voila, it's done.
Happy Stampin' ... .. ...  Glenda Mollet

Monday, October 11, 2010

Notably Ornate Birthday Card

Today it is raining cougars and wolves here (you know cats and dogs only bigger LOL), so its a great day to create In My Craft Room!!!!
Each month I showcase one stamp set for my Stamp-A-Stacks, and create 3 cards using all the stamps in the set.  Last month it was "Elements Of Style", this month it is "Just Believe" and my next one will be "Notably Ornate".  I am uncertain what month it will be right now, as November I have a different kind of class up my sleeve for Christmas Cards.
Anyhoo ... ... ... here is the card I created today.  I loosely used the Mojo Monday Sketch #160 ... ... ...

 Here is what the sketch is ... ... ...

And here is an up close picture of the bling ... ... ...

For the scalloped edge on the Early Espresso piece I used the new Stampin' Up! Bat Punch!  Yup, can you believe it?????   I cut a piece of cardstock 1-1/2 x 4-1/4.  Then pushed the cardstock all the way into the punch and punched a row of bats out. I will do a quick post on how to do this right after posting this one.
I stamped the bird in Early Espresso on Very Vanilla, hand cut it out, then spritzed it with Champagne Mist Shimmer Spritz, let that dry, then spritzed it with Platinum Shimmer Spritz as well.  Talk about blingy!!  I used 3 Neutrals Glimmer Brads, and 2 In Colour Glimmer Brads to bling it up even more.  For the sentiment I used the frame stamp from Notably Ornate, inked it with my Early Espresso Stampin' Write Marker, then stamped Birthday Wishes from Ocassional Quotes inside the frame also using Early Espresso ink.
The main image is stamped on Very Vanilla in Early Espresso Classic Ink, then I sponged Blushing Bride around the outside, and Regal Rose right on the very edges.  A Vintage Brad gathers the Early Espresso Satin Ribbon.  I used my Teahouse Background stamp on the Regal Rose layer in Regal Rose Classic Ink.
Ahh, it felt so good to get back into card making again.  I have been so busy prepping for classes the past little while.
Off now to create another one out of this stamp set, check back tomorrow I hope to have it posted then.
Happy Stampin' ... ... ... ...   Glenda Mollet

Sunday, September 26, 2010

French Foliage Happy Anniversary Card

Yesterday was our 34th Wedding Anniversary.  We spent our honeymoon on MacKenzie Beach, Tofino, on Vancouver Island in B.C. and once again here we are!  I love the fact that every year on our anniversary hubby's job brings him back to this awesome place.  It has changed a bit, but mostly the beach is the same.
Here is the card I made for him using French Foliage.  This is the first chance I have had to use this set ... ...
The light spots on the Night Of Navy card base are from some Champagne Mist Shimmer Spritz I liberally applied.  I love how sparkley it turned out.  I used the Stampin 411 Sketch Challenge #169.  I did not bring any sentiment stamps with me, so I had to had write the Happy Anniversary, I am just glad I spelled it correctly, lol.
Stamp:  French Foliage
Ink:  Bashful Blue, Basic Black, Night of Navy
Cardstock:  Night of Navy, Bashful Blue, Very Vanilla
Punches:  Wide Oval, Large Heart
Other:  Champagne Mist Shimmer Spritz
For the leaf image on the large heart punch I punched out 2 wide ovals in bashful blue and one in night of navy.  Then I arranged the bashful blue ones behind the night of navy one in a heart pattern to outline the large heart punched in very vanilla.  The background is the words image from the stamp set stamped in night of navy then the small leaft from the set stamped over top of that in basic black.  Then lots of Shimmer Spritz.
Thanks for visiting, see you next time ... ... ...  Glenda Mollet

Sunday, August 29, 2010

Dasher and Deck The Halls Designer Series Paper - Christmas Card

Another one of the cards for my Echo Center classes (our local recreation center).  Here is the one I posted yesterday Santa Head card.  I am having so much fun making Christmas cards this year.  Stampin' Up! has come up with some super duper awesome Designer Series Papers!!!  And I absolutely LOVE Cherry Cobbler cardstock.  I can't believe how rich this card looks......
I used Crumb Cake for the card base and I spritzed it liberally with Champagne Mist Shimmer Paint Spritz.  This card also uses Cherry Cobbler and Early Espresso.  When I stamped Dasher I inked up the stamp in Early Espresso then I daubed Champagne Mist Shimmer Paint on it with a sponge.  When I stamped it the bling transferred to the image on the Very Vanilla cardstock.  I tried all sorts of ways to get a picture of the shimmery but no luck.  Give it a try tho, its awesome.
The Deck The Halls Designer Series Paper is available in only 4 days in the new Stampin' Up! Holiday Mini Catalogue (Item # 120810-page 18). I would love to share this DSP with you, just CLICK HERE on September 1st to order your very own package (or two!!).  Don't forget to order some co-ordinating supplies as well, Cherry Cobbler, Very Vanilla, Early Espresso and Always Artichoke cardstocks and some Classic Ink pads, the matching Stampin' Write Markers and Ink Refils to go with them.  You truly won't be disappointed.......... And, if you order the stamp set and / or the new Deck The Halls Designer Series Paper through my Online Store, I will send you one of these cards and the instructions to make your own!
Bye for now, I will be back tomorrow with another Christmas card for you.
Happy Stampin'   .. .. .. .. ..   Glenda Mollet Independent Stampin' Up! Demonstrator

Wednesday, August 4, 2010

For You Business Card Holder

Good afternoon!!!  Don't you just love this weather, but boy, oh boy, do we need some rain.  We are very lucky that there are no forest fires around where we live, but the rest of British Columbia, Canada is burning up in over 400 Forest Fires right now. 
I read in a business booster post somewhere (sorry can't remember who) that I should be going out shopping etc. with a bunch of small notes that hold my Stampin' Up! business cards to give out to people who are kind in some way, or when I talk to someone who is trying to buy a greeting card.  So I made up these.............
The cardbase is River Rock, then I added a layer of Concord Crush.  On top of that is Poppy Parade which I stamped once with an image from Just Believe in Poppy Parade for a tone on tone look.  The frame image from Just Believe is stamped in Concord Crush on Whisper White cardstock, then I cut that out. I stamped "for you" in River Rock in the centre of the blank space.  Once it was all stamped and cut out, I spritzed it with some Champagne Mist Shimmer Spritz (oh la la is it glittery I used about 2 oz of 70% rubbing alcohol and 8 drops of Champagne Mist Shimmer Paint).  I put one of Stampin' Up!s brand new Basic Rhinestones on the topmost flower for a bit more bling.
You can't see it, but inside I used my Vintage Jumbo Wheel and ran it across the bottom half of the card using River Rock ink.  Then I attached my business card with some Dotto Repositionable adhesive so the card can be removed if necessary.
I wanted to make an impression with this little bit of creativity, so I used Poppy Parade and Concord Crush which are very intense colours.  This little card shows how Stampin' Up! colours coordinate, two of the new In Colours and matching inks, as well as the new Basic Rhinestones and two of the neutral colours.
Thanks for visiting today, I'm off to create some more...........  Glenda Mollet

Thursday, June 10, 2010

Lilly Explosion Box

Another day of "Gardening".  I love these flowers, I can't kill them.  Its' amazing how not watering your flowers / garden causes them to die ~ ~ ~ who knew!!!
I used THIS tutorial by Valita in Aussie, for the lillies, they originated from Sharri and they are so fun to make.  I made 2 of the white ones, then made a pinkish one for this box.  Here is a picture of my completed box with a couple of my white lillies...........

and the inside


Here is a close up of the inside flowers - one lilly and two roses behind it, the "leaves" are a MS punch.


And here is a close up of the flower detail on the top of the box ~ ~ ~


Supplies I used:
Paper:  Retired Stampin' Up! DSP (sorry can't remember the name)
Cardstock:  Pink Pirouette, Whisper White, Regal Rose, Pretty In Pink, Old Olive
Ink:  Pretty In Pink and Regal Rose for sponging
Ribbon:  Regal Rose 5/8" GG, Whisper White Taffeta
Other:  Beads from Pretties Kit, Little Leaves die, MS Punch, NEW XL 2-3/8" Scallop Circle punch
For the flower on the box top I punched 3 XL Sc Circles from Pretty In Pink and 3 from Regal Rose.  Then I ran them through the crimper to break down the fibers and to separate the layers.  I separated each one into two pieces.  Then I spritzed them with Champagne Mist Shimmer Pain Spritz and crumpled them, put them together with a pink brad and formed into a flower.  Then I spritzed again with some Gold and Vanilla Shimmer Smooch Spritzes.  Oh my the ***BLING***.  I sponged all the DSP with Pretty In Pink and Regal Rose around all the edges.  The bow detail is just 2 layers of Regal Rose GG then a layer of Whisper White Taffeta, and a round of Regal Rose again.  The inside is all ready to put either pictures or some stamped and / or coloured images.  I have not decided yet.  But I love this little box, and they are so darned easy to make.
Here' another picture of the box all closed up....


Thanks for taking the time to visit my blog,

              see you soon In My Craft Room. ......  Glenda Mollet

Monday, April 26, 2010

Shabby Chic - Mojo Monday - 136

Hi out there in Stampin' Land ~  I had another great day!  Every other Wednesday morning I go to our local Community Centre and stamp up a storm with some of the ladies from the local seniors group - Sunshine Club.  They really keep me hopping coming up with projects that they have not done before.  Most of these ladies have been stamping for a very long time and create such impressive cards!
Last time I was there, one of them requested we do a card using the Shimmer Paints again.  I have not used them much lately, as it goes "out of sight out of mind".  They are in one of my drawers and don't see the light of day very often.  So Thanks! ladies for stretching my creativity.  Here is the card I came up with.........
I used a lot of Champagne Mist Shimmer Paint in different ways on this card. Here is what I did:
The Pink Pirouette card base has been spritzed with a mixture of Champagne Mist Shimmer Paint and 70% Rubbing Alcohol.
The middle piece that looks like DSP is actually cardstock that has been treated as below:
1.  On Whisper White cardstock I stamped Bella Toile background in VersaMark ink
2.  Then I embossed it in White Embossing Powder
3.  Next using a dauber I spread Regal Rose classic ink all over the cardstock, making it darker around the edges, and lighter in the middle
4.  Then I sponged some Bravo Burgundy classic ink just around the edges
5.  I wiped over everything vigorously with a piece of paper towel
6.  Then I hit it with the heat gun just to make sure it was all dried
7.  Then using a sponge I sponged Champagne Mist Shimmer Paint all over the prepared cardstock making sure I covered it all.
8.  I layered this on a piece of Bravo Burgundy cardstock
The glitter on this piece is unbelieveable, I wish I could get an acurate picture, but here is my attempt:
The sentiment piece has also been sponged with the Champagne Mist Shimmer Paint after I stamped the words on it, and I slipped it under the main part of the card.
The flower is made with Stampin' Up! 5 Petal punch.  I read somewhere on a blog how to do this technique, but can't remember whose it was, sorry.  UPDATE:  here is the link to the flowers on Lynn Larson's blog - Here's the steps to make this flower:
1.  Punch 3 Regal Rose 5 Petal Flower pieces
2.  Spritzed them with Champagne Mist Shimmer Paint Spritz
3.  Ran them through the crimper about 8 times in different directions
4.  Then I scrunched them up in very small balls and unscrunched them
5.  Separated the layers of each piece
6.  Layered one on top of the other and attached them together with a brad
7.  Then I mashed and scrunched and manipulated the layers into a flower to my liking
8.  Then I spritzed again with the Champagne Mist spritz
9.  After adhering to the card I added some Crystal Effects dots to mimic morning dew
10.  The leaves are the Little Leaves embosslits die and Old Olive cardstock


The actual putting together of this card went real quick, it was the prep work that takes the time.  But I think it was well worth the effort, it is absolutely gorgeous in real life!  Here is the inside of the card, I could not leave that un-spritzed!  I spritzed the Bravo Burgundy and Whisper White cardstocks both with more of the Champagne Mist spritz and added some stamped images in Regal Rose and Bravo Burgundy.
I don't think you would want to mail one of these cards due to the flower.  But you could, it would just cost a bit more.  But hand delivering it gives you a chance to witness its unveiling!!!!
Thanks so much for visiting again today, and I hope you havea great week.  I am busy with classes etc. but hope to do more stamping soon.
Glenda Mollet

Monday, October 26, 2009

Pattern Pines and Brushed Gold Christmas Card

I created this card tonight:

I used a piece of heavy cardboard and cut out an oval using my Coluzzle. Then I taped it on the outside front of my Petals A Plenty Embossing Folder. I put a piece of Whisper White cardstock into the folder and ran it through my Big Shot. This left a "negative" area in the middle of the cardstock where the pressure from the Big Shot does not reach. This technique was demonstrated at our Vancouver Island Demo meeting earlier this month, I am sorry I cannot remember who demoed it, but thank you! Then I used a dauber and the Frost White Shimmer Paint and daubed randomly over some of the raised flower images. I stamped Patterned Pines image in the negative area with Almost Artichoke cardstock. I tied a piece of Gold Elastic Cord around the left side of the Whisper White cardstock. The sentiment is stamped in Encore Gold ink and punched out with the Modern Label punch. I then punched Brushed Gold cardstock out with the Word Window punch and over-punched that with the Modern Label punch creating the frame for the sentiment. This was mounted on a Brushed Gold layer and finally on an Almost Artichoke card. I wanted to showcase some of the items from the Holiday Mini and I think I hit quite a few of them.
Thanks ever so much for your interest in my blog. Sorry I was gone for so long, but I was away in Tofino...................... again. I know, I know, such a tough life right? LOL Well that's it for trips to Tofino this year, next one is planned for the middle of March 2010. Bummer!!!!
................. Bye for now................. Glenda Mollet

Wednesday, October 21, 2009

Reindeer Punchie Card

I finally got the card created for our second punchie for the October Punchie Class. These reindeer are from Andrea / Sophie at Andrea Walford's website. The card is my own creation.
Here's the card......

I am continuing with my personal goal to use up all my retired stuff. So I used some Antique Brass Hodgepodge Hardware. The Reindeer heads are popped up on dimensionals, the strip in the middle is some of the Wood Sheets and I stained it with Sahara Sand ink and a sponge, then I dabbed some Chocolate Chip ink on with a sponge very lightly and sporatic to add some dimension to the strip. I also used Frost White Shimmer Paint on the antlers. The sentiment is also up on dimensionals. Here's the entire recipe:

Stamps: Many Merry Messages
Paper: Christmas Cocoa DSP, Real Red, Whisper White and Naturals White cardstock, Wood Sheets
Ink: Soft Suede, Sahara Sand, Chocolate Chip
Other: Reindeer punchies, Antique Brass HPH, Frost White Shimmer Paint

Thanks for looking, feel free to CASE and share this card.......
Glenda Mollet

LinkWithin

Related Posts with Thumbnails