Showing posts with label Basic Pearls. Show all posts

Saturday, September 17, 2011

Pink Butterfly Birthday Card

I used the retired designer series paper "Tea Party" to create this colourful birthday card ....
I needed to create a Workshop-In-A-Box for my Wednesday morning Sunshine Club ladies.  The only criteria for me was that I could not use anything that I needed at other classes / workshops because I am loading up everything it takes to make this card, and the card kits, into a box and dropping it off for them to create without me!  Should be a lot of fun for them, I hope they don't have too many "issues"!!!
Stamps:  Butterfly Prints, Confetti,  God's Blessings
Ink:  Pink Pirouette, Pretty In Pink, Basic Black, Certainly Celery
Paper:  Tea Party DSP
Cardstock:  Pink Pirouette, Lucky Limeade, Regal Rose, Whisper White
Other:  2-3/8" Scallop Circle punch, Modern Label Punch, Movers and Shapers die, Circles #2 die, Pretty In Pink Satin Ribbon, Basic Pearls
Have fun, ladies!
Happy Stampin' ..... 

Friday, September 2, 2011

Convention Make 'n Takes - Card #2

Back again today with a quick card I made from the Make 'n Takes at Convention this year ....
Another bright, happy card!  I love the ribbon treatment.  I always learn exciting new things when doing the projects from a Stampin' Up! event.  The 1/8" Taffeta ribbon is layered on top of the 3/8" Ruffled ribbon.  So cute!  Little Basic Pearls on teh flower centers really finish it off.
Stamps:  Raining Flowers
Ink:  Basic Black, Cherry Cobbler, Island Indigo, Lucky Limeade, More Mustard
Cardstock:  Lucky LImeade, Whisper White
Other:  Island Indigo 3/8" Ruffled ribbon, Old Olive 1/8" Taffeta ribbon, Basic Pearls, 1/2" Circle Punch
Thanks for visiting.
Happy Stampin' .....

Sunday, August 28, 2011

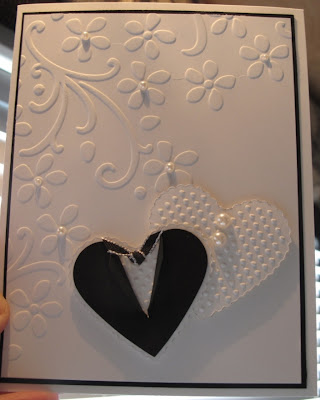
Embossed Wedding Hearts

A great friend asked me to create a Wedding card for a member of her family.  This is one of the prototypes I came up with.  I have some tweeking to do to it to change it a bit (different colours, different way of opening). 
I made the Bride and Groom hearts out of the Scallop Heart of Heart Embosslits die and the Full Heart Punch. We added a bunch of pearls and wanted to keep the card clean and simple.
Stamps:  None
Ink:  None
Cardstock:  Whisper White, Basic Black
Other:  Elegant Bouquet Embossing Folder, Scallop Heart of Heart Embosslits die, Full Heart Punch, Basic Black 1/8" Taffeta Ribbon, Basic Pearls
Now I am off to create prototype #3 (the first one was in THIS post). 
Happy Stampin' .... ..... ......    

Wednesday, August 24, 2011

Hello, Doily Wedding Card

Today felt like a wedding card kind of day.  I just got this awesome background stamp called "Hello, Doily" (page 127 and 150 Item 122845 $21.95)  .  This was on my mind since yesterday and had to come out LOL ....
It is a different fold.  Here is how it opens ....


Stamps:  Hello, Doily, Petite Pairs, Four Frames
Ink:  Pink Pirouette, Wisteria Wonder, Basic Black
Cardstock:  Whisper White, Pink Pirouette
Other:  Lace Ribbon Border Punch, Basic Pearls
This card could be done in almost any colour scheme to match any bride`s colours and would still look awesome.
  Whisper White - 5.5 x 4.24 scored at 2-1/8 from each side
  Pink Pirouette - 5.25 x 4
  Whisper White - 5-1/8 x 3-7/8
  Pink Pirouette - 2 x 2.5
  Whisper White - 1-7/8 x 2-3/8
Hope you are having a great week!
Happy Stampin` ... ... ... ... ... ... ...

Wednesday, June 8, 2011

Simple Friendship and Presto Patterns DSP Fond Farewell......

I pulled out one of the stamp sets I have been "crying" over since it was announced it is retiring.  This set is almost worn out (if you can wear out a stamp set) because I have used it so many times.  It has been my go to set when I wanted to add flowers or a swirl to the inside of a card or matching envelope, not to mention the front.  I also pulled out some of my shrinking stash of Presto Patterns DSP and this is the card I came up with .....
I added some Daffodil Delight and a happy surprise of a stamp set that is NOT retiring. It was in a recent mini catalogue and is not located in the new 2011-12 Idea Book and Catalogue!  Happy Dance being done over this one.  I sponged some Peach Parfait around and down the center of the butterfly and stamped (stamped off first) the flower from Simple Friendship in Daffodil Delight behind the sentiment.
Stamps:  Simple Friendship (retiring), Bring On The Cake
Ink:  Basic Black, Daffodil Delight, Peach Parfait
Paper:  Presto Patterns DSP (retiring) - two different patterns
Cardstock:  Whisper White, Basic Black
Other:  Daffodil Delight Satin Ribbon (retiring), Basic Pearls
Thanks for visiting, don't forget to hurry and get your retiring stamp sets and accessories before they disappear on June 30.  Some accessories have already sold out!  Click on the link to my Online Store, then "shop now" top right hand corner and go to the Stampin' Up! Online Store for all the up to date Last Chance items.  Or simply click on the links to the left and email me with your order.
Happy Stampin.      

Tuesday, May 31, 2011

Strength and Hope Birthday Card

Today I created another card with the stamp set "Strength and Hope".  I absolutely love the versatilty of this set of 4 stamps!

I created the background piece by stamping first the words in Peach Parfait, then I randomly stamped the butterfly in VersaMark and used White Embossing Powder on it.  Then I used So Saffron ink and daubed it over top of the butterflies so they popped out.  Lots of white on this card.  After I made it I really did not like it a lot, but now that it has dried and the inks have mellowed a bit, it is growing on me.
Stamps:  Strength and Hope, Build A Cupcake
Ink:  VersaMark, Peach Parfait, So Saffron, Cajun Craze
Markers:  Tangerine Tango
Cardstock:  Whisper White, Tangerine Tango, Peach Parfait
Other:  Lots of Tags - Label 3, Basic Pearls, Vintage brad, Peach Parfait 1/2" Stitched Poly ribbon
Thanks for visiting today, Happy Stampin' .....    

Sunday, May 15, 2011

Embossed Regal Wedding Card

I am back into my comfort zone today after my card yesterday.  I am finding I love the simplicity of Whisper White with one other colour and have to stretch myself to use more than one colour on a card.  But I persevere sometimes and they do work out!
Here is today's card for you .....
 and a bit closer view of the sentiment, bow and some of the pearls .......
I ran the whisper white 5 1/4 x 4" piece through my Big Shot with the Elegant Lines embossing folder.  But I only went part way through so it just embossed the top of the cardstock.  Then I pulled out my Perfect Polka Dot embossing folder and embossed the bottom of the cardstock so there is two different embossings on the piece.  I love this look!  Then I put a bow made with Whisper White Satin ribbon over the part where the two embossings meet so you don't see it.  I punched two Decorative Label pieces out of Regal Rose and offset them behind the whisper white Four Frames piece I also punched out with the Decorative Label punch.  Basic Pearls added throughout the card just finish it off.  You could make this wedding card out of any colour to match the colours of the wedding, and it would look just as awesome.
Stamps:  Four Frames, Always Elegant
Ink:  Regal Rose, Basic Black
Cardstock:  Whisper White, Regal Rose
Other:  Decorative Label punch, Elegant Lines and Perfect Polka Dot Embossing Folders, Whisper White Satin Ribbon, Basic Pearls
If I had been at home I probably would have used my pink sharpie marker to colour the pearls a nice light pink to go with the colour scheme.   Maybe next time!
Happy Stampin' ......................                                   

Thursday, May 5, 2011

Strength and Hope Note Card - Cased Myself!

Today I cased myself!  I posted THIS card earlier this week, and decided I wanted to make it in pink and white.  So here is what I did .....

I used Whisper White and Pretty In Pink cardstock.  The ribbon is Pretty In Pink Satin Ribbon.  I think it looks even better in this colour combination.  I made one of these for my Mom for Mother's Day.
We moved our trailer from the Shuswap area (Sicamous) in British Columbia to the Okanagan Valley.  We are now in West Kelowna in a resort campsite right on Okanagan Lake.  Oh my its awesome here, just wish it was a bit warmer so we could go swimming.
Here is a picture for you looking out our back window.  The back of the trailer is only about 3 feet from the sandy beach.

Well, I am off to walk the beach now.  Have a super day and Happy Stampin'

Sunday, May 1, 2011

Strength and Hope note card

Sorry I have been MIA lately. We are on another business trip, and I can’t get internet in our trailer. I have to walk up to the club house of the Eagle River Golf Club in Sicamous where we are presently staying. It is truly beautiful here in the Shuswap and today we had sunshine and it was almost warm!


I have a card for you today that I made using the Strength and Hope set. Stampin’ Up! Is donating $2.00 from every set sold to Breast Cancer Research. Here is the card I created for you …….

and a closer view of the ribbon .....
and the butterfly part ....

Stamp set: Strength and Hope
Ink: Early Espresso, Baja Breeze
Cardstock: Very Vanilla, Early Espresso
Other: Baja Breeze Seam Binding, Basic Pearls, Framed Tulips Embossing Folder, Scallop Trim Border Punch
I pulled a few threads from the middle of the seam binding (length wise) to gather it a bit then attached it to my card. The butterfly is hand cut then I put a couple of dimensionals under the wings to make them stay popped up.
My Stamp-A-Stack class in June will be using this awesome stamp set, stay tuned for more cards.
Hope you have a great weekend. I will be back as soon as I can, bye for now.


Thursday, March 31, 2011

Elegant Bouquet Wedding Card

Hi, I'm back today with a Wedding Card for you.  This is an original, not cased or inspired by anyone.  Yup, my mojo had a workout!
and the inside .....


With my Brayering class on my mind, I decided to dust off one of the techniques (brayering on an embossing folder) and create this card.  I brayered the Elegant Bouquet Embossing Folder with Rich Razzleberry ink and I just LOVE the result.  It sure made the embossing stand out.  Then I added the ribbon and pearls.  This layout would go with any colour scheme that any bride chooses.
Stamps:  Occasional Quotes (outside), Ever After (inside), Vintage Vogue (inside)
Ink:  Rich Razzleberry
Cardstock:  Whisper White, River Rock, Rich Razzleberry
Other:  Elegant Bouquet Embossing Folder, Decorative Label Punch, Scallop Oval Punch, Brayer, Basic Pearls (the 3 on the sentiment were coloured with a sharpie marker)
Happy Stampin' and I hope you have a great weekend.                       

Thursday, March 3, 2011

Thoughts and Prayers Sympathy Card

I have not had much of a chance to stamp In My Craft Room lately, but I just had to put all other things aside and create this card.  I pulled out a left over card kit from a previous class, used the colours and switched a few of them.  Then I pulled out Thoughts and Prayers, a set I love but it has been unloved lately!
I used some Vanilla Shimmer Smooch Spritz on the Crumb Cake cardfront, then some Champagne Mist Shimmer Spritz on the Baja Breeze piece at the bottom.  Lots of bling, LOL!  Here is an up close shot of the bling ....

For the Whisper White punched border strip I used the XL Snowflake punch.  Can you believe it????  Here's a bit of a tutorial for you.  Click on the pictures to make them bigger and easier to see.
I cut a piece of Whisper White cardstock 5-1/2 x 1-3/8, then I lined up the bottom edge in the first level of two of the spikes of the snowflake punch like this ....
Then you slide the cardstock over and line it up just past the part you punched previously, like this (notice you can just see the punched part in the very left hand side of the snowflake punch) ...
You continue punching like this until you have punched all along your cardstock.  You will end up with an edge like this ....
And here is a picture of it with the Baja Breeze piece mounted on it .....

Now isn't this something different?
Stamps:  Thoughts and Prayers, Fundamental Phrases
Ink:  Always Artichoke
Cardstock:  Crumb Cake, Whisper White, Baja Breeze, Regal Rose
Other:  Snowflake Punch, Trio Flower Punch, Vanilla Shimmer Smooch Spritz, Champagne Mist Shimmer Spritz, Basic Pearls, Texture Plate from Kit #4
Bye for now and Happy Stampin' ~   ~    ~    ~    ~    ~   

Friday, February 25, 2011

Christmas All Year Long - Magnolia Blog Hop - February 2011

Welcome back to another Christmas All Year Long blog hop featuring Magnolia Stamps.  If you have arrived here from Danielle's blog you are on the right track.  If not, HERE is the link back to the start at the Magnolia-Licious Christmas All Year Long blog and start at the beginning.  You don't want to miss any of these darling creations.
I used Wrapped Tilda (2009 So Jolly So Snowy Collection) and put her sitting on top of the Sugar Bag (2010 Raise the Ceiling / Right Through My Heart Collection).  I wanted to go all white so that the Tilda image pops out at you.  I did end up putting a bit of colour on the card, but I don't think it takes away from the image at all ......
I used mostly Stampin' Up! supplies for this card - the cardstock, the ribbon, the embossing folders, the punch, the pearls, and the beads.  Here is an up close look at the coloured image (coloured with Copics - I will list them at the end of this post).....
I used Suzanne Dean's tip of putting a warm gray over top of the red to make it less bright and I love the result.  I used some red Smooch Pearlized Accent Ink to the flower centers on the layer I embossed with the Petals-A-Plenty embossing folder, you can see them a bit in this picture. And a closer look at the ribbon and bead treatment on the left hand side of the card ....
I generated the sentiment on my computer and punched it out with the Stampin' Up! Jewelry Tag punch, of course I had to add a pearl to the top where they intersect, it just needed it!  I also added LOTS and LOTS of pearls to this card.  Some of them are from the Pretties Kit (now retired) and some are Basic Pearls.  The beads are from the Pretties Kit and the pearl headed stick pin I bought somewhere, but can't remember where.
There are 3 layers on the cardfront of this card, and I spritzed all layers with Champagne Mist Shimmer Paint Spritz (make with 70% Rubbing Alcohol and Champagne Mist Shimmer Paint).  I also distressed the first layer on the outside, and the inside layer.  Oh lala, talk about bling!  I tried to take a picture of it, but as usual it does not show up very well, but here's the picture anyways ....
The inside is also white, I did not add any sentiment as I will do that when I decide who will adopt this card at Christmas time ...
And this is the top page of the inside, I puched out some snowflakes on Stampin' Up! Shimmer White cardstock using the Northern Frost decorative strip die ....

Of course I had to add pearls to the inside of this card as well.
Stamps: Magnolia - Wrapped Tilda, Sugar Bag
Ink:  Memento Black
Cardstock: Whisper White, XPress Blending paper (images stamped on)
Colouring:  Copic Sketch Markers
Other:  Embossing Folders - Petals-A-Plenty, Northern Flurry; White Satin Ribbon, Basic Pearls, Pretties Kit (retired), Red Smooch Paint, Jewelry Tag Punch, Distress Tool, Dazzling Diamonds Glitter, Frosted Lace Stickles, Champagne Mist Shimmer Spritz, Sharpie White Poster Pen
Thank you very much for visiting us on the Monthly Christmas All Year Long Blog Hop.  Your next stop is Jean Hemple.  I know she will have a great card for you.  Bye for now, see you all next month!  (Yipeee I now have 2 Christmas cards done!!!)
Copics Used:
  Dress - R24, R27, R29, W3
  Sugar Bag - E0000
  Heart on Sugar Bag - R0000
  Bow - R0000
  Skin - E41, E00, E1
  Cheeks - R20
  Hair - E00, YR23, E99m E39

Friday, February 18, 2011

Happiness Shared Birthday - Mojo Monday #178

Another awesome sketch from Mojo Monday!  I wanted to make something very feminine after all my masculine cards lately and this sketch proved the perfect layout.  Here's my card .....

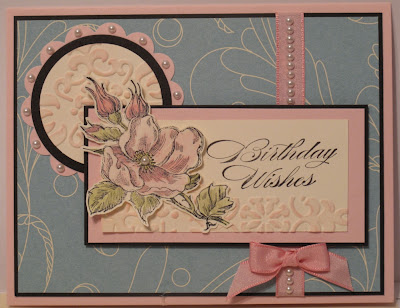
I really like how feminine this card turned out, all the Basic Pearls take it over the top, don't you think?  I did something a bit different on this one.  I used the Stampin' Up! Vintage Wallpaper Embossing Folder on the two Very Vanilla pieces.  For the circle, I centered one of the medallions from the folder onto the circular piece, ran it through my Big Shot, then using a dauber, I daubed on some Pink Pirouette classic ink very, very lightly ( or as my favourite grandson says, vee, vee, light  LOL).  Then for the rectangular piece I used the same embossing folder but I used 2 different sections of it.  There is a medallion part under the flower embellishment, and one of the edges to put some along the bottom.  Then I again daubed some Pink Pirouette classic ink very, very lightly so the colour only goes on the raised portions of the embossed image.  I stamped the large Dogwood Blossom from the set Happiness Shared in Basic Black ink on Very Vanilla cardstock, coloured it with an Aqua Pen and the Watercolour Wonder Crayons and fussy cut it out.  Then I adhered it to the top of the rectangular piece over some of the embossing.
Stamps:  Happiness Shared, Bring On The Cake
Ink:  Basic Black, Pink Pirouette
Paper:  Elegant Soiree
Cardstock:  Pink Pirouette, Basic Black, Very Vanilla
Other:  2-3/8" Circle Punch, 1-3/4" Circle Punch, Circles Die, Vintage Wallpaper Embossing Folder, Watercolour Wonder Crayons (Regal Rose, Old Olive), Basic Pearls, Dauber, Pretty In Pink Taffeta Ribbon
Here is an upclose picture of some of the embossing and floral details ....


Thanks for taking the time to visit my blog today, Happy Stampin'

Tuesday, February 8, 2011

Thinking Of Spring - Mojo Monday #177

Another great sketch from Mojo Monday again this week.  Here's the sketch ......

and here is my version of the sketch .............
I used some new stuff on this card.  New Rubber and New Designer Series Paper, both of which I got for FREE recently.  The stamp set - Something To Celebrate - is a Hostess Reward set, and the stamp set - Punch Bunch - is a Sale-A-Bration FREE set.  The designer series paper - Springtime Vintage - is from the Occasions Mini catalogue and I got it FREE with my Hostess Rewards money!  Can't beat that!
Stamps:  Punch Bunch, Something To Celebrate
Ink:  Pear Pizzazz, Rose Red, Always Artichoke
Paper:  Springtime Vintage DSP
Cardstock:  Very Vanilla, Pear Pizzazz
Other:  Scallop Circle punch, 1-3/8" Circle punch, Basic Pearls, Perfect Polka Dots Embossing Folder
I am going to make up more of these wonderful cards to send to my downline (complete with recipe), so watch out ladies, they will be coming soon! If you want to join my downline team, just contact me. Right now you can become a Stampin' Up! Demonstrator for 15% off AND get an extra $60 in awesome products for FREE!!!!
Thanks for visiting today, Happy Stampin' ......   Glenda Mollet

Tuesday, February 1, 2011

A Sunny Garden - Mojo Monday #176

I love this week's Mojo Monday sketch.  I used to make a card like this every once in a while, but have not done so in a few years now.  Here's my interpretation of the sketch ..............

You can't see the texture very well, but I used a texture plate for the peach parfait piece on the bottom called Perfect Details.  I also used another one of the Movers and Shapers Magnetic dies - Punch Windows.  A fun, bright and springy card for you today.  We had sunshine yesterday and it was awesome and boy was the sunrise a gorgeous surprise.
Stamps:  Punch Potpourri, Elegant Cheer
Ink:  Daffodil Delight, Poppy Parade, Peach Parfait
Paper: Sunny Garden DSP
Cardstock:  Whisper White, Basic Gray, Old Olive
Other:  Boho Blossom punch, Little Leaves die, Mover and Shapers Magnetic die - Punch Windows, Scallop Oval punch, basic rhinestones, Perfect Details texture plate
Bye for now and Happy Stampin'  ..................  Glenda Mollet

LinkWithin

Related Posts with Thumbnails