Showing posts with label Glimmer Brads. Show all posts

Wednesday, September 14, 2011

Floral Fabric Christmas Card

Now that I am a "Fabric Convert" I decided to whip up a couple of projects using the Holly Berry Designer Fabric.  The first project is a Christmas card using the Utah Divas Sketch Challenge . . . . .
I used the Fun Flowers Die to create the flower image on this card.  The bottom layer of the flower is Holly Berry Designer Fabric, then I used Fabric Adhesive (page 196 main catalogue, Item 122194, $18.50) to fuse it to Very Vanilla cardstock. Then ran it through the Petals A Plenty Embossing Folder.  In this picture you can see a bit of the bling I spritzed on the background and the flower layers ....

A bit of Cherry Cobbler Classic Ink was sponged on top to add texture and dimension.  Then I layered two more of the flowers from the die, and finished it off with a Regals Designer Button and Cherry Cobbler Baker's Twine.  The ribbon is Early Espresso Quilted Ribbon from the Holiday Mini Catalogue (page 30, Item 124104 - $10.95).   I did the sentiment the same as I did in yesterday's blog post.
Stamps:  Petite Pairs
Ink:  Cherry Cobbler, Early Espresso
Cardstock:  Cherry Cobbler, Very Vanilla
Fabric:  Holly Berry Designer Fabric
Other:  Petals A Plenty Embossing Folder, Champagne Mist Shimmer Spritz, Early Espresso Quilted Ribbon, Petal Cone Die, In Colour Glimmer Brad, Word Window punch, Regals Designer Button, Cherry Cobbler Baker's Twine
Happy Stampin' ..............

Saturday, August 27, 2011

Patterned Birthday Party

I created a really fun and happy card today using the new set "Patterned Party".  What youngster, or youngster at heart, would not love to receive this happy card .....
I used a lot of Champagne Mist Shimmer Spritz on this one again.  Here is a picture of the bow treatment where you can see the bling in the background...
I used the "quilting" technique for this card.  First I stamped all the images on the Whisper White cardstock, then I ran it through my Big Shot with the Square Lattiace Embossing Folder. Then I spritzed on the Champagne Mist Shimmer Spritz.  Then I cut out more balloons and added them on the card with dimensionals.  The bow is Lucky Limeade Ruffled Ribbon tied into a bow and then an In Colour (Poppy Parade) Glimmer Brad in the middle.  Love that bling!!!
Stamps:  Patterned Party
Ink:  Poppy Parade
Markers:  Poppy Parade, Lucky Limeade, Tempting Turquoise, Daffodil Delight, Peach Parfait
Cardstock:  Whisper White, Lucky Limeade
Other:  Square Lattice Embossing Folder, Champagne Mist Shimmer Spritz, Lucky Limeade Ruffled Ribbon, In Colour Glimmer Brad
  Whisper White - 5.5 x 4.25
  Lucky Limeade - 5-1/8 x 3-7/8
  Whisper White - 5 x 3.75
Happy Stampin' see you soon .......

Saturday, June 11, 2011

Flower Garden in Daffodil Delight

I decided to pair Daffodil Delight with Concord Crush for this bright and cheery birthday card.

I added a Concord Crush Glimmer Brad to the Daffodil Delight 1-1/4" Striped Grosgrain Ribbon to gather it just at the bottom of the emobossed image.  I added some Daffodil Delight ink to the flower centers using a dauber.  The sentiment is from Whisical Words which is retired, but it was calling my name to be used.
Stamps:  Whimsical Words
Ink:  Concord Crush, Daffodil Delight
Cardstock:  Whisper White, Concord Crush
Other:  Daffodil Delight 1-1/4" Striped Grosgrain Ribbon, In Colour Glimmer Brad (Concord Crush), Flower Garden Embossing Folder
I hope you have a great weekend and Happy Stampin' ... 

Wednesday, May 11, 2011

Flower Garden Embossed Birthday Wishes

There has been a few awesome cards being shared lately, made with Stampin' Up!s new Flower Garden Embossing Folder.  Today I decided I would make my own version of this card. 

I spritzed the whisper white with Champagne Mist Shimmer Spritz before I embossed or stamped it.  I hope you can see some of the bling in this picture.


I also used on of the Subtles Glimmer Brads on the sentiment piece.


Inside I embossed and used the dauber again to match the outside of the card.

 Then I thought, why not do the envelope to match!  So I did ....

Today was a picture perfect day in the Okanagan Valley.  The temps were over 20 deg cel. and there was not a cloud in the sky.  I hope your day was just as perfect wherever you are!
Stamp:  So Happy For You (sentiment)
Ink:  Pretty In Pink
Cardstock:  Whisper White, Pretty In Pink
Other:  Flower Garden Embossing Folder, Champagne Mist Shimmer Spritz, Dauber, Subtles Glimmer Brad,  Pretty In Pink 1/8" Taffeta Ribbon
Happy Stampin' ~ ~ ~ ~ ~                      

Thursday, February 24, 2011

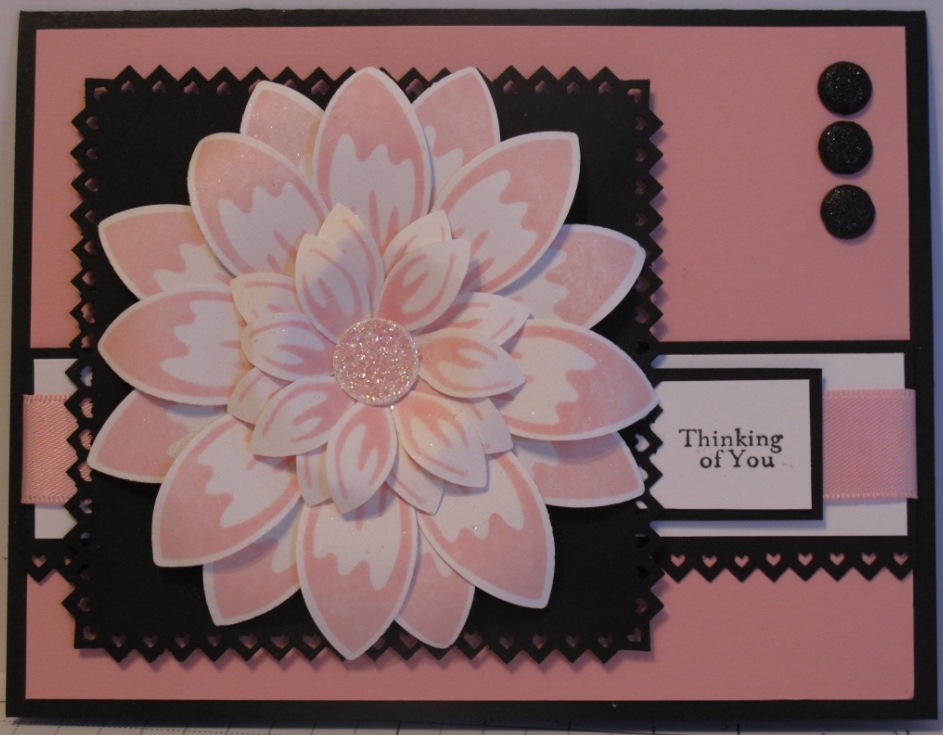
Pretty In Pink Flower - Mojo Monday #179

Yesterday I showed you a card I cased from a friend and fellow demonstrator, Barb Tripps.  HERE is that post.  I can't link you to Barb's blog, because she does not have one!!
Today I woudl like to share the same colour scheme and gorgeous flower but I turned it into the Mojo Monday #179 Sketch....

Another great sketch from Mojo Monday, don't you think?  Here is a closer view of the flower ...
Lots of sparkle and glitz on this flower, I used the Champagne Mist Shimmer Spritz on it along with Dazzling Diamonds Glitter in the middle.  And I used three Black Glimmer Brads ....
Oh they sparkle too!!!  I am off tomorrow to Vancouver, BC for the Vancouver Regional event with a lot of fun demonstrators.  There are a whole bunch of us going from Vancouver Island and we are staying over night.  It is always such a fun time. 
Stamps:  Build A Blossom, Silhouette Sentiments
Ink:  Pretty In Pink, Basic Black
Cardstock:  Pretty In Pink, Basic Black
Other:  Blossom Petals punch, 1/2" Circle punch, Pinking Hearts Border and Corner punch, Champagne Mist Shimmer Spritz, Pretty In Pink Satin Ribbon, Dazzling Diamonds Glitter, Neutral Glimmer Brads (black)
Thanks for visiting, hope you have a really great weekend!           

Monday, October 11, 2010

Notably Ornate Birthday Card

Today it is raining cougars and wolves here (you know cats and dogs only bigger LOL), so its a great day to create In My Craft Room!!!!
Each month I showcase one stamp set for my Stamp-A-Stacks, and create 3 cards using all the stamps in the set.  Last month it was "Elements Of Style", this month it is "Just Believe" and my next one will be "Notably Ornate".  I am uncertain what month it will be right now, as November I have a different kind of class up my sleeve for Christmas Cards.
Anyhoo ... ... ... here is the card I created today.  I loosely used the Mojo Monday Sketch #160 ... ... ...

 Here is what the sketch is ... ... ...

And here is an up close picture of the bling ... ... ...

For the scalloped edge on the Early Espresso piece I used the new Stampin' Up! Bat Punch!  Yup, can you believe it?????   I cut a piece of cardstock 1-1/2 x 4-1/4.  Then pushed the cardstock all the way into the punch and punched a row of bats out. I will do a quick post on how to do this right after posting this one.
I stamped the bird in Early Espresso on Very Vanilla, hand cut it out, then spritzed it with Champagne Mist Shimmer Spritz, let that dry, then spritzed it with Platinum Shimmer Spritz as well.  Talk about blingy!!  I used 3 Neutrals Glimmer Brads, and 2 In Colour Glimmer Brads to bling it up even more.  For the sentiment I used the frame stamp from Notably Ornate, inked it with my Early Espresso Stampin' Write Marker, then stamped Birthday Wishes from Ocassional Quotes inside the frame also using Early Espresso ink.
The main image is stamped on Very Vanilla in Early Espresso Classic Ink, then I sponged Blushing Bride around the outside, and Regal Rose right on the very edges.  A Vintage Brad gathers the Early Espresso Satin Ribbon.  I used my Teahouse Background stamp on the Regal Rose layer in Regal Rose Classic Ink.
Ahh, it felt so good to get back into card making again.  I have been so busy prepping for classes the past little while.
Off now to create another one out of this stamp set, check back tomorrow I hope to have it posted then.
Happy Stampin' ... ... ... ...   Glenda Mollet

Tuesday, September 28, 2010

We Wish You A Merry Crittermas! Musical Card - Mojo Monday #158

Stampin' Up! now sells special greeting cards.  One is a recordable card that you can record anything on, over and over again if you want. Messages from Gramma, Special Music, Valentine's Day Messages, the possibilities are endless.  The second one plays "We Wish You A Merry Christmas" when the button is pushed.  They are both in the Holiday Mini Catalogue -Page 15 - Item#121009 Recordable, and #121007 Musical - $7.50 each.
Yesterday I decided I needed to make one of the muscial cards up and I have not used my Merry Crittermas set, also from the Stampin' Up! Holiday Mini catalogue (page 39 - Item 120855 wood - $28.95, or #121181 clear mount - $21.95).  I also used the Mojo Monday Sketch #158.  So I let my creative juices flow and this is what I came up with... ... ...


This card also uses Candy Cane Specialty Designer Series Paper which has some lovely red glitter on the stripes, 3 of the new Glimmer Brads (Bold Collection), 1/8" Taffeta Ribbon - Real Red which I did a different kind of treatment with, and I watercoloured with the old Watercolour Wonder Crayons.  I have been patiently waiting for the new ones to become available, but could wait no longer.  This card was screaming "Paint Me, Paint Me", so I did!
Here is a close up of the singing critter.  I stamped the critters on Shimmery White cardstock with Basic Black Classic Ink, and they are shimmery.  You can see a bit in this close up  ... ... ...

And this is the inside where I had to put something over the "button" to make the card sing.  The speaker is hidden under the cardstock ... ... ...

Thanks for visiting, if you want to order this stamp set, or some of the recordable or musical card blanks, just contact me.  My email link is up at the top of my blog on the left hand side.
*** *** *** ***   Glenda Mollet

Saturday, September 25, 2010

Christmas All Year Long - Magnolia Blog Hop - September

It's the 25th of the month, and that means another Christmas All Year Long Blog Hop using Magnolia images.  It's also a great way to get some Christmas Cards done for very special people! 
If  you arrived from Deb Zachrich's blog, you are on the right track.  If not, go back to the Magnolia-Licious Christmas All Year Long blog and start at the beginning to see all the great creations.
My card this month uses Edwin as Santa's Helper.  This is one of the cards I created for my new class "Magnolia Monday" where I am showing stampers different methods of colouring using Stampin' Up! Markers, Water Colour Crayons, etc.  It is also Mojo Monday #155 sketch.
Enough already, here is my card.... .... .... ....
All supplies, except the stamped image and the Stickles, are Stampin' Up!  I used  the new Candy Cane Specialty Designer Series Paper for the striped piece, the scallop oval piece, and the presents piece on the top.  It has red bling on the stripes!  Whisper White, Garden Green and Real Red are the cardstock colours I used.  Edcwin is sitting on a stripe of Real Red Satin Ribbon.  I used the Tag and Small Tag punches to punch out for the sentiment, then I did not have one to fit it.  So I just hand wrote in the sentiment I wanted.  Two of the new Glimmer Brads in the top corners finish off the card.  I love all the new blingy products in the new Stampin' Up! Holiday Mini Catalogue, oh my!!!
Edwin is stamped in StazOn ink, on Water Colour Paper, and coloured in with Stampin' Write Markers and an Aqua Pen.  Then I used lots of Star Dust Stickles on the fur parts of his costume.
Here is a closer picture of Edwin.....

Thanks for joining our Blog Hop today.  Your next stop is  Jessica Hammond, and I know she has a fabulous card all ready for you.
Happy Stampin' .... .... .... .... Glenda Mollet

Saturday, September 11, 2010

Greeting Card Kids Sweetest Card Ever!

Yesterday I posted this same card using a non Stampin' Up! image.  Today I made the same card (with a few variations noted below) using exclusively Stampin' Up! products... ... ...

 I used the same basic supplies, except this time I used Greeting Card Kids for the image.  I stamped in on Stampin' Up!s Watercolour Paper using Black StazOn ink.  Then she was coloured using Stampin' Write Markers and an Aqua Pen.  I used Crystal Effects this time to attach the Champagne Glass Glitter.  Oh how I love this new glitter!!!
Here is an up-close picture of the image... ... ...


I used Stampin' Write Markers and the Aqua Pen to do the background for the image as well.
The Glimmer Brads I used this time were from the In Colour package.

Then I put some Basic Pearls on the sentiment piece... ... ...

Just goes to show you how versatile a card can be, you can use lots of different images on it and maintain the integrity of the whole card.
I am heading home now for a few days.  We have been in Victoria, BC for the past 10 days enjoying all the Saanich Peninsula has to offer.  Now home for a few, then Hubby heads back to Tofino for the fall courses.  I will be joining him off and on until almost the end of October.  I love storm season on the westcoast of Vancouver Island, it is wildy beautiful.
Bye for now, enjoy your day... ...  Glenda Mollet

Friday, September 10, 2010

Stardust Tilda (Magnolia Card)

This turned out to be the sweetest card ever!  I don't know who will receive this little gem, but any girl, of any age, would be happy to receive her special Fairy Dust Wishes!  Here's the card ... ... ...

I used mostly Stampin' Up! products on this card.  Here is what I used:
Stamps:  Fairy Dust Tilda (Magnolia), Occasional Quotes (Stampin' Up!)
Ink:  Blushing Bride, Baja Breeze, Basic Black
Markers:  Blushing Bride, Baja Breeze, Blush Blossom, Daffodil Delight, So Saffron, Soft Suede
Paper:  Presto Patterns DSP
Cardstock:  Whisper White, Baja Breeze, Watercolour
Other:  Glimmer Brads - Subtles, Champagne Glass Glitter, Diamonds Stickles (non SU), Basic Rhinestones, Pretty In Pink Satin Ribbon, Modern Label and Word Window punches, nestability (non SU), sponge daubers
Here is a close up picture of the image - Fairy Dust Tilda by Magnolia
I coloured this image with Stampin' Up! Markers using an Aqua Pen on Watercolour Paper.  Then I added some stickles where the fairy dust is bweing blown.  The background is also done the same way.  Then I cut the image out with one of my nestabilities and put Champage Glass Glitter around the outside of the image with Tombo Multi Purpose Glue.  Oh the sparkle is amazing.
Then I just had to add some of the new Glimmer Brads so I used 3 of the blue ones in the Subtles package.....
These are on the top left hand corner.  The sentiment is at the bottom on the right hand side, and I added two of the smallest Basic Rhinestones to it.  The small ones come adhered together so you can use them in a row and have them evenly spaced, I just cut the adhesive and popped them on the cardstock.
I hope you get a chance to use some of these awesome new products from Stampin' Up!s new Holiday Mini Catalogue, you will not be disappointed.
Thanks for visiting, Have a Super Day!
... ... ... ... ...   Glenda Mollet   ... ... ... ...

LinkWithin

Related Posts with Thumbnails