Wednesday, November 25, 2009

Purse Punchie Birthday Card

As promised, I'm back to post my latest creation. Its a punchie purse that is very easy to do. This card has to ribbon to tie, no Stamp-A-Ma-Jig to use, no embellishments to adhere, just some layers, a cute little very easy punchie, and a sentiment that you stamp then punch out with the large oval. So you don't even have to worry about stamping anything straight, the punch takes care of that for you!!!!

For the purse you just punch once from some designer paper using the Round Tab Punch and cut it in half at the indenting dimples. I added a bit of sponging around the outside of the purse with Melon Mambo. Then punch once out of cardstock using the 3/4" square punch and cut that in half corner to corner making two triangles. The handle is the Large Oval punch out of the same cardstock as the square, and the Small Oval punch out of the same colour as your background (in my case Whisper White). The handles are adhered flat on the cardstock, and the purse is popped up on dimensionals. Super easy to do! Here is the recipe:
Stamps: Sincere Saluations
Ink: Melon Mambo
Paper: Bali Breeze DSP (retired, still keeping to my decision to use up my older papers)
Cardstock: Bermuda Bay, Pretty In Pink, Melon Mambo, Whisper White
Other: Round Tab, Large Oval, Small Oval, Scallop Oval and 3/4" Square punches, sponges, dimensionals
That's it. You could make a lot of these cute purses in a very short period of time.
Thanks for stopping by, I won't be posting for a while, my DH and I are going to do some family visiting. Have a super weekend!
************* Glenda Mollet

Tuesday, November 24, 2009

Another Matchbook Gift Card Holder


This is the second Matchbook Gift Card Holder I made from Carole'Ann's blog. See THIS post for my first one. This is the larger holder with double pockets inside.
This one is made using:
Stamps: Christmas Punch, Best Yet, Christmas Classics, Patterned Pines, Baroque Motif
Ink: Real Red, Basic Black
Markers: Old Olive, Real Red
Cardstock: Old Olive (textured), Real Red, Basic Black, Very Vanilla, Whisper White
Other: Circle Designer Brads, Whisper White Organza Ribbon, Dimensionals, 1/16" punch, 2 Way Glue Pen, Fine Cosmo and Fine Galaxy Glitter
To make this one I stamped the Baroque Motifs stamp in Real Red on Real Red cardstock for the front. The sentiment stamp is stamped in Real Red, punched with the 1/16" punch, and glitter added. It is popped up on dimensionals. Inside the front red piece is run through a non SU embossing folder and stamped in Basic Black ink. The slide in card has the flourish stamp on the top right hand and bottom left hand corners, and it was coloured with Stampin' Write Markers.
Well, that's it for today, off to get ready for my Customer Appreciation Day.
Thanks for stopping by........ Glenda Mollet


Monday, November 23, 2009

Matchbook Gift Card Holder

I am still creating items for the craft fair on Dec 6th. This one, and the one I shall post tomorrow, are both made using the tutorial on Carole'Ann's blog. Funny how many of my recent projects have been cased / inspired from Carol'Ann, thanks so much. Her tutorial is easy to follow.
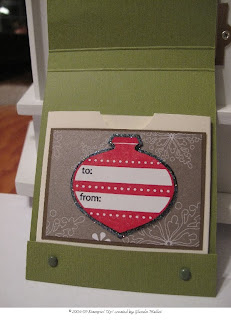
The first picture is of the front of the holder. This is the smaller one on her blog. I used:
Stamps: Winter Post, Delightful Decorations
Markers: Real Red, Soft Suede, Basic Black
Paper: Christmas Cocoa DSP
Cardstock: Old Olive, Soft Suede, Very Vanilla, Basic Black
Other: Old Olive brads, Dimensionals, Holiday Windows (ornament) for Movers and Shapers die, 2 Way Glue Pen, Dazzling Diamonds glitter, Whisper White Satin ribbon, Designer Label punch.
I used the glue pen and glitter to bling up the DSP on the front but you can't see it very well. Inside I punched the ornament from Holiday Windows out of Basic Black cardstock, then using the glue pen I added glitter around the outside. This I layed flat on the DSP and then stamped the ornament stamp using real red and basic black markers, cut it out (by hand not using the punch) and popped it up on dimensionals. These are so fun to make, I hope I get time to make a few more. Tomorrow I am having a Customer Appreciation Day for all my Stampin' Ladies. Should be a lot of fun.
Thanks for looking.......... Glenda Mollet

Saturday, November 21, 2009

On Your Birthday Punchie Kitten card


Here is the second card for my monthly Punchie Class. I was real lost as to what to do for this cat. Cats are not my favourite animal in the world, but I persisted and last night this one came to me (well a version of it anyways). The cat punchie is another one of Heather Summers punchies.

To make the fish in the bowl I punched a window sheet and a piece of bashful blue cardstock with the Wide Oval punch. Then I ran the BB piece through the Big Shot with a non SU embossing folder to make the bubbles. I tried the texture plate with the small dots on it, but could not get it defined enough. Then I punched the fish on a scrap of Whisper White with Brillian Blue ink and coloured it with Only Orange and YoYo Yellow. This is popped up on the BB piece with a dimensional. I cut the BB piece down to the bowl shape, then glued the window sheet overtop and cut it to fit the "bowl". The window sheet is open on the top and wraps around the popped up fish. How cute is that.
The window is 1-3/8" square cut from Pawsitively Prints. I sponged around the edges with Brilliant Blue and adhered them on a piece of Basic Black with 1/16" border all around them.
The curtains are made by ripping a piece of So Saffron DSP and adhering it to the window.
I don't know what the pieces behind the cat are, except it looked naked there and it needed something, this is what I came up with.
I used my VersaMark Pen to make shadows below and to the left of the cat and bowl. I hope the ladies like the cards on Tuesday!
Here is the complete supply list:
Stamps: On Your Birthday, Essence of Love, Just Beachy
Ink: Brilliant Blue, Basic Black
Paper: So Saffron Prints DSP (retired)
Cardstock: Ballet Blue, Chocolate Chip, Basic Black, Naturals Ivory, Bashful Blue
Other: 1-3/8", Wide Oval and Word Window punches, window sheet, YoYo Yellow and Only Orange markers, Cat Punchie, dimensionals
Thanks for looking, have a great weekend......... Glenda Mollet

Friday, November 20, 2009

Turtle Punchie Card - Belated Birthday!

I have my monthly Punchie Class on Tuesday and I am just now getting the cards made! Kinda last minute, but at least I've had this one in my brain for the past few days, just had to find time to make it. A couple of years ago I bought the set Older And Wiser, this is the first time I have used the "did I at least get the month right?" stamp.
This is a Joy Fold card and I used the tutorial on Splitcoast Stampers to make it.


These are the supplies I used:
Stamps: Older and Wiser, Embrace Life
Ink: Old Olive, Close To Cocoa
Paper: Cottage Wall DSP, Kaleidoscope DSP
Cardstock: Naturals Ivory, Old Olive, Creamy Caramel, Chocolate Chip
Other: Word Window and Modern Label punches, sponges, dimensionals, Tommy the Turtle Punchie by Heather Summers (http://www.stampinwithheather.com/ )

My DH did some storage installation in my craftroom yesterday while I was holding classes. I needed some button storage (way too many containers for my tower storage). So we bought real cheap towel racks from the local big box store (not Ikea as it is too far away from our house) and he installed them for me. Now the button containers are out in the open and I can actually see what I have............ Here's a picture for you to see.

Thanks for looking, have a great weekend. We are having quality Grand time with our Grandson James overnight tomorrow. Can't wait, all those puddles are calling our name I am sure. Rubber boots, rain gear for Gramma and Grampa and Muddie Buddie for him and off we go! ................... Glenda Mollet

Wednesday, November 18, 2009

Gift Card Holders


These are some Gift Card Holders I made for a craft fair that is coming up. They were quick and easy to make and used up some scraps of DSP.

I am sure there are lots of them out there somewhere. I destructed one I did at a Make-N-Take to make these up.

Thanks for looking, if you want to view how to make them, HERE is a video Dawn did on her blog.

Thanks for lookin'

Glenda Mollet

Tuesday, November 17, 2009

Birthday Easel Card

Sunday my downline and I headed to Campbell River (on Vancouver Island) about 1.5 hrs away for a Front Row Regional. It was truly great. I went to the Edmonton Regional, and just let me say that this was much better. Why you ask? Well it only took us 1.5 hrs to get there, no flying and depending on airports was involved, there was a small contingent of us demos, and if we had a question regarding the DVD, we could pause it and carry on. I missed the big venue part, but it was really nice. Thanks, Barbara, for putting this on for us!

So today I have an Easel Card to share with you. On Wednesday mornings I go to our local Recreation Center and have quality time with a bunch of great ladies in our local Sunshine Club. We make a card or two, have lots of laughs and its just awesome. Today I had to create one of the cards we will be doing this week. Here's a picture of the card outside and the inside too:


For the front I used a piece of Bride Specialty DSP and sponged it very lightly with Taken With Teal classic ink. Then I stamped the tree image from Very Versatile once on scrap paper then on the DSP. As the shiney parts of this paper do not hold ink, I used a sponge to lightly remove the ink on the shiney parts, which left the tree kind of in the distance. I wanted something very soft and flowey on this card. The layer with Ruby Red in it is poppped up and the sentiment is popped on dimensionals as well. Inside the sentiment is popped to provide the stop to rest the card on when it is open. Here are the details:
Stamps: Very Versatile, Sincere Salutations, Curvey Versus (inside)
Ink: Taken With Teal and Basic Gray classic pads
Paper: Bride Specialty DSP
Cardstock: Basic Gray, Whisper White, Taken With Teal, Ruby Red
Other: Dimensionals
These cards are so easy to make and they are definitely a WOW. I used the tutorial located in THIS post.
Have a super day............ Glenda Mollet

Monday, November 16, 2009

2010 Coaster Calendar - December

Here it is the twelfth and final installment of my 2010 Coaster Calendar. I hope you have enjoyed them and found at least a bit of inspiration in them. I have tried to incorporate a few techniques but not enough to make it too onerous to make.

This time I used:
Stamps: Four The Holidays
Ink: Real Red
Paper: Ski Slope DSP (retired)
Cardstock: Real Red, Whisper White, Baja Breeze
Other: Jumbo Snowflake punch, CB Embossing Folder, Dazzling Diamonds Glitter, Dimensionals

The Sentiment piece is popped up on Dimensionals, the calendar piece is on dimensionals on the right hand side only. I slipped the Jumbo Snowflake punchies under the corners of the sentiment and the calendar. Of course Dazzling Diamonds Glitter is applied almost everywhere. Its on the raised areas of the WW embossed piece, and around the sentiment and the calendar.

Well, that's it for this series. I used my Bind-It-All to put the entire calendar together. Please email me if you have any questions from any of the months, there is a link to my email address at the top of the left hand side of my blog. Its been great, now off to create some more................
............................. Glenda Mollet

Sunday, November 15, 2009

2010 Coaster Calendar - November

Almost to the end now. This is page number 11 - November. I wanted it to be simple but bring in the Remembrance Day theme. I did not have a Poppy stamp, so I used one of the flowers from Simple Friendship. The flower is stamped in Basic Black and Real Red using masks all around the calendar piece. I put real light pencil marks on the Whisper White cardstock where I was going to mount the calendar, this gave me lines to put the flowers around. The centers are inked in YoYo Yellow using the marker, then I added Diamond Stickles overtop of the centers.

Here's the picture:These are the supplies I used:
Stamps: Simple Friendship
Ink: Basic Black, Real Red
Cardstock: Real Red, Basic Black, Whisper White
Other: Diamond Stickles, YoYo Yellow marker, dimensionals

I popped the calendar up on dimensionals os it looks like the flowers are in behind it. This flower gets used a whole bunch in my cards. It makes fantastic images for inside the cards and on the envelopes. See ya tomorrow for post number twelve - December!!!
............................. Glenda Mollet

Saturday, November 14, 2009

2010 Coaster Calendar - October

Now the fall colours are being brought in. I used a stamp set that I just "had" to buy, Autumn Days. It is very versatile and has a lot of great images in it.
Here's the Ingredients:
Stamps: Autumn Days
Ink: Soft Suede, More Mustard, So Saffron, Pumpkin Pie
Paper: Autumn Traditions DSP
Cardstock: Soft Suede, More Mustard
Other: More Mustard 1/4" Grosgrain ribbon, Antique Brass Jumbo Eyelettes, Crop-A-Dile

I sponged the Pheasant in More Mustard then a tiny bit of Pumpkin Pie to brighten him up and add a bit of depth. The tops of the grasses and the Pheasant are all popped up on Dimensionals.

Thanks so much for taking the time to visit my blog. I'll be back tomorrow with November...........
Glenda Mollet ..........

Friday, November 13, 2009

2010 Coaster Calendar - September

For this page I wanted to try sponging some Bride Specialty DSP. That turned out great, and I used colours to match three Lillies from Fifth Avenue Floral I had hanging around which are done using Shimmery White cardstock, white embossing powder and the Water Colour and Reinker technique first introduced to me by Patty Bennett HERE. I hope my ladies don't mind making a few more of these flowers. I love this technique. The picture is taken at quite an angle, but I wanted to show you the shimmer of the Bride Specialty DSP and the Shimmery White cardstock used for the flowers. The first flower is flat on the cardstock, then the two in the front are popped up on the top using dimensionals, I adhered the bottoms of the flowers flat to the cardstock.

And now the supplies:
Stamps: Fifth Avenue Floral
Paper: Bride Specialty DSP
Cardstock: Whisper White and Shimmery White, Old Olive
Ink: Versa Mark, Apricot Appeal and Regal Rose
Other: Swirly die, sponges

I sponged the Bride Specialty DSP with Apricot Appeal and Regal Rose classic inks. The flowers were done in Pretty in Pink, Regal Rose, Cameo Coral and Summer Sun. Here is that wonderful Swirly die again, its so versatile and just finishes off some things really well. The calendar does not have any cardstock behind it, I just sponged the edges with Apricot Appeal and Regal Rose a bit. Then the calendar is popped up on Dimensionals over the flowers.

Thanks for looking, I'll be back tomorrow with October!

************ Glenda Mollet *************

Thursday, November 12, 2009

2010 Coaster Calendar - August

Cottage Wall DSP is one of my all time, most favourite papers. It just hits my comfort zone on the nose. I love the colours and the patterns. So of course it would make its way into my Coaster Calendar for 2010. Here is my August page where I use three different patterns from Cottage Wall DSP:

This page was a challenge for what embellishments to use on top of the DSP. I did not want them to cover too much of it, they had to coordinate, but not get lost in the paper. I think this turned out not too bad.

Here's the list of supplies:
Stamps: None
Ink: None
Paper: Cottage Wall DSP
Cardstock: Rich Razzleberry, Orchid Opulence, and Old Olive
Other: Big Shot, Little Leaves die, 5 Petal punch, White button from Button Latte buttons

Now the pages will start into the fallish colours and themes. Stay tuned tomorrow for September! TFLooking....... Glenda Mollet

Wednesday, November 11, 2009

2010 Coaster Calendar - July

This page was so fun to do. I had to wait until my Love Bug set arrived, but when it did the little bugs were so fun to use. I stamped and coloured them, then cut them out and popped them up on dimensionals. The background is Pretty Petals and I used Stampin' Write markers to colour it, then stamped it on Whisper White cardstock. A bit of Crushed Curry cardstock behind the calendar part and voila! Here's the picture:

And here is a list of the supplies I used:
Stamps: Love Bug, Pretty Petals backgrounder
Ink: StazOn Black
Markers: Bermuda Bay, Crushed Curry, Melon Mambo, Rich Razzleberry, Old Olive, Real Red
Cardstock: Bermuda Bay, Crushed Curry, Whisper White
Other: Dimensionals

Have a great day, and stay tuned for August tomorrow.......

........... Glenda Mollet

Tuesday, November 10, 2009

Christmas Tags 2009

On Saturday I am having my annual Copious Quantities of Christmas Tags class. I made 6 different tags, and a box to hold them in. Stampers tell me how many sets of the 6 tags they want to make, and they get one box to hold them all in.

Here is a picture of the box and tags:


And I have pictures of the details for each of the tags, and for the box and acetate lid. For tag #2 and #4 I have listed REal Red Curly Label and Real Red Scallop Oval - these are the curly label and scallop oval from the Movers and Shapers sets. They punch out just slightly larger than the actual punches and are super for layering.


I have been quite prolific with my blogging and there are still more posts to come for the Coaster Calendar. I have been creating and prepping for my November classes lately and have been able to share lots of things with you. But I am taking December off from my classes to spend some time with family and friends and enjoy the Holiday Season. There is still a couple of weeks left in November and you never know what I am going to produce when I spend the day In My Craft Room................... Glenda Mollet.......

2010 Coaster Calendar - June

Back again with the sixth installment of my Coaster Calendar - June. This page is easy and quick to do (I don't want to have all of them difficult, don't want to overwhelm my Stampin' Ladies!). I knew I wanted to use Kaleidoscope DSP for this page but was stumped as to what stamps or embellishments I could use. Then it came to me RIBBON, only RIBBON and use some delicious colours that match the DSP. This is what I came up with:


Here's what I used:
Stamps: none at all
Ink: none at all
Paper: Kaleidoscope DSP
Cardstock: Regal Rose
Other: 5/8" Grosgrain Ribbon in Certainly Celery and Regal Rose, Summer Sun Corderoy button
Half way done the posts for this year's Coaster Calendar. I hope you are enjoying them, and are getting some ideas. Please feel free to be inspired by or copy my ideas to share with your customers, friends and family.
............ Glenda Mollet .............

Monday, November 9, 2009

Santa Box

I finally got time to finish the fourth box in my series. I think it turned out ok. It was quite easy to make after all, just needed to sit for a while and DO IT!!!
I put ribbon on the sides of the box to look like a present, there is a brad (non SU) holding the middle together. Then on the front, Santa is stamped on Shimmery White cardstock and coloured with Stampin' Write markers. I used some Liquid Applique for his fur and berd. A bit of Dazzling Diamonds glitter finishes it off.

Here's the front, sides and top of the box:


And this is a list of what I used:
Stamps: Jolliest Time of the Year, To You and Yours
Ink: StazOn Black, Real Red
Paper: DSP from last years SS Kit, I Wish
Cardstock: Whisper White, Real Red, Shimmery White, Glorious Green textured
Other: Small Tag punch, 1" Square punch, Mistletoe Ribbon, non SU brads, dimensionals, Liquid Applique (non SU)
That's it for boxes for now. I have to pitter patter get atter with a swap I am in on Sunday, and I have a tag class on Saturday I need to prep for........whew I'm outta here!
............ Smiles, Glenda Mollet

2010 Coaster Calendar - May

The fifth month, May is my favourite month. It just may be the month of my birthday! But that's not the only reason, I love the leaves popping out on all the trees, the spring flowers, and the warmth returning to the days. A fabulous time of the year.
Here's what I used for May:
Stamps: Eastern Blooms
Ink: Summer Sun, Apricot Appeal, Perfect Plum
Paper: Groovy Guava DSP (retired)
Cardstock: Whisper White, Old Olive
Other: Big Shot and Swirly die

I was real hesitant to purchase this Swirly die for my Big Shot. But once I saw it in use, well I just could not resist. I love the cut out part and the negative part which I plan to use as waves, when I get a chance to create another card of course. But I have used the punched out pieces on lots and lots of projects.
Have a tremendous day!!!! I'll be back tomorrow with June...........

.......................... Glenda Mollet ......................

Sunday, November 8, 2009

Embossed Elegance Easel Christmas Card

I totally cased this card from Carole'Anne. Click HERE for a link to her awesome card and tutorial. I phoned my DIL and requested some James time today after I had a very late start to my day. Coronation Street was on and I had to watch it. I watch it every Sunday for 2.5 hours and have been doing so for almost 35 years now!!! James came over for lunch and is staying the night. I just love having him, especially when my DH is away, I get him all to myself. We were out jumping in mud puddles this afternoon and I found out my rubber boots have a hole in them. Guess I have to throw away the 14 yr old ones, and get out the newere ones!!!! Anyways, I digress. When James went in for his nap, Gramma (or YaYa as he calls me right now) hit her craft room. I get updates from Carole'Anne's blog and there was one today. I whipped right into it as her puppy Max was injured and was in the puppy hospital for a while, and I needed to see how he was doing. Well the first thing that caught my eye was her awesome Easel Card. I went to her blog and she has a fabulous tutorial on how to make it. So of course I just had to make one, so much for completing the last box. But I got this card made and it is every bit as gorgeous as it looks on Carole'Anne's blog.
Here are some pictures of mine ~ ~ ~ ~
This is the front of the card with a close up of the snowflakes:


And here is the inside with the card open and an upclose of the inside sentiment:


This card uses Shimmery White cardstock for the main images, then you stamp the Friends 24-7 stamp in Whisper White craft ink and emboss it using White Embossing Powder. Then take a sponge and beginning off the cardstock in a circular motion, sponge Taken With Teal ink over the embossed area, leaving the middle almost untouched. Then wipe the ink off the embossed areas with a paper towel or a baby wipe. This makes the most stunning effect you can ever imagine. Thank you Carole'Anne for another awesome card.
Here is the complete list of supplies:
Stamps: Friends 24-7, God's Blessings, Snow Swirled, Christmas Classics
Ink: Whisper White craft, Taken With Teal, Basic Gray
Cardstock: Basic Gray, Wisper White, Taken With Teal, Shimmery White, Ruby Red
Other: Jumbo Snowflake punch, 1/4" circle punch, non SU Snowflake brad, Whisper White Satin Ribbon dyed with Ruby Red ink
Well, now I really really need to finish that other box. I will post it tomorrow, if I get it done. Good thing James is in bed for the night, I have an hour or so left to whip it up. Goodbye for now and I hope you are inspired a bit by something I posted today...............
Glenda Mollet

Christmas Boxes Number 2 and 3

Last night I found some time to complete these boxes (I still have one to go). The first one I used some of last year's Ski Slope DSP. I really let loose with the 2 way glue pen and the Dazzling Diamonds glitter, it is everywhere on this box.


Here's the box I made:
This is the front

Here's a picture of the bling on the front (there IS a lot of it)

Here is the top
And this is what all 3 sides look like, bling on them too:

I used:
Stamps: Christmas Punch, Snow Swirled
Ink: Brilliant Blue, Baja Breeze, VersaMark
Cardstock: Brilliant Blue textured, Whisper White, Brushed Silver, Baja Breeze
Paper: Ski Slope DSP (retired)
Other: 2-way glue pen, Dazzling Diamonds glitter, Jumbo Snowflake punch, 1/4" circle punch

And the next box I made uses Holiday Lounge DSP and some ribbon. Here's the pictures:

The front........

And the sides look like this:

And lastly the top:

The list of ingredients include:
Stamps: Patterned Pines, Best Yet
Ink: Taken With Teal (also stamped off)
Paper: Holiday Lounge DSP
Cardstock: Taken With Teal textured, Sahara Sand, Whisper White
Other: Whisper White Satin ribbon, Tempting Turquoise 1/4" GG Ribbon, Large Oval Punch

Well, I guess I should go do the last box, oh yeah the reason I did not finish it today...... see my next post about a fabulous card I just HAD to make!!! LOL
Bye for now............ Glenda Mollet ........

2010 Coaster Calendar - April

I posted a tutorial on how to make these cute umbrellas HERE. This was another fun month to make. I went wild with the rubber boots and umbrellas, who doesn't need those supplies in April when "April showers bring May flowers"???? The boots have Crystal Effects on them, but you can't tell that from my picture. They are also popped up on Dimensionals.
Here's the recipe:
Stamps: Scene In A Garden (retired, what a bummer!)
Ink: StazOn Black
Paper: Pink Flamingo and Tea Party DSP
Cardstock: Whisper White, Pretty In Pink, Close to Cocoa
Other: Punched Umbrellas
I love how the Pink Flamingo DSP looks like it is raining flowers!!! So cool.
I hope your day is a wonderful one and you don't need to use your rubber boots! Unless you are running through mud puddles with children / grandchildren, of course. I LOVE running through puddles, isn't that what Gramma's are for, to introduce our Grandchildren to puddles, splashing and getting really wet. Then inside for a nice warm drink, some chocolate and a big cuddle to get warm............. hmmmmmmm. May have to call and book time with James today.
Thanks for taking the time to visit my blog. Tomorrow will be the May page.
~ ~ ~ ~ ~ ~ Glenda Mollet ~ ~ ~ ~ ~ ~

Saturday, November 7, 2009

Christmas Gift Box

Yesterday I was visiting blogs and there on Myra Shaw's blog was the is awesome box, and the tutorial to go with it. I loved it at first sight (Thanks So Much Myra) I had to create one then and there. I decided I did not "have" to prep for that next class, it could wait till I was done. Then, the box turned out so good I had to cut out and put together some more. Visit Myra's blog to get the template and tutorial for this box, its fun and easy to make. I can't wait to decorate the other 5 I've put together!!!!! For this box I used Myra's dimensions (8.5 x 12 cardstock). Then Shanna, my downline said, could you do it with 8.5 x 11 inch paper too. So I sat right down and redid the dimensions and created it using 7.5 x 10.5 inch piece of cardstock. They both work, Myra's works out to be a 4" cube, and my redone one works out to 3.5" cube. Here is the 4" one I made ~ ~ ~
Here's the front of the box:
And on each of the other 3 sides:

And on the top:
And finally a close up of the front:

I used:
Stamps: Christmas Punch (level 2 hostess), Christmas Classics, Serene Snowflakes
Ink: Old Olive, Real Red
Cardstock: Old Olive, Real Red, Whisper White
Other: CB embossing folder, Real Red 5/8" GG Ribbon, Diamond and Xmas Red Stickles, Wide Oval Punch
Here is a picture of my redone instructions with the new dimensions:

Hope you get a chance to make one / some of these fantastic boxes.
Bye for now, gotta go prep for my class now................
............................. Glenda Mollet ............

2010 Coaster Calendar - March

Here is the third installment for my 2010 Coaster Calendar - March.

Supplies I used:
Stamps: Fresh Cuts
Ink: Handsome Hunter (and H Hunter stamped off once), Garden Green
Cardstock: Garden Green, Whisper White

When I stamped the main Fresh Cuts image, I inked it up in Garden Green, then I daubed some Handsome Hunter in places. This month was real quick and easy to do. Funny how sometimes the images are in my head and work out the first time, and other times the image will not work no matter how many times I try it!

Bye for now, talk to you tomorrow with April............... Glenda Mollet

Friday, November 6, 2009

2010 Coaster Calendar - February

Here is the second in my Coaster Calendar series ---- February 2010.

This one was quite difficult for me, goodness knows why. I ended up making it twice. The first one was a complete disaster. Once I started the second one it went real fast, I like how the it looks. Only one thing I would do different, I did not adhere the cardstock on the back until everything was complete, this made the coaster damp and made a big wrinkle on the velum cardstock. I hope when it dries completely it will lay down again. If not I will need to fix it.

Here's the details:
Cardstock: Regal Rose, Vellum
Other: Whisper White Satin ribbon, 1/2 pearl from the Pretties Kit, Manhattan Flower Embossing Folder
Not many supplies, no ink, no stamps at all. But quite effective anyways.
Bye for now, look for March tomorrow.
...................... Glenda Mollet .........................

Thursday, November 5, 2009

2010 Coaster Calendar - January

For the past few days I have been crafting up a storm, and today it hit! Wind and rain, its definitely winter now......but I digress. I have been creating my 2010 Coaster Calendar for the class on November 28. I have all 12 months done, and I will be sharing them all over the next 12 days. I will post pictures and lists of supplies I used. Here is the picture of January 2010 ~ ~ ~
Supplies:
Stamps: Christmas Punch Set, Holidays and Wishes
Paper: Holiday Lounge DSP
Cardstock: Ruby Red, Taken With Teal, Shimmery White, Brushed Gold
Ink: Basic Black, Taken With Teal
Other: Snowflake and 1/2 punches, Frost White Shimmer Paint
Don't know where this year has gone. It seems like I just quit work (February) and now its time to get ready for Christmas and the New Year!!!
Happy Stampin' ................. Glenda Mollet ..............

Tuesday, November 3, 2009

Direct to Paper and a new Marker Technique

I had some time yesterday so I went blog hopping. At Dawn's blog I found the most amazing card, this is the link to it Dawn's Stampin Studio go have a look at her version. Then on that card, using the Direct To Paper technique, she also did another technique using markers, a lighter but coordinating ink pad, and a stamp with cut out lines on it. Here is that link Marker Technique . I love both of these techniques and had to stop everything right there and make some of these using the amazing marker technique. I am hooked, thanks Dawn for another great idea.
Here is my card:

I am in a swap later this month, for a Front Row Regional, and the theme is Masculine Birthday. I think this would make a great masculine card. I used:
Ink: Bordering Blue, Night of Navy
Stamps: Patterned Pines, Kind and Caring Thoughts
Paper: Bordering Blue, Night of Navy, Whisper White
Other: Modern Label Punch
Technique:
First I put Bordering Blue classic ink direct to Bordering Blue cardstock (for the background). It is real dark to start, but lightens as it dries.
Next I inked Patterned Pines with Bordering Blue classic ink
Then I took the Night Of Navy marker and drew over the "cut out lines" on the Patterned Pines stamp.
This was stamped on a 4 1/4 x 3" piece of Whisper White cardstock
Then it was layered on a piece of 4 1/4 x 3 1/4 " Night Of Navy cardstock
This was adhered flat to the prepared card.
The sentiment was stamped in Night of Navy classic ink, then punched with the Modern Label punch.
I then punched the Modern Label twice using Night of Navy cardstock. These were layered behind the WW sentiment.
The entire sentiment was popped up using dimensionals.
Easy peasy, quick and fun to make.
Here are some pictures of different colour combinations I used:


Up close - the Bordering Blue / Night of Navy combination:

Then I tried Old Olive classic pad and Always Artichoke marker:

Then I turned to flowers from Eastern Blooms - they work really well too.
The first one is Pale Plum pad with Perfect Plum marker.
The second one is Pretty In Pink pad with Melon Mambo marker.
I sure had fun "playing" with this technique today. Give it a try. If you are coming to one of my classes this month, I am going to be showing you how to do this technique, an extra card for you to make. Remember, November is my Give Away month and every class you come to, every $25.00 in product you order, each new stamper you bring, each Home Workshop you have, or each Virtual Workshop you have, you earn an entry into my draw. I have lots and lots of stuff to give away.
Thanks for looking, have a super day............. Glenda Mollet

LinkWithin

Related Posts with Thumbnails