Tuesday, November 29, 2011

Beau Chateau Birthday Wishes

I felt like making a vintage type card today to share with you.  I pulled out my Beau Chateau Designer Series Paper (oh my it is awesome!!!).  It matches the Elements Of Style stamp set so well. . . .

I love gathering the Polka Dot Ribbon and turning it into a flowerette.  A Basic Pearl added to the center makes it match the vintage feel of the rest of the card.  To do the sentiment piece, I used Naturals White cardstock, something I don't use nearly enough.  I used a dauber to put some Pink Pirouette colour onto the flowers in the DSP.
Stamps:  Elements of Style, Elegant Cheer
Ink:  Marina Mist, Pink Pirouette, Basic Black, Sahara Sand
Paper:  Beau Chateau DSP
Cardstock:  Marina Mist, Pretty In Pink, Naturals White
Other:  Pretty In Pink Polka Dot Ribbon, Designer Frames Embossing Folder, Basic Pearls, Dauber, Wide Oval Punch
Happy Stampin .....

Monday, November 28, 2011

Rock Stars

I have a fun card for you today.  I find it very difficult to create boy cards, and for that age about 8 or 9 to 15 or so is really difficult.  I hope I hit it with this one ....
I participated in my own Designer Series Paper Share back in July when the new catalogue came out.  Now I have a whole bunch of DSP to choose from, for any occasion.  I reached for Big Top Birthday DSP for this card because I loved the bright colours.
Stamps:  Crazy Cool
Ink:  Basic Black
Paper:  Big Top Birthday DSP
Cardstock:  Whisper White, Real Red, Tempting Turquoise
Other:  Stars #2 Die, 1" Circle Punch, Perfect Polka Dots Embossing Folder
I am having my Annual Customer Appreciation Open House on Wed and will be a bit busy the next couple of days.  Please excuse me if I don't get a chance to post.
If you are in my area, pop on by to the open house.  Email me for details.
Happy Stampin' ....... 

Friday, November 25, 2011

Calypso Coral Birthday card

A long while ago I saw a card like this on the internet somewhere.  If it is yours, please email me so I can give you proper credit.  I changed it a bit, including the colours and embossing folders ....

I bought the new Designer Frames Embossing Folders but have not used them much yet.  So out it came for this one.  I like Calypso Coral and it goes so well with Early Espresso!
Stamps:  Petite Pairs, Four Frames
Ink:  Early Espresso, Calypso Coral
Cardstock:  Whisper White, Calypso Coral
Other:  Designer Frames and Vintage Wallpaper Embossing Folders, Calypso Coral Ruffled Ribbon, Champagne Mist Shimmer Spritz
I hand cut the Four Frames image because I wanted it very close to the stamped image, and I hand cut out the Designer Frame as well.
Happy Stampin' .....

Thursday, November 24, 2011

Happy Snowman Christmas card

I could not sleep last night so decided I needed to get this card out of my head!  I headed to the craft room in the dark of the early morning and created this CAS (clean and simple) and quick card ....
You know, sometimes they are not the same in paper as they are in our heads!  Oh well, now its done and I can sleep tonight.......  I used 2 retired sets for this one.  I think this will be my last Christmas card of the season ....  maybe!
Stamps:  Wandering Words, The More The Merrier
Ink:  VersaMark, Basic Black
Markers:  Cherry Cobbler, Marina Mist, Garden Green, Tangerin Tango
Paper:  Letters To Santa DSP
Cardstock:  Whisper White, Early Espresso
Other:  Scallop Circle Die, Early Espresso Quilted Ribbon, Champagne Mist Shimmer Spritz, Cherry Cobbler Embossing Powder
Happy Stampin' .....

Tuesday, November 22, 2011

Spice Cake Thank You - Mojo Monday 216

I had a chance, this week, to use the Mojo Monday Sketch #216.  Here is the card I came up with ....


Stamps:  Warmest Of Wishes, So Happy For You
Ink:  Early Espresso
Markers:  More Mustard, Cajun Craze, Crumb Cake, Early Espresso
Paper:  Spice Cake DSP
Cardstock:  Very Vanilla, More Mustard, Early Espresso, Pool Party, Cajun Craze
Other:  2-3/8" Scallop Circle, 1-1/4" Circle, Bird Builder punches, Spice Cake Designer Buttons, Basic Rhinestone, Champagne Mist Shimmer Spritz
Happy Stampin' .....

Monday, November 21, 2011

2012 Calendar

Last year I received one of these calendars from a fellow Vancouver Island Demonstrator, Petty Wong.  It has taken me this long to re-create it.  Why so long?  Well it took me that long to get the calendars.  I will be making some of these for the craft fair I am participating in on Sat and Sun Dec 10 / 11 at Cup and Saucery Eatery in Port Alberni, BC.  Hope to see you there!


Don't forget the Online Extravaganza Sale at Stampin' Up! begins today.  It lasts until November 28 (a whole week).  There is also two special items on sale for only 24 hours (until 11:59 pm tonight).  The Simply Scored scoring tool Reg $38.95 on SALE for $31.16 and the Sweet Pressed Cookie Stamps Reg $20.95 on SALE for $16.76!
Click on the picture below to go to my online store and see what all is on Sale.  There are items 20 to 60% off - stamp sets, decore elements, ribbon, buttons, digital downloads ......

Bye for now, and Happy Stampin' .....

Friday, November 18, 2011

Pink Elebration - Baby Girl Card

I'm still in a Baby kick and have a pink one to share with you today.  I love how Stampin' Up! now offers single stamps.  They call it A La Carte.  Elebration is one of those stamps, and I used it to create this card ....
The corner is punched with the Decorative Label Punch.  HERE is a tutorial Patty Bennett posted on her blog on how to do it.  You all know I love to use my punches "outside the box" and this is one of those ideas.  We saw it at Convention in Salt Lake City in July.  The DSP I used is retired "Sending Love Specialty DSP" but it just went so well with my colour scheme.  I may have hoarded a bit of this paper!  LOL
Stamps:  Elebration, Short And Sweet
Ink:  Regal Rose
Paper:  Sending Love Specialty DSP (retired)
Cardstock:  Whisper White, Regal Rose
Other:  Elegant Lines EF, Scallop Squares Duo Die, Mini Oval Punch, Decorative Label Punch, Basic Rhinestones, Pretty In Pink Satin Ribbon, Blushing Bride Marker
Happy Stampin' ....

Thursday, November 17, 2011

Bashful Blue Baby Hippo Card

I just finished making our new Grandson, Cameron's baby announcement cards (that was a marathon like making Christmas cards!).  Inspiration was taken from THIS post of Chat W back in February 2011.  Chat created a great baby card, and I cased and changed it a bit and created this card ...
 Well it has a lot of layers and I popped up a bunch of them so, that together with the bow made it unfriendly for putting in the mail.  So I reconfigured it for Cameron and came up with this one ....
Only the hippo is popped and the bow is made from some retired Bashful Blue 3/8" Taffeta Ribbon.  Now I know why I am such a hoarder!  I printed the inside out on my computer matching the colours from the outside ...
 Here is the basketful ....
I love the set Pun Fun and plan on keeping it for a long, long time.  I also used some retired Bashful Blue patterns DSP.  Such fun.
Thanks for visiting, and Happy Stampin' .....

Wednesday, November 16, 2011

Petal Cone Santa Ornament

I ran across the most awesome Santa made out of the Petal Cone Die on Kay Sha's blog.  Her Santa was inspired by Mary at Mary's Craft Room .  Oh what talented ladies, thanks for sharing!  I made one, and will make more they are so easy and cute and awesome ...


Mary has some directions, and Kay has other ones that will help you recreate this out of the Petal Cone die and some Stampin' Up! punches.  For the holly I used the Bird Builder Punch and punched 2 stem and leaves out of Garden Green then put the holly berries on them.  I also spritzed the entire thing with Champagne Mist Shimmer Spritz when I was done, and a Brights Designer Button finished it off.
Happy Stampin' and Punchin' .....

Tuesday, November 15, 2011

Modern Label Punch Repunched Tutorial

Yesterday I shared this card with you .....
Up on the top right hand corner I have a sentiment punched with the Modern Label punch, but it is much smaller than the original punched shape.  I call it "Repunching".  Today I have a tutorial for you on how to do this with your punch ....
Here are the supplies you will need ... the Modern Label Punch, Ink, Sentiment Stamp, Cardstock
 Stamp your image ....
 Punch it out with the Modern Label Punch ...
Take a scrap of cardstock (I am using the piece I just punched the sentiment out from) and put a bit of adhesive tape on the end.  This will make an "extender" to use ...
 Stick the corner of your sentiment to the adhesive tape ...
 Put it back into the punch from the outside of the punch as shown and punch your image ...
 Turn the piece around and adhere the end you just repunched to the extender ...
 Put it back into the punch and repunch again ...
 There you go, a repunched sentiment that has the same shape as the original one, just shorter ...
 Here is a comparison of the original size, and the repunched size ...
I am all about using the punches for much more than they were originally intended.  I hate having tools in my craft room that have just one purpose.  You can make this any length you want depending on how long your sentiment is.  I chose to layer it onto the Large Oval punch.
Hope you give it a try.  Happy Stampin' .....

Monday, November 14, 2011

Thoughts And Prayers Snowy Day Card

I'm back after a weekend of preparations!  Oh my I cut a LOT of cardstock this weekend.  But I did managae to have some card crafting time as well.  I have a snowy card for you today ....

We had the first snow of the season this weekend, not where we live, but up in the passes.  So I decided to create a snowy scene card for you.  I used Irridescent Ice Embossing Powder and the background stamp Wonderfully Worn to create the falling snow.  Then I took the VersaMark pad and did the direct to paper technique (putting the stamp pad directly on the paper to cover it in ink) then used Irridescent Ice Embossing Powder to create that snow as well.  I ripped the paper to size first, then after the embossing I just distressed the ripped edge a bit with my thumb nail.
Stamps:  Thoughts and Prayers, Very Versatile
Ink:  Early Espresso, VersaMark
Cardstock:  Whisper White, Calypso Coral
Other:  Framed Tulips Embossing Folder, Irridescent Ice Embossing Powder, Large Oval and Modern Label punches
Are you wondering how I got the sentiment punched piece so small?  Well tomorrow I will be back with a tutorial on how I did that, complete with lots of pictures.
See you tomorrow ....

Friday, November 11, 2011

It's Been A Prepping Day ...

No card to share with you today.  We had a Grandson James day today and I have been preparing for my Christmas Tag classes.  James came over this morning and him and I went for a really LONG bike ride.  Well it was long for him!  He rides a bike called a Strider Bike which has no peddles.  He just pushes himself along with his feet and sort of glides on the bike.  He is very fast on it and we had a super bike ride.  Then Grampa got some more gravel for the driveway and James helped Grampa and Uncle Charlie spread the gravel out.  He has a huge ride on Tonka Dump Truck and he kept filling it up and dumping it while the bigger boys were shovelling and using the wheelbarrow.  After a very big dinner we took him home, where I bet he was in bed asleep within half an hour.  He was tuckered out.
Then Gramma hit the craft room and continued preparing for the classes.  Here is a couple of pictures ...

I made 160 eyeballs in the past 2 days!  The eyeballs from the Owl Builder Punch, 3 layers, Black, White, Black.  Very tiny time consuming pieces.
Then I cut the cardstock, and punched the owls and owl vests (not shown here but there are a lot of them).
I hope to get some quality card making time tomorrow.  I will be spending some time at the local Field Of Honour tomorrow remembering all the soldiers that have fought for our country.
Happy Stampin' .....   

Thursday, November 10, 2011

Lovely As A Tree Mocha Morning Birthday Card

We had a lovely visit with our two very favourite Grandsons, James and Cameron, today.  It was Cameron's first visit to Gramma and Grampa's house!  I managed to get some serious cuddle time, oh it was awesome.  Not to mention the great play time and visit with James!
Then I headed into my craft room to create a card to post on my blog.  I bought some Mocha Morning Specialty DSP a while ago, and have only used a very small piece of it.  I am really trying to get over my hoarding tendancies.  Here is my card ....
I punched a piece of Early Espresso cardstock with the Decorative Label punch, then spritzed it with Champagne Mist Shimmer Spritz, cut it in half and attached it behind the top and bottom points of the Top Note Die piece.  Just for some extra interest.  I used two Neutrals Glimmer Brads as well.  The Top Note Die piece is also spritzed.  Oh the bling is great.
Stamps:  Lovely As A Tree, Curly Cute
Ink:  Soft Suede, Crumb Cake, Cherry Cobbler
Paper:  Mocha Morning Specialty DSP
Cardstock:  Very Vanilla, Early Espresso
Other:  Top Note Die, Decorative Label Punch, Neutrals Glimmer Brads, Champagne Mist Shimmer Spritz
Despite the bling, this would make a great masculine birthday card, and it was so quick to make too.
Happy Stampin' ......

Wednesday, November 9, 2011

Patterned Birthday Delight

I wanted to create a quick CAS (clean and simple) card to share today.....


Ever since I saw this stamp set - Patterned Party, page 68 Main Catalogue, Item #123065 (W) - $32.95, OR Item #123067 (CM) - $22.95 - I thought it looked like it needed to be suspended.  This time I think it looks like goal posts.  You could change this up and make it any colour you want (personalize it with his favourite team's colours).  I cut 4 strips in Daffodil Delight using the Tasteful Trims Die (page 221 Main Catalogue, Item #120893, $52.95) and using my dauber added some Daffodil Delight ink on the scallops.  Before I added the scallops to the card front, I ran the front through my Big Shot using the Square Lattice Embossing Folder (I already had the stamping, posts and circle at the top on the Whisper White).
Stamps:  Patterned Party
Ink:  Daffodil Delight, Concord Crush
Cardstock:  Whisper White, Daffodil Delight
Other:  Tasteful Trim Die, Square Lattice Embossing Folder, Itty Bitty Shapes Punch (circle)
Thanks for visiting today, Happy Stampin' ......

Tuesday, November 8, 2011

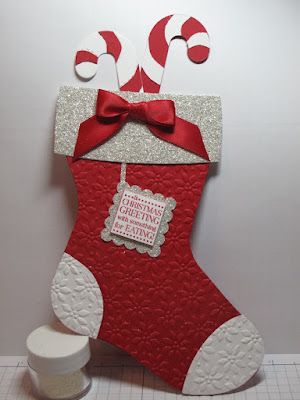
Real Red Stocking Treat Holder

As promised, I am back with my second Holiday Stocking project.  Today's project is a Treat Holder.  I created the candy canes out of cardstock using the Stocking Accent Die as I could not find candy canes in the stores yet!  I know, bizarre.  Maybe I just went to the wrong stores.....
I created a double stocking (adhered together around the outside using my multi purpose liquid glue - Tombo) leaving the top open to slide in the treats.  I really used the Champagne Mist Shimmer Spritz on this one, I blinged everything!
Stamps:  Tags Till Christmas
Ink:  Real Red
Cardstock:  Whisper White, Real Red, Silver Glimmer
Other:  Holiday Stocking Die, Stocking Accents Die, Petals A Plenty Embossing Folder, Scallop Square and 1" Square punches, Real Red Satin Ribbon
CLICK HERE to purchase your very own Holiday Stocking and Stocking Accents Die from my online store.  Every order this month receives my tutorial for the Kinder Egg Treat Holder Tutorial absolutely FREE just designate me as your Demonstrator and I will email it to you.

Holiday Stocking Die - Holiday Mini catalogue - page 24 - Item 124098 - $40.95
Stocking Accents Die - Holiday Mini catalogue - page 24 - $21.95

Red and Silver Glimmer Paper - Holiday Mini catalogue - page 41 - Item 121790 and 124005 - $5.95

Happy Stampin' .....

LinkWithin

Related Posts with Thumbnails