Tuesday, August 31, 2010

Christmas Postcard and Dryer Sheet Technique

Another Christmas card for an upcoming class.  Wouldn't you just love to create this card?  Check out my Classes HERE or my Newsletter HERE for details on all my classes, including pictures of the projects we are making.....
This card was created to show how to do the Dryer Sheet Technique, and it will be my Technique Class in October.
I used the Music Notes wheel on the background  and VersaMark ink.

Stamp:  Christmas Postcard
Ink:  VersaMark, Basic Black
Marker:  Real Red
Cardstock:  Always Artichoke, Basic Black, Real Red, Whisper White
Other:  Real Red 3/4" Taffeta ribbon, dimensionals, Dazzling Diamonds glitter, used dryer sheet (unscented)
The stamped layer in on the Real Red layer, then those two layers are popped up on Dimensionals over the ribbon. 
Here are a couple of pictures of the Glitter on the Dryer Sheet.......


Its hard to see the bling, but it is there and very subtley awesome.

Contact me today to order this lovely little stamp (Item 121428 (wood mount only), page 41, $11.95 Cdn) from the Stampin' Up! Holiday Mini Catalogue which goes live tomorrow.  Don't forget the Real Red Stampin' Write Marker and the Dazzling Diamonds Glitter.

Bye for now, Happy Stampin'        Glenda  Independent Stampin' Up! Demonstrator

Monday, August 30, 2010

Lovely As A Tree - Christmas Card

The third in a series of Christmas Cards I am making for classes at our local Recreation Center.  Here is the links for the past two days posts:  Santa Head and Dasher
For this card I cased a card I got in a Christmas Card swap held at our Vancouver Island Demo meeting last year from a very talented Demonstrator Debbie Thompkins....
I changed a couple of colours, but the basic card is the same. 
Stamps:  Lovely As A Tree, Heard From The Heart
Ink:  Pear Pizzazz, Riding Hood Red
Cardstock:  Whisper White, Riding Hood Red
Other:  Dazzling Diamonds Glitter, 2 Way Glue Pen, Dimensionals, Pear Pizzazz Stitched Poly Ribbon, Slot Punch (now retired, you could just cut a slit with a craft knife)
How simple and elegant this card is.  No matter how many years go by Lovely As A Tree is still my all time favourite stamp set.  This is the very first set I purchased from Stampin' Up!  I saw it used somewhere online and had to get it right away.  This is a very well loved set and I won't ever get rid of it, but I can't see Stampin' Up! retiring this set.
If you would like to get this stamp set for your very own, along with the other supplies to make this card, just CLICK HERE to go to my online store.  Remember to go to the store through my store then you qualify for a reduced shipping and handling rate, and all the associated Hostess Rewards.  If you purchase this stamp set through my Online Store, I will send you one of these cards AND the instructions on how to create it yourself.
Bye for now, Happy Stampin' .. .. .. .. Glenda Mollet Independent Stampin' Up! Demonstrator

Sunday, August 29, 2010

Dasher and Deck The Halls Designer Series Paper - Christmas Card

Another one of the cards for my Echo Center classes (our local recreation center).  Here is the one I posted yesterday Santa Head card.  I am having so much fun making Christmas cards this year.  Stampin' Up! has come up with some super duper awesome Designer Series Papers!!!  And I absolutely LOVE Cherry Cobbler cardstock.  I can't believe how rich this card looks......
I used Crumb Cake for the card base and I spritzed it liberally with Champagne Mist Shimmer Paint Spritz.  This card also uses Cherry Cobbler and Early Espresso.  When I stamped Dasher I inked up the stamp in Early Espresso then I daubed Champagne Mist Shimmer Paint on it with a sponge.  When I stamped it the bling transferred to the image on the Very Vanilla cardstock.  I tried all sorts of ways to get a picture of the shimmery but no luck.  Give it a try tho, its awesome.
The Deck The Halls Designer Series Paper is available in only 4 days in the new Stampin' Up! Holiday Mini Catalogue (Item # 120810-page 18). I would love to share this DSP with you, just CLICK HERE on September 1st to order your very own package (or two!!).  Don't forget to order some co-ordinating supplies as well, Cherry Cobbler, Very Vanilla, Early Espresso and Always Artichoke cardstocks and some Classic Ink pads, the matching Stampin' Write Markers and Ink Refils to go with them.  You truly won't be disappointed.......... And, if you order the stamp set and / or the new Deck The Halls Designer Series Paper through my Online Store, I will send you one of these cards and the instructions to make your own!
Bye for now, I will be back tomorrow with another Christmas card for you.
Happy Stampin'   .. .. .. .. ..   Glenda Mollet Independent Stampin' Up! Demonstrator

Saturday, August 28, 2010

Santa Face - Christmas Card

I have been working on Christmas cards for the past few days because I have a couple of classes coming up in November for our local Recreation Department.  The cards are to go on display in our Recreation Centre starting Sept 1st and I have to get the samples to my contact there for her to put in the case. 
Last year I made this cute Santa Face for our Grandson for Christmas.  I am truly sorry I cannot remember who I "cased" it from, please email me so I can give you proper credit.  Anyways, it used some now retired stuff, so I had to retro fit it to the new colours and papers.  Here is this year's version of Santa Head ......
Is he not the most adorable thing you have ever seen?  And so easy to make too.  This is one of the cards we will be making in one of the classes.  Here is an upclose view of the Santa hat "fur".....
I used Glossy White cardstock and a Texturz Plate from Texture Plates Kit #4 (item # 114531 - page 215 Stampin' Up! Main Catalogue - $13.25).  These plates are double sided and you get 3 plates in the set, so that's 6 textures for one low price, you can't beat that!  I think it looks like fur too.
And here is an upclose picture of his beard.....

Again I used Glossy White cardstock and another of the Texturz Plates, this time it is from Backgrounds 1 (Item # 114512 - Stampin' Up! Main Catalogue page 215 - $15.95) this set also has 3 plates that are double sided so you get 6 textures for one low price. 
To make the cardstock stop slipping around when I added the Standard Texturz Silicone Rubber mat (Item # 114615 - page 205 Stampin' Up! Main Catalogue - $7.95) I put a bit of removeable adhesive on the cardstock and stuck it to the texture plate.  It worked like a charm and I was able to get the swirls I wanted on his mustache!
If you order these Texturz Plates through my Online Store HERE I will send you one of these cards and the instructions on how to make it!
Here is the recipe for this awesome card (all supplies are Stampin' Up!):

Cardstock:  Whisper White, Glossy White, Basic Black, Real Red, Pink Pirouette
Ink:  Pretty In Pink (sponge cheeks and on nose)
Punches:  1 3/4 (cut in half for mustache); 1" circle, 3/4" circle
Other:  Texturz Plates - Texture Plates Kit #4 and Backgrounds 1, sponge, dimensionals

Have fun creating this cute dude, and many thanks to whoever created him last year.
Happy Stampin' ............  Glenda Mollet Independent Stampin' Up! Demonstrator

Wednesday, August 25, 2010

Mini Briefcase Album Tutorial and Kit - Sunny Garden Designer Series Paper

I finally got home to get my eagerly awaited supplies from my last shipment.  It was truly a difficult week knowing all those lovely items were just sitting In My Craft Room awaiting my return......  But now I'm home and raring to go. Classes coming up soon, lots of new ones to choose from.  See the "Classes" page just under my blog header for more information.
In an earlier post (here) I showed you a Mini Briefcase Album I created using the now retired Cottage Wall DSP and told you I would create a current one when I got home.  Well I've finished it completely, and now I am working on the tutorial for it.  Here is a picture of the front of the album which will hold special pictures from our trip to Hawaii in January this year...........
and here are a few more pictures for you.............

and some hidden journaling pieces, you would mount your pictures on the Poppy Parade pieces ......

and a pocket for journaling and pictures would be put on the Pear Pizzazz piece .......

This is not only a mini scrapbook, but a book of techniques as well. Flowers, ribbons, bows, journaling pockets, etc. 
I am now working on the tutorial for this awesome little book and will have it ready for you hopefully tomorrow.  I am making this available to purchase for the sum of $5.00 CDN for the tutorial.  If you would like to order the Kit to create the album, the cost would be $40.00 CDN, and you would have to let me know by August 30th at noon Pacific Time so I can order the Briefcase Album (Item 118766 - page 23 - $6.95 CDN) as it is in the current Summer Mini Catalogue and disappears after the end of August.  But you can use the same principle and design for any album, you would just have to adjust the size of your background papers.  To order your album, or any other supplies CLICK HERE for my online store open 24 hrs a day 7 days a week at your convenience!
I accept Pay Pal and all you need to do is email me HERE is the link, and I will send you a Pay Pal invoice.
You can pre-order the tutorial and I will let you know when you email me when the tutorial will be available (it will be Saturday, August 28th at the latest).
Have a super day tomorrow, and stay cool!   Glenda Mollet

Friday, August 20, 2010

Sweetest Day Ever!

Another card created for my upcoming Watercolouring Class.  This one uses Tilda With A Flower In Her Hair (Magnolia Stamps), one non SU punch for the branches and all other supplies are Stampin' Up!  Here's a picture of the card.............
I used the sketch for Stampaholics 10 minute challenge, but it took me a "bit" longer than 10 minutes!  I really liked this sketch!  I coloured Tilda With A Flower In Her Hair (Magnolia) with Stampin' Up! Stampin' Write Markers and an Aqua Pen on Watercolour Paper.
The card recipe is: (all Stampin' Up! except as noted)
Stamps:  Tilda (Magnolia), Confetti, Something Sweet
Ink:  Blushing Bride, Pretty In Pink, Basic Black
Markers:  Mellon Mambo, Pretty In Pink, Sahara Sand, Daffodil Delight, Basic Gray, Blush Blossom, So Saffron, Peach Parfait, Rose Red, Pink Pirouette
Paper:  Presto Patterns DSP, Watercolour Paper
Cardstock:  Pretty In Pink, Basic Black, Whisper White, Pear Pizzazz
Other:  Blushing Bride Stitched Poly Ribbon, non SU branch punch, Flower Soft, Basic Rhinestone, Wide Oval and Large Oval punches
Here is an up close picture of the coloured image..........
Thanks for looking, I hope you are able to come to one of my Watercolouring Classes and learn to do this technique yourself.  It is super easy, and makes a Wow impact!
.................   Glenda Mollet

Thursday, August 19, 2010

Tutorial - Dotted Scallop Ribbon Punch Border

In my last post HERE I showed you a card I made using Magnolia Stamps and watercolouring. For this post I am going to do a tutorial on how I made the frame on the inside of the card.
Here is the original cardfront.....
and here is a picture of the inside where I used the new Stampin' Up! Dotted Scallop Ribbon Punch to create the border.

and now for the tutorial on how to do this.............

First cut a piece of cardstock 5-1/4 x 5-1/4 .....


then I marked (very lightly) 1/4" in from each side on each corner......


then, I lined up one of the marks with the edge of the cutting part of the punch and punched once.....


continue punching, until you have reached the mark on the other end.......


you may have a tiny bit more on the end than the marked 1/4", but just make sure you are lining up the punched image to punch it correctly......


then turn the cardstock piece 90 degrees and punch as shown above, for the second side......


you will end up with a very small piece holding the punched dotted scallop ribbon piece on ..........


here is what it looks like with all 4 sides punched......


then I just erased the marks I made on the corners, and voila!!

There you have it, a frame made out of the Dotted Scallop Ribbon Border Punch from Stampin' Up!  (item #119275, page 200 of the main catalogue, $22.95 CDN)
Give it a try, it is really easy to do.  I don't have any other paper sizes at the moment, but I will post them as I do.  If you make a border, send me the size of cardstock you started with, and I will add it to this post.
Happy Stampin'!!!!!!!!!   Glenda Mollet

Magnolia Card - Noble Tilda on Traveller Luggage

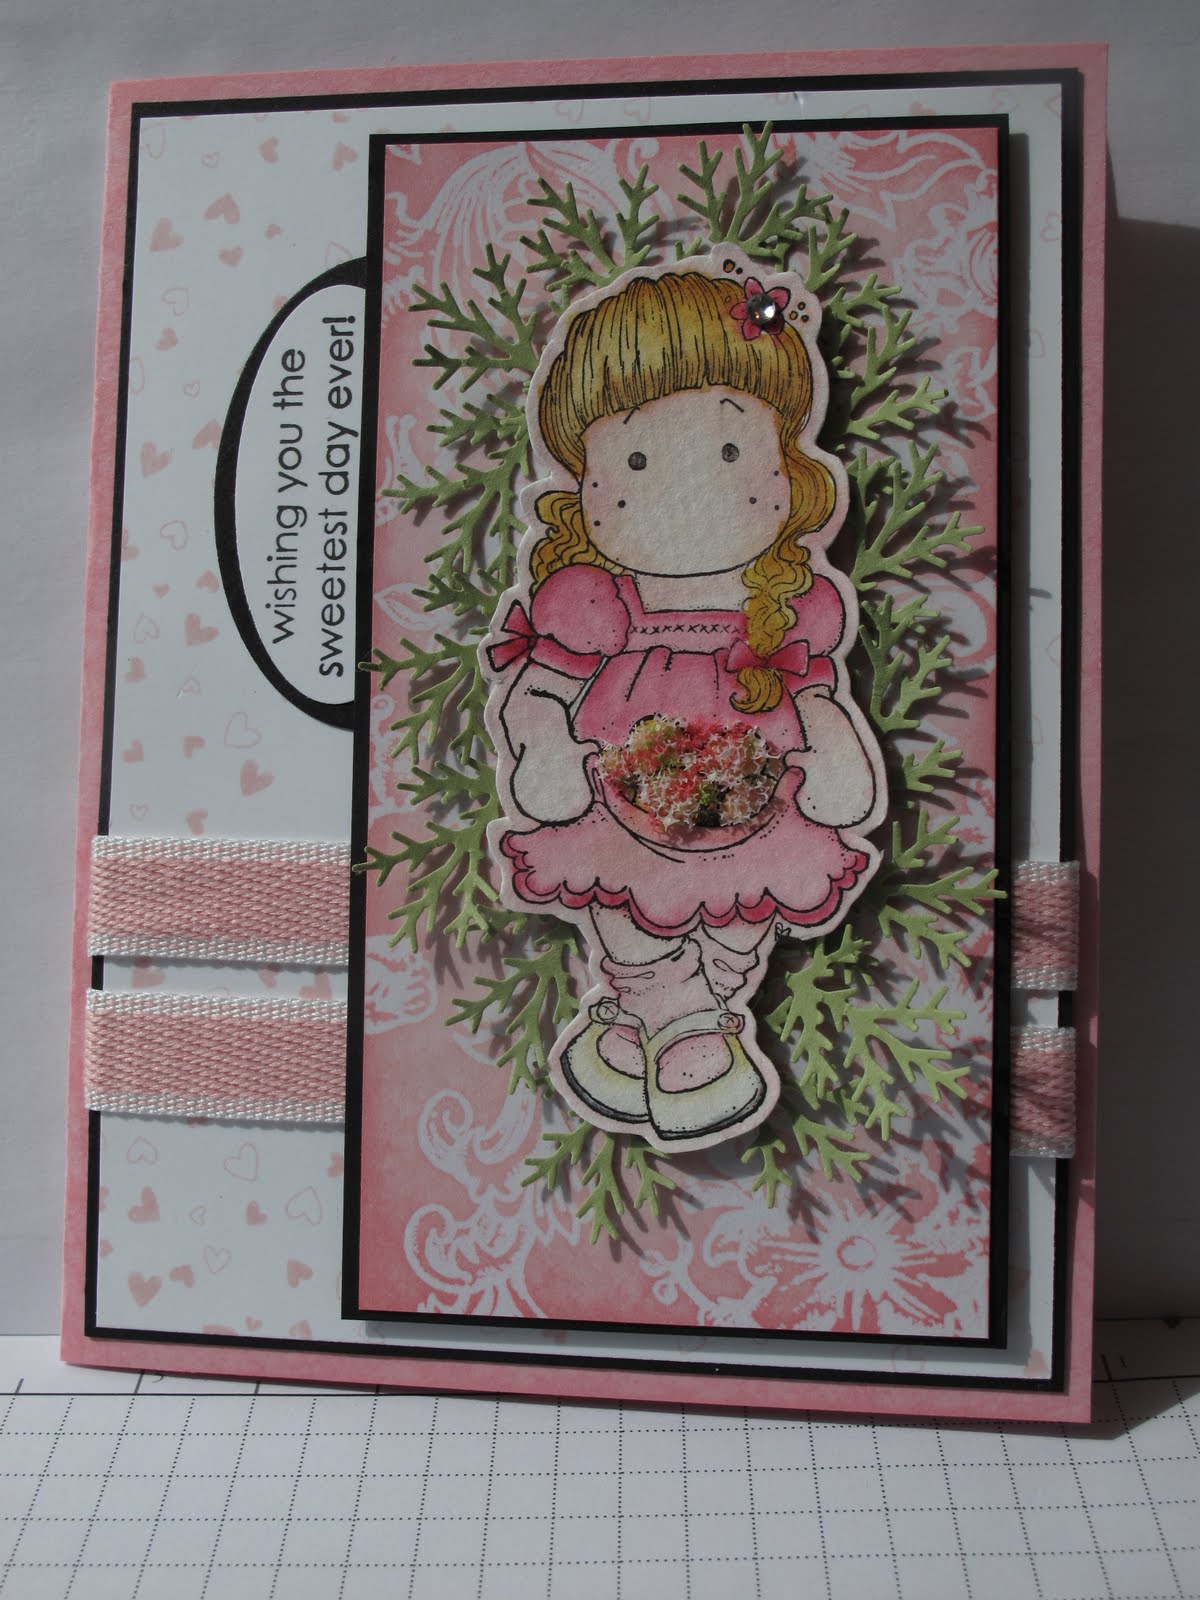
This card is coloured on Stampin' Up! Watercolour Paper, using Stampin' Write Markers and an Aqua Pen.  I wanted to experiment with a different way to colour my Magnolia stamps so I can create a class or two with them, and keep the price of the class quite low.  This is the card I came up with......
I started with some Watercolour Paper, then stamped Nobel Tilda in Stampin' Up! Basic Black Classic Ink.  I do not have my StazOn ink with me, so had to make do, and this works really well for Watercolouring.  Then I masked Tilda and stamped the Traveller Luggage "behind" with Basic Black ink.  I coloured the images in by putting a small amount of colour in the area I wanted with Stampin' Write Markers, then using the Aqua Pen, I moved the colour around and painted the image in.
When that was all done, I created the card using Stampin' Up! Cardstock, Designer Series Paper, Punches, Stamps and Embellishments.
Here is a list of ingredients for you: (all Stampin' Up! unless noted)
Stamps:  Magnolia - Noble Tilda and Traveller Luggage; Stampin' Up! - Silhouette Sentiments and Lots of Thoughts
Paper:  Elegant Soiree Designer Series Paper
Cardstock:  Very Vanilla, Baja Breeze, Soft Suede, Watercolour paper
Ink:  Baja Breeze, Soft Suede
Markers:  Blush Blossom, Soft Suede, Baja Breeze, Melon Mambo, Old Olive, Crumb Cake, Basic Gray, Daffodil Delight
Other:  Aqua Painter, Basic Pearls, 1-1/4 and 1-3/8 square punches, Dotted Scallop Ribbon Border punch

On the inside I did something a bit different with the Dotted Scallop Ribbon Border Punch......
I punched all around the outside of a piece of Very Vanilla cardstock, leaving just enough inbetween to hold it all together.  Then using Baja Breeze and Crumb Cake inks, I stamped some flower images from the Hostess set Silhouette Sentiments.
I will be doing a tutorial on how to do this in my next post.  If you are interested in it, I would love you to revisit soon.
Thanks, hope your week has been good, almost the weekend now.  It's hot and sunny where I am right now.  We have moved to Quadra Island just off the coast of Campbell River on Vancouver Island.  This island is so popular even Oprah and Barbara Streisand visit here (no they are not here right now,boohoo). 
Bye for now.....................  Glenda Mollet

Sunday, August 15, 2010

All A Flutter Elizabeth Birthday

I created another card today.  This one uses some single stamps available in the new Stampin' Up! 2010-11 Idea Book and Catalogue (email me if you would like a copy of your own) All A Flutter and Elizabeth.  I used the new In Colour Peach Parfait as well as Whisper White.  Here's the card.....
The recipe for this card:
Stamps:  All A Flutter, Elizabeth
Ink:  Basic Black
Markers: Peach Parfait, Pumpkin Pie, Cajun Craze, Soft Suede
Cardstock:  Whisper White, Peach Parfait, Shimmery White
Other:  Finial Press Embossing Folder, Dimensionals, Peach Parfait 1/2" Stitched Poly Ribbon
For the butterflies, I stamped them in Basic Black on Shimmery White cardstock.  Then I coloured them with the markers.  First I coloured the all of both of the wings in Peach Parfait. Then I used Pumpkin Pie, and went out from the body in a half circle, making sure to colour the two dot things on each wing.  Then I used Cajun Craze up close to the body again in a half circle, and both dot things on each wing.  Then I went over the shaded parts again with the Peach Parfait.  I think they turned out quite well, don't they look like Monarch Butterflies?  Here's a close up picture for you.....

Bye for now, Happy Stampin'!!!   Glenda Mollet

Saturday, August 14, 2010

Mini Briefcase Album

I've been MIA for a while, not unusual for me, but this time I have been busy.  Here is what I have been working on........
Please excuse the lettering, I left home for another trip and left my Alphabet dies at home.  So I had to improvise!  Not pretty, but they make the point.  Also, I wanted to make this out of the new Sunny Garden Designer Series Paper (page 174 of the new 2010-11 Stampin' Up! Idea Book and Catalogue, Item 119831, $12.50 CDN), but my order was held in Richmond BC for 4 days, and did not make it to my house before we had to leave for this trip, missed it by 2 hours.  Anyways, I used the retired DSP called Cottage Wall.  It is the same patterns, but in Rich Razzleberry, Orchid Opulence and Old Olive instead of Poppy Parade, Daffodil Delight, Pear Pizzazz and Peach Parfait.  Not very professional, I know.  But this book retires really soon and I wanted to get it out and make it available for you. This is made out of the Mini Suitcase Album that is currently available in the Stampin' Up! Summer Mini Catalogue (page 23, Item 118766, Briefcase on Board Book, $6.95 CDN) and only available until August 31st.  I am working on a tutorial for this book (all 16 pages), and it will be available to purchase hopefully in the next few days.  I will be offering the Tutorial Only (which can be purchased in Canada and other countries) or Complete Kit which will contain the Book, Cardstock, DSP, Ribbons, Embellishments, etc. Check back soon for this opportunity, the Complete Kit will have to be ordered by August 30th, so I can put an order in on August 31st and order the books.
Hope you are staying cool wherever you are.  It was 30 deg celcius here today, thank goodness for air conditioning in the trailer..............  Glenda Mollet

Friday, August 6, 2010

Ribbon, Button, Brad, Designer Paper Sampler Packs Available For Purchase

I created some Sampler Packs I have available for purchase.  Please note prices are in Canadian Funds, and do not include shipping from me to you, that is extra.  If you are interested in any of these please email me HERE is my address, and we will make arrangements.   Payment can be made through Pay Pal.
I will keep this post at the top for a while.
Thanks for your interest, I am trying to build my Stampin' Up! business so I can go to Convention next year, and possibly earn the Incentive Trip to Walt Disney World in 2012.
Do you want to come?  All you have to do is join my Stampin' Up! Team and you can come to Convention, and possibly earn the Incentive Trip!
........    Glenda Mollet


Stampin' Up! Sampler Options - Glenda Mollet

Thursday, August 5, 2010

Greeting Card Kids Musical Christmas

I have an original card for you today using the new Stampin' Up! set Greeting Card Kids (Item 119887 - wood OR 120633 - clear mount page 36 of the new 2010-11 Idea Book and Catalogue).
Here's the card I created using one of these really cute images....

Here is a list of the supplies I used:
Stamps:  Greeting Card Kids, Music Notes Wheel, Occasional Quotes
Ink:  Cherry Cobbler, Basic Black
Markers:  Cherry Cobbler, Daffodil Delight, Old Olive, Soft Suede, Basic Black
Cardstock:  Whisper White, Cherry Cobbler, Basic Black
Other:  Basic Rhinestones, Smooch Top Coat, Moonlight Pearlized Smooch, Perfect Polka Dots Embossing Folder, 2 Way Glue Pen, Dazzling Diamonds Glitter, Scallop Circle #2 Die, Circles #2 Die, Circle Cutter, Tag Punch, Small Tag Punch, Basic Black Satin Ribbon, Dimensionals
Here is an upclose picture of the image layer.........


I ran the Whisper White piece through my Big Shot with the Perfect Polka Dots Embossing Folder, then put 2 way glue on each raised dot and added Dazzling Diamonds Glitter.  Her gloves are done with the Moonlight Smooch, and the fur on her coat has been covered with Smooch Top Coat.  I added a Basic Rhinestone on the top of the tree.
This card was a lot of fun to make, look for it in one of my upcoming Christmas Card Classes.
.............................   Glenda Mollet

Wednesday, August 4, 2010

For You Business Card Holder

Good afternoon!!!  Don't you just love this weather, but boy, oh boy, do we need some rain.  We are very lucky that there are no forest fires around where we live, but the rest of British Columbia, Canada is burning up in over 400 Forest Fires right now. 
I read in a business booster post somewhere (sorry can't remember who) that I should be going out shopping etc. with a bunch of small notes that hold my Stampin' Up! business cards to give out to people who are kind in some way, or when I talk to someone who is trying to buy a greeting card.  So I made up these.............
The cardbase is River Rock, then I added a layer of Concord Crush.  On top of that is Poppy Parade which I stamped once with an image from Just Believe in Poppy Parade for a tone on tone look.  The frame image from Just Believe is stamped in Concord Crush on Whisper White cardstock, then I cut that out. I stamped "for you" in River Rock in the centre of the blank space.  Once it was all stamped and cut out, I spritzed it with some Champagne Mist Shimmer Spritz (oh la la is it glittery I used about 2 oz of 70% rubbing alcohol and 8 drops of Champagne Mist Shimmer Paint).  I put one of Stampin' Up!s brand new Basic Rhinestones on the topmost flower for a bit more bling.
You can't see it, but inside I used my Vintage Jumbo Wheel and ran it across the bottom half of the card using River Rock ink.  Then I attached my business card with some Dotto Repositionable adhesive so the card can be removed if necessary.
I wanted to make an impression with this little bit of creativity, so I used Poppy Parade and Concord Crush which are very intense colours.  This little card shows how Stampin' Up! colours coordinate, two of the new In Colours and matching inks, as well as the new Basic Rhinestones and two of the neutral colours.
Thanks for visiting today, I'm off to create some more...........  Glenda Mollet

LinkWithin

Related Posts with Thumbnails