Wednesday, August 31, 2011

So Glad You're Here

There is going to be a big reunion in our town soon (50th) for the local high school.  The organizers were looking for items to put into goodie bags for the participants.  I offered to make small welcome cards.  I made them 2.75 x 2.75 because I wanted to use 8.5 x 11 paper and 1/2 of 11 is 5.5 and 1/2 of 5.5 is 2.75 - see the reason now?
Here is what I came up with.....
I stamped the leaf swirl image from Best Friends Forever in Always Artichoke.  Then stamped the bird image from the Language of Friendship set in Pacific Point on separate very vanilla cardstock and punched and the wing out.  The words are from Petite Pairs and they are in Early Espresso.
They wanted to make sure we included our company information as it was to showcase local businesses as well as welcome participants back into Port Alberni for the reunion.  So inside I stamped the Stampin' UP! stamp I got at convention, and a personalized stamp that has my contact information on it.
I hope they like them!
Happy Stampin' ... ... ...

Tuesday, August 30, 2011

Nature Walk Birthday

I have a card for you today that loosely uses the UDI Sketch Challenge from last Saturday.  I added some ribbon and brads to the sketch ...
Stamps:  Nature Walk, Happies Birthday Wishes
Ink:  Rich Razzleberry, Old Olive, Early Espresso, VersaMark
Markers:  Old Olive, Rich Razzleberry
Cardstock:  Rich Razzleberry, Old Olive, Early Espresso, Naturals Ivory
Other:  Scallop Circle and 1" Circle punches, 3" and 3.5" Circle Dies, Mat Pack, 1-1/4" Old Olive Striped Grosgrain Ribbon, Daubers, Brights Glimmer Brads
  Rich Razzleberry - 8.5 x 5.5
  Old Olive - 5 x 3.75
  Ribbon - 6.5"
Happy Stampin' .....

Monday, August 29, 2011

Nature Walk Projects Finally Done

When I go to Stampin' Up! events such as Regional or the Convention, I don't do the make 'n takes while I am there.  I much prefer to take that time taking pictures and talking to other demos.  In February I went to the Vancouver Regional Event, I did not do the M&Ts and have not gotten them done until now.  I am proud to say I finally got them all completed and I will share them with you today.  They use the stamp set "Nature Walk" and Botanical Gazette designer series paper.  The stamp set is still available, but they retired the DSP.
The first project is a "CREATE" banner.  It also uses the Broadsheet Alphabet set ...
and a couple of closer pictures ...


Then there is the first Thanks card which uses a Vanilla Rosette (now retired) which is coloured with the Cherry Cobbler Stampin' Write Marker and an Aqua Pen ...

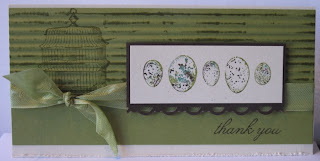
and this one uses the bird cage image from Nautre Walk and I spritzed it liberally with Champagne Mist Shimmer Paint....
Project #4 is a great card made a bit smaller.  Once again it uses Nature Walk, the egg image, and some crimping ....
The last one I am going to share with you today, is a 3.5 x 3.5 pouch with 4 matching thank you cards to fit in it ...

I hope you had a great weekend, if you listen to the weather report on the TV as I do, then you also heard that this would be the last really warm weekend of the year.  Where did our summer go this year.  I sure hope the fall is much better!
Happy Stampin' ...

Sunday, August 28, 2011

Embossed Wedding Hearts

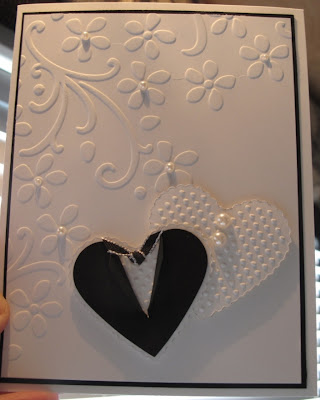
A great friend asked me to create a Wedding card for a member of her family.  This is one of the prototypes I came up with.  I have some tweeking to do to it to change it a bit (different colours, different way of opening). 
I made the Bride and Groom hearts out of the Scallop Heart of Heart Embosslits die and the Full Heart Punch. We added a bunch of pearls and wanted to keep the card clean and simple.
Stamps:  None
Ink:  None
Cardstock:  Whisper White, Basic Black
Other:  Elegant Bouquet Embossing Folder, Scallop Heart of Heart Embosslits die, Full Heart Punch, Basic Black 1/8" Taffeta Ribbon, Basic Pearls
Now I am off to create prototype #3 (the first one was in THIS post). 
Happy Stampin' .... ..... ......    

Saturday, August 27, 2011

Patterned Birthday Party

I created a really fun and happy card today using the new set "Patterned Party".  What youngster, or youngster at heart, would not love to receive this happy card .....
I used a lot of Champagne Mist Shimmer Spritz on this one again.  Here is a picture of the bow treatment where you can see the bling in the background...
I used the "quilting" technique for this card.  First I stamped all the images on the Whisper White cardstock, then I ran it through my Big Shot with the Square Lattiace Embossing Folder. Then I spritzed on the Champagne Mist Shimmer Spritz.  Then I cut out more balloons and added them on the card with dimensionals.  The bow is Lucky Limeade Ruffled Ribbon tied into a bow and then an In Colour (Poppy Parade) Glimmer Brad in the middle.  Love that bling!!!
Stamps:  Patterned Party
Ink:  Poppy Parade
Markers:  Poppy Parade, Lucky Limeade, Tempting Turquoise, Daffodil Delight, Peach Parfait
Cardstock:  Whisper White, Lucky Limeade
Other:  Square Lattice Embossing Folder, Champagne Mist Shimmer Spritz, Lucky Limeade Ruffled Ribbon, In Colour Glimmer Brad
  Whisper White - 5.5 x 4.25
  Lucky Limeade - 5-1/8 x 3-7/8
  Whisper White - 5 x 3.75
Happy Stampin' see you soon .......

Friday, August 26, 2011

Bells and Boughs Sparkley Christmas Card

I was inspired for this card by the one in the Stampin' Up! 2011-12 Idea Book and Catalogue on page 43.  I sure changed it a lot, but loved how they stamped the image on the top note die piece.  Here is my version ...
I used a lot of bling on this card.  Here are a couple of pictures where I hope you can see the bling.


I sure like how Cherry Cobbler, Always Artichoke and Very Vanilla go together. Truly classic Christmas colours!  I sponged Champagne Mist Shimmer Paint around the outside of the Always Artichoke layer, then after I stamped the holly images in Cherry Cobbler on the Cherry Cobbler layer, I spritzed it with Champagne Mist Shimmer Spritz.
Stamps:  Bells and Boughs, Curly Cute
Ink:  Cherry Cobbler, Always Artichoke, Crumb Cake
Cardstock:  Very Vanilla, Always Artichoke, Cherry Cobbler
Other:  Top Note Die, Champagne Mist Shimmer Paint and Spritz, Cherry Cobbler Seam Binding
  Very Vanilla - 5.5 x 4.24
  Always Artichoke - 5.25 x 4
  Cherry Cobbler - 5-1/8 x 3-7/8
  Very Vanilla - Top Note Die
Bye for now, Happy Stampin' ... .... ..... ......

Thursday, August 25, 2011

Pines and Poinsettias Christmas Card

Another Christmas card for you today.  Chat W used this layout in a card she made, and I cased the layout from her.  This one uses a new set coming out in the Holiday Mini Catalogue on September 1st ....

Here is a closer view of the poinsettia/rose image and the words. 

I stamped them with VersaMark and embossed them with the brand new Cherry Cobbler Embossing Powder available in the new Idea Book and Catalogue.   (Page 201 Item 122949 $5.95) I also did some spritzing with my Colour Spritzer Tool (Page203 Item 107066 $16.95) using the Crumb Cake and Cherry Cobbler Stampin' Write Markers.
Stamps:  Pines and Poinsettias
Ink:  Cherry Cobbler, Basic Black, VersaMark, Early Espresso
Cardstock:  Crumb Cake, Early Espresso, Very Vanilla, Cherry Cobbler
Other:  Cherry Cobbler Quilted Satin Ribbon, Cherry Cobbler Embossing Powder, Colour Spritzer Tool, Dotted Scallop Ribbon Border
  Crumb Cake - 4.25 x 5.5
  Early Espresso - 5.25 x 4
  Cherry Cobbler - 3-5/8 x 4-1/8
  Very Vanilla - 3.5 x 4
Happy Stampin' and thanks for visiting .....

Wednesday, August 24, 2011

Hello, Doily Wedding Card

Today felt like a wedding card kind of day.  I just got this awesome background stamp called "Hello, Doily" (page 127 and 150 Item 122845 $21.95)  .  This was on my mind since yesterday and had to come out LOL ....
It is a different fold.  Here is how it opens ....


Stamps:  Hello, Doily, Petite Pairs, Four Frames
Ink:  Pink Pirouette, Wisteria Wonder, Basic Black
Cardstock:  Whisper White, Pink Pirouette
Other:  Lace Ribbon Border Punch, Basic Pearls
This card could be done in almost any colour scheme to match any bride`s colours and would still look awesome.
  Whisper White - 5.5 x 4.24 scored at 2-1/8 from each side
  Pink Pirouette - 5.25 x 4
  Whisper White - 5-1/8 x 3-7/8
  Pink Pirouette - 2 x 2.5
  Whisper White - 1-7/8 x 2-3/8
Hope you are having a great week!
Happy Stampin` ... ... ... ... ... ... ...

Tuesday, August 23, 2011

Baby Boy Bear Hugs

Time to make some baby cards again. This time blue for the boys that have been born lately.  I hauled out my Bashful Blue and Whisper White cardstock.  Then I went to the ribbon and - many thanks to Stampin' Up! who heard my Oh NO!!!  when they retired the Bashful Blue satin ribbon, and then this year brought it back again - and got out my Bashful Blue Satin Ribbon!  Here is what I came up with.....
I hardly ever use the Pinking Hearts punches, so decided to use them this time, along with the new Stripes Embossing Folder.  Then to put the scored lines around the stamped image, I used the brand new wonderful Simply Scored by Stampin' Up!
Stamps:  Bear Hugs (page 94 Item 116966 $16.95), Short and Sweet (page 166 Item 115060 21.95)
Ink:  Bashful Blue
Cardstock:  Whisper White, Bashful Blue
Other:  Stripes Embossing Folder, Bashful Blue Satin Ribbon, Simply Scored, Basic Pearls
A day of rain here today, we sure needed it so I don't begrudge Mother Nature at all.  But, now its time for the sun to come out again, please???
  Bashful Blue card base - 5.5 x 4.25
  Whisper White - 5.25 x 4
  Bashful Blue (for punching) 4-1/8 x 4-1/8
  Whisper white - 3-1/8 x 3-1/8
Happy Stampin' and thanks for visiting....

Monday, August 22, 2011

Northern Frost Stitched Stockings Christmas Card

Hi, I'm back with my third card in the Stitched Stockings trilogy.  I pulled out the Northern Frost Embossing Folder and a retired set called Peaceful Season for the sentiment.
I never did get a chance to use this sentiment last year.  Now it is retired, but I still like it.  You could substitute any sentiment you have, if you don't have this one.
Stamps:  Stitched Stockings, Peaceful Season
Ink:  Concord Crush
Cardstock:  Whisper White, Concord Crush
Other:  Northern Frost Embossing Folder, Perfect Pennents Die, 2-1/2" Circle Punch, Basic Rhinestones, Dazzling Diamonds Glitter
Whoo hoo, I now have 3 Christmas cards done and its only August!!!
These will all be cards in my first Christmas Card Class.  Stay tuned for more info.
Happy Stampin' ... ... ...    

Sunday, August 21, 2011

Embossed Stitched Stockings Christmas Card

I am continuing on with the "Stitched Stockings" theme today.  I made another card from this awesome set that has a matching punch!  Life can't get much better when you have a punch to match a favourite stamp set.  I did some embossing and used some of the new ribbon coming out in the Holiday Mini Catalogue....
This card does not fold in the usual way.  The Whisper White piece in behind is a single piece, then the Cherry Cobbler piece is the one that folds. 
  Whisper White - 5.5 x 4.25
  Cherry Cobbler - 7.5 x 5
  Whisper White (embossed layer) 4-7/8 x 3-5/8
  Cherry Cobbler - 3-1/8 x 2-1/4
  Whisper White - 3 x 2-1/8
Here is a closer view of how it folds ....

Stamps:  Stitched Stockings, Petite Pairs
Ink:  Cherry Cobbler
Cardstock:  Whisper White, Cherry Cobbler
Other:  Snowburst Embossing Folder (new), Cherry Cobbler Polka Dot Ribbon, Cherry Cobbler Quilted Satin Ribbon (new), Stocking Builder Punch
Off to make another Christmas Card with this same stamp set. Come back tomorrow and I will share that one with you.
Happy Stampin' ... ... ...    

Saturday, August 20, 2011

No stampin' today .....

I don't have any stamping to show you today.  I am on another trip with my hubby.  This time we are in Victoria.  It takes me quite a while to pack up treasures from my craft room to bring with me so I can make cards while in our trailer.  This time I brought some stamp sets that needed to be assembled.  The new clear mount stamps are wonderful and they can be used as is right from the package.  But I like to put the printed image on each stamp to make it easier for my class participants to know which stamp to use.  Before I put the image on the stamp I cut around it as close as I can to the printing.  This allows a ring of the cling foam to make direct contact with the acrylic block and it tends to cling to the block better.  It takes quite a while to do this, but sometimes this type of work is great for an evening in front of the TV.  Along with this, if a stamp set comes in 2 clear mount cases, I always put it all into one case (storage issues you know!).
So here is a picture of the stamp sets I mounted tonight.  I can`t show you the front of the packages and the images, but here is a picture of the spines ....
I will be creating some Christmas cards while I am here.  This is a picture of the rubble left over from mounting the images onto the stamps .....

So much fun!!!  Tomorrow I will be creating and have something to share with you.
Happy Stampin`and enjoy your weekend.....

Friday, August 19, 2011

Punched Floral Birthday Card

A few times I've told you about the demo only magazine we receive monthly from Stampin' Up! called Stampin' Success.  It is chocker block full of inspiration and awesome ideas.  The Aug 2011 issue is no exception.  There is a scrapbook page that has lots of floral embellishments on it made using the new Lace Ribbon Border Punch.  I love to make use of my punches in other ways, and was inspired to create this card......
All the flowers have been made using Stampin' Up! punches: Lace Ribbon Border Punch, Blossom Bouquet Triple Layer Punch, 1/4", 1/2", 3/4" and 1" circle punches. I used the now retired Sweetest Stem Embosslits to make the leaves, but you could just as easily use the Little Leaves Embosslits, I just had to use this one because I haven't used it yet!
Stamps:  Very Verstatile (sentiment)
Ink:  Early Espresso
Paper:  Calypso Coral Patterns DSP
Cardstock:  Whisper White, Early Espresso, Lucky Limeade, Calypso Coral, Daffodil Delight
Other: punches listed above, Champagne Mist Shimmer Spritz (on the early espresso flower centers) Basic Rhinestones
This card was very labour intensive, but really fun to make.  A bright, happy card.
The cardstock sizes are:
  Whisper White 8.5 x 5.5 folded in half
  Early Espresso 1-5/8 x 5.5
  DSP 1.5 x 5.5
Happy Stampin' and thanks for visiting!          

Thursday, August 18, 2011

Thank You Cards - CASEd card

I cased this card from Chat W at Me My Stamps and I.  I chaged it a bit, and made it into my August Thank You cards for customers who place an order.  You can follow the link to see Chat's version, and here is mine....
I really like how Poppy Parade and Pear Pizzazz go together.  I made a "few" of these and it took me a couple of hours to cut out the flowers and the leaves.  Each flower has 2 layers and each card has 3 leaves!  But I like fussy cutting as my class attendees can tell you!
Stamps:  Fabulous Florets, Thank You Kindly
Ink:  Basic Black
Cardstock:  Poppy Parade, Pear Pizzazz, Whisper White
Other: dimensionals
Happy Stampin' and I hope you have a great day!           

Wednesday, August 17, 2011

Stitched Stockings Christmas Card

I finally got my box with sneak peek goodies in it from the Stampin' Up! Holiday Mini Catalogue!!  Whoo hooo....  We were away on our sailboat when Aug 1st arrived, so I was not able to order anything till I got back.  Then it was a very lllloooonnnnnggg 9 days for it to arrive.  But this morning was a super duper morning.  First of all I got my box and all the goodies, then our grandson, James, phoned and wanted to come and have some Gramma time.  Who am I to say no.  Sorry, but the box got put aside.  James is the only person in the world I would do that for, sorry DH and kids!
I had to make this card that I have had floating around in my head since Convention.  We saw so many awesome things made with new products, that I know this one was inspired by something I saw, but as far as I know it is an original.
I can't show you pictures of the actual products until after September 1st, but I can tell you about them and show you projects made using them.  I used my Champagne Mist Shimmer Spritz on the entire card.  I spritzed it after assembly so the ribbon and all the layers have bling on them.  Here is a closer view of the bling....
I hope you can see some of it.  Here is a list of supplies for this card.  The items in red are new and coming out with the Holiday Mini.  If you have not received yours and would like a copy, email me and I will get one to you!
Stamps:  Stitched Stockings, Curly Cute
Ink:  Real Red, Garden Green
Cardstock:  Whisper White, Garden Green, Red Glimmer, Silver Glimmer
Other:  Simply Scored, Real Red 1/4" Grosgrain Ribbon, Snow Burst Embossing Folder, Champagne Mist Shimmer Spritz, Stocking Builder Punch
I hope you are having a great day and you get a chance to create In Your Craft Room.
Happy Stampin'  ...............        

Monday, August 15, 2011

Just Believe Wild Wasabi Embossing

This week I have a class coming up and we will be making cards using the new coloured embossing powders, Wild Wassabi, Melon Mambo and Tangerine Tango. I was contacted by one of my stampin' ladies who asked me to have a class because they were having "withdrawals".  Haha, I know what that is like!  This is one of the cards we will be making ....
I used Just Believe and inked it in VersaMark then added the Wild Wasabi Embossing Powder.  The Very Vanilla cardstock has the new Starburst Jumbo Wheel in Pool Party then I embossed it with the Square Lattice Embossing Folder.  The ribbon is Wild Wasabi 1-1/4" Striped Grosgrain Ribbon tied with a piece of White Baker's Twine.  The butterflies are made with Pool Party cardstock and the Beautiful Wings Embosslit.
Then I decided I wanted to mix the Wild Wasabi embossing powder with Irridescent Ice embossing powder.  HERE is a link to Dawn Griffith's tutorial on how to mix embossing powders.  Here is the card where I mixed the powders ....
I made it a bit different.  The Very Vanilla cardstock is embossed with Vintage Wallpaper Embossing Folder and I used the de-bossed side.  Can't quite see the bling of the image so here is a closer picture ....

Wow, isn't that super?
Stamps:  Just Believe, Very Versatile, Starburst Jumbo Wheel
Ink:  VersaMark, Basic Black, Pool Party
Cardstock:  Crumb Cake, Very Vanilla, Basic Black, Pool Party
Other:  Wild Wasabi and Irridescent Ice Embossing Powders, Square Lattice and Vintage Wallpaper Embossing Folders, Beautiful Wings Embosslits, Wild Wasabi 1-1/4" Striped Grosgrain Ribbon, White Baker's Twine
Happy Stampin' ....

Sunday, August 14, 2011

Mini Matchbook Album

One of the perks of being a Stampin' Up! Demonstrator is we get a monthly magazine called Stampin' Success.  It is full of all sorts of stuff demonstrator related, but it also contains some awesome papercrafting ideas.  In July we were lucky enough to get pictures and instructions for a Mini Matchbook Album.  When I received an email from a local organization for new parents (mostly Moms) asking me to go and share scrapbooking ideas with them, I knew instantly that I wanted to share this super little album with them.  Being new parents, they are understandably overwhelmed with day to day living, and adding scrapbooking into their busy lives just piles on more stress.  So to keep things simple and easy for them I came up with this idea.
First, here is a picture of the front of the album.  It is based on our Grandson, James (of course!).  In agreement with our DIL and Son I do not show his face in any pictures I post on my blog, so I placed a sticky note piece on his face in each picture.
and here is a picture of the album open showing the inside with one of the pages ....
I used a bashful blue and daffodil delight colour scheme and added some texture to the background papers with various embossing folders.  Here is a picture of the open album and all 4 of the pages I will carry inside it ......
Then, as he gets older and I get more pictures and want to share them in my "Gramma's Brag Book" I can turn the older pages into scrapbook pages with minimal supplies and time.  Here is one of the pages turned into a 6x6 page ....
I just used the page as it came out of the album, matted it with some poppy parade and added a strip of bashful blue with a strip of daffodil delight cut with the Tasteful Trim die.  Then added a bit of journalling.  If 6x6 is not the size you are looking for, you can turn the pages into a 12x12 page as well ....
I matted these in poppy parade as well, added a strip of bashful blue and another tasteful trim die cut in daffodil delight.  How easy is this?  Then because I always like to add journalling to my pages, and hiding the journalling is fun for me, here is what is hidden behind the top picture ...

Just pull out the daffodil delight "handle" and you have a whisper white piece to journal on.
Well, what do you think?  The mini album, printing the pictures, and creation of 4 pages only took me 1 hour.  That's right - ONE HOUR!  I did it during my soapie (The Young and The Restless of course) which is a good length of time for a small one to have a nap.  Moms will be able to whip up 4 pages once or twice a month, then the alternate weeks, take the older pages and turn them into scrapbook pages in under half an hour.  Not to bad I am thinking.  I sure hope they like the idea.  I know I do, now I will have a brag book to carry with me in my purse, it slips right into one of the small ziplock bags and will be safe and sound.  And I now have the start of a really special album or two.
Since I got the invitation to visit these special ladies, it got my but in gear to finish off the mini album I created for our trip to Hawaii in Jan 2010 that I created but never got around to putting pictures in.  And I finished James' first year scrapbook too.  All in 2 days, whoo hooooo.
Thanks for visiting, I hope this inspires you to get some scapbooking done.
Happy Stampin' and Scrappin'  .....  

LinkWithin

Related Posts with Thumbnails