Thursday, April 29, 2010

Vintage Double Slider Card

I have been so into Vintage / Shabby Chic lately I can't believe it.  I love the new Presto Patterns DSP by Stampin' Up!  And those new Smooch Spritzes, Oh My Goodness!!!!
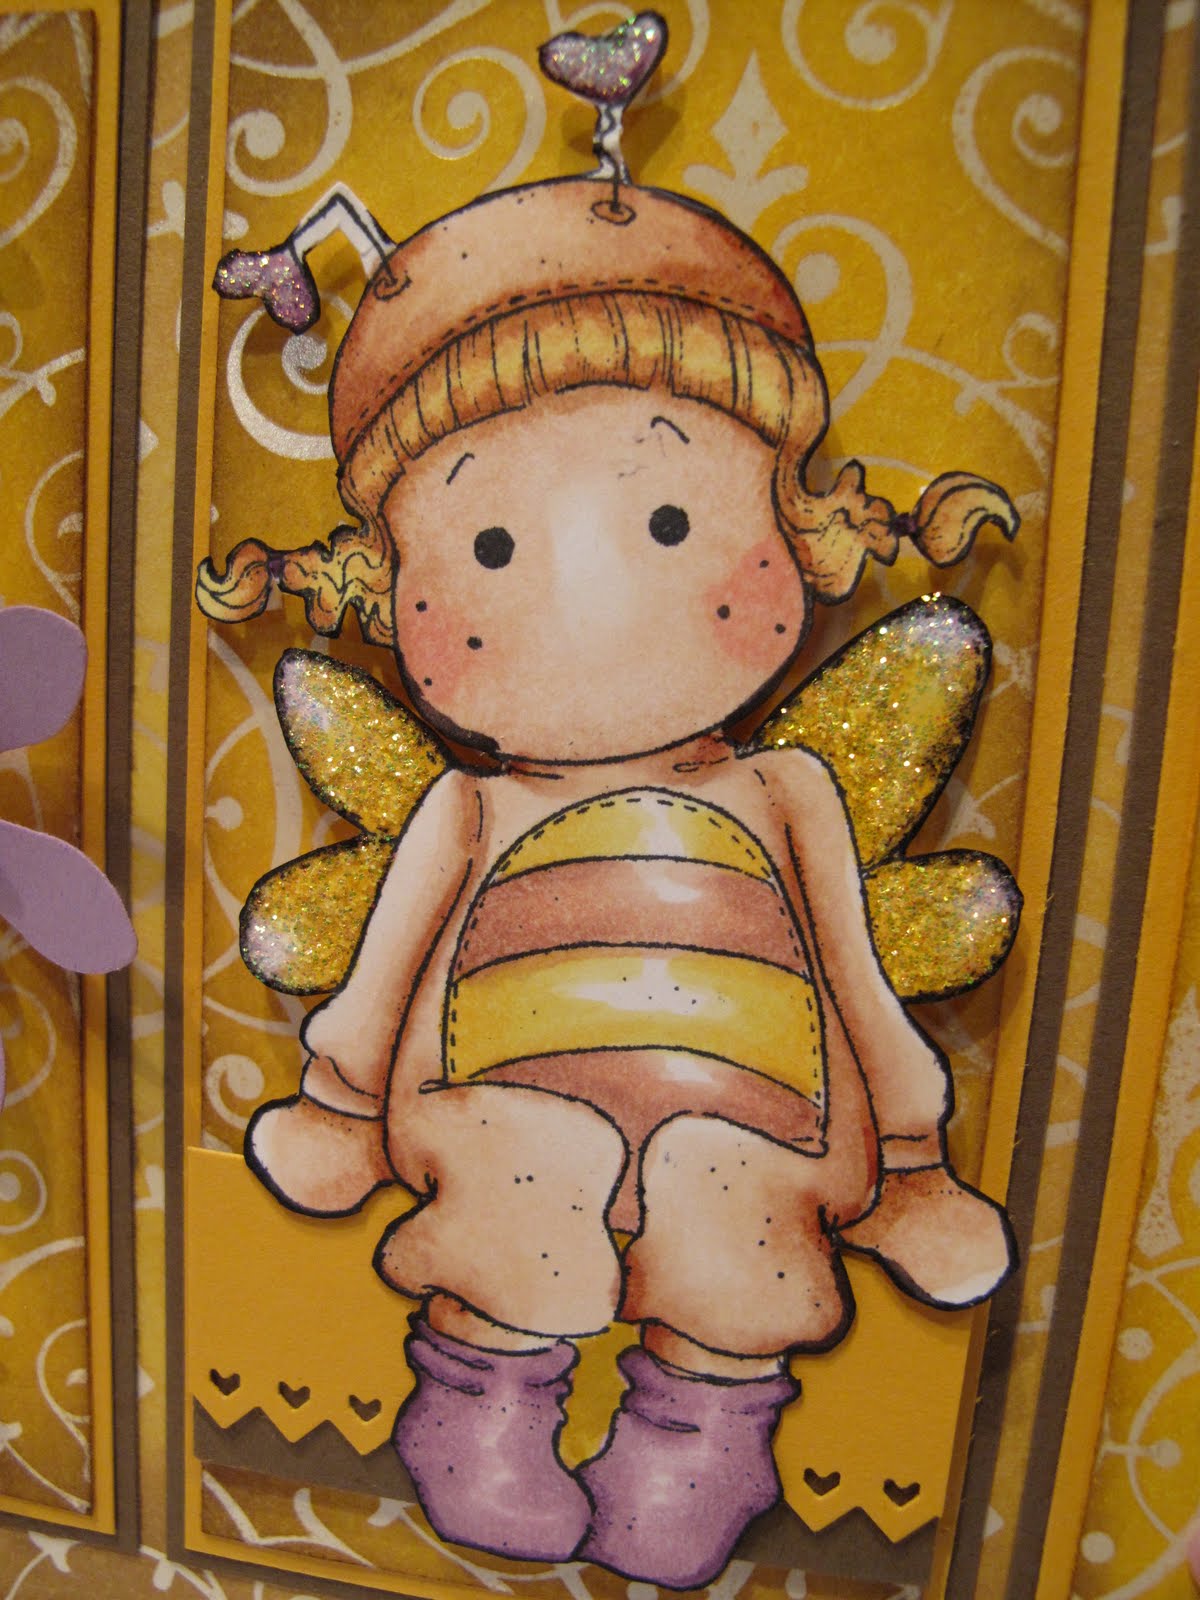
Yesterday I took a card project to my Wednesday morning Ladies Group  THIS was the card we did.  We spent a long time stamping and embossing the Bella Toile background before we could get into the colouring part.  Then I came home to design a slider card for this month's Technique Class and decided to carry on with the Vintage theme, but use the new Presto Patterns Specialty DSP and the Smooch Spritzes available starting Saturday, May 1st in the new Summer Mini Catalogue.  Sorry I can't show you pix of the paper or the spritzes as they are not released to the public yet.  But I can show you the results, and they are fabulous.  Here is the card I created.......
I used Creamy Caramel cardstock for the base.  I am trying to use some of the colours that are disappearing as a fond farewell to them.  The contrasting colour is Bravo Burgundy.  The mesh type paper and the bella toile type paper are two of the six designs from the new Presto Patterns Sp. DSP.  Aren't they great.  For the mesh one, I just spritzed some Log Cabin Smooch Spritz on it, then wiped it around using TP (which I have heard lately called Technical Paper - really its toilet paper).  The sparkle on it is unbelieveable.  The flower piece I first sponged on Bravo Burgundy ink in varying degrees of coverage, then spritzed it with Vanilla Shimmer Smooch Spritz another one of the new ones.  Again, the shimmer is spectacular.  These spritzes are much more intense than making spritzes with the Shimmer Paints. They both work, but have different uses and results.  I love them all.  Here is a close up view of the front, I tried to get the shimmer in the picture but don't think I did it justice, oh my its gorgeous.....

As I said this is a slider card, so here is the card partially open:

For the handle to pull out the slider part (you can just see the bottom of the round tab punch on the far right hand side) I used a piece of the mesh type paper from the front.  I used Asian Artistry stamp set for the stamps, and the flowers on the front are stamped again, fussy cutt out, and popped up on Dimensionals for a 3D effect.
Here are the side panels........

These cards are super fun to make, but not easy.  They can be confusing if you don't get things put together just right, it won't slide.  HERE is a tutorial by Dawn at Dawn's Stamping Studio. 
  Thanks for visiting, have a great day!!!  Glenda Mollet

Monday, April 26, 2010

Shabby Chic - Mojo Monday - 136

Hi out there in Stampin' Land ~  I had another great day!  Every other Wednesday morning I go to our local Community Centre and stamp up a storm with some of the ladies from the local seniors group - Sunshine Club.  They really keep me hopping coming up with projects that they have not done before.  Most of these ladies have been stamping for a very long time and create such impressive cards!
Last time I was there, one of them requested we do a card using the Shimmer Paints again.  I have not used them much lately, as it goes "out of sight out of mind".  They are in one of my drawers and don't see the light of day very often.  So Thanks! ladies for stretching my creativity.  Here is the card I came up with.........
I used a lot of Champagne Mist Shimmer Paint in different ways on this card. Here is what I did:
The Pink Pirouette card base has been spritzed with a mixture of Champagne Mist Shimmer Paint and 70% Rubbing Alcohol.
The middle piece that looks like DSP is actually cardstock that has been treated as below:
1.  On Whisper White cardstock I stamped Bella Toile background in VersaMark ink
2.  Then I embossed it in White Embossing Powder
3.  Next using a dauber I spread Regal Rose classic ink all over the cardstock, making it darker around the edges, and lighter in the middle
4.  Then I sponged some Bravo Burgundy classic ink just around the edges
5.  I wiped over everything vigorously with a piece of paper towel
6.  Then I hit it with the heat gun just to make sure it was all dried
7.  Then using a sponge I sponged Champagne Mist Shimmer Paint all over the prepared cardstock making sure I covered it all.
8.  I layered this on a piece of Bravo Burgundy cardstock
The glitter on this piece is unbelieveable, I wish I could get an acurate picture, but here is my attempt:
The sentiment piece has also been sponged with the Champagne Mist Shimmer Paint after I stamped the words on it, and I slipped it under the main part of the card.
The flower is made with Stampin' Up! 5 Petal punch.  I read somewhere on a blog how to do this technique, but can't remember whose it was, sorry.  UPDATE:  here is the link to the flowers on Lynn Larson's blog - Here's the steps to make this flower:
1.  Punch 3 Regal Rose 5 Petal Flower pieces
2.  Spritzed them with Champagne Mist Shimmer Paint Spritz
3.  Ran them through the crimper about 8 times in different directions
4.  Then I scrunched them up in very small balls and unscrunched them
5.  Separated the layers of each piece
6.  Layered one on top of the other and attached them together with a brad
7.  Then I mashed and scrunched and manipulated the layers into a flower to my liking
8.  Then I spritzed again with the Champagne Mist spritz
9.  After adhering to the card I added some Crystal Effects dots to mimic morning dew
10.  The leaves are the Little Leaves embosslits die and Old Olive cardstock


The actual putting together of this card went real quick, it was the prep work that takes the time.  But I think it was well worth the effort, it is absolutely gorgeous in real life!  Here is the inside of the card, I could not leave that un-spritzed!  I spritzed the Bravo Burgundy and Whisper White cardstocks both with more of the Champagne Mist spritz and added some stamped images in Regal Rose and Bravo Burgundy.
I don't think you would want to mail one of these cards due to the flower.  But you could, it would just cost a bit more.  But hand delivering it gives you a chance to witness its unveiling!!!!
Thanks so much for visiting again today, and I hope you havea great week.  I am busy with classes etc. but hope to do more stamping soon.
Glenda Mollet

Thursday, April 22, 2010

Tilda With Balloons - Mojo Monday 135

Ah another sweet Tilda card.  I love doing these as I can really let my creativity run wild, and use ribbons, buttons, punches, fussy cutting, and of course the Magnolia images.  How much more fun can life get than being able to create cards every day!!!!  I absolutely LOVE my life right now, thank you Lord for giving us so many riches and the ability to enjoy each and every one of them. 
Anyways, back to the card.......

Here's the front of the card.......

I coloured the image with Copic Markers a while ago and will post the colours at the end of this post.  The cardstock is Orchid Opulance (retiring), Real Red, Pretty In Pink, and Whisper White.  The designer paper is Shades of Spring (retiring).  I used a MS punch for the punched strip on the left hand side, and a Nestability to cut out the shape behind Tilda.  Then before I removed the die, I sponged some Pretty In Pink classic ink on the middle of the shape.  Then I took the Orchid Opulance marker (retiring) fine tip and drew around the die to define the outline of the sponged area.   This shape is popped up on the DSP, and then Tilda is cut out and popped up on the shape.  The ribbon is Whisper White and Pretty In Pink Satin ribbon from Stampin' Up!.  The Pretty In Pink cardstock piece was run through my Big Shot with the new Perfect Polka Dots embossing folder by SU!  The flowers, as usual, are hand done.  I punched out the medium and small daisy marvy shapes out of Whisper White and Pretty In Pink cardstock.  Then I added a very small circle of So Saffron cardstock in the middle of each flower, and put some Diamond Stickles on top of that.  I really mounded the Stickles so it looks like rounded flower centers.  There are also some MS branch punches in Old Olive in there.  Tilda's balloons have Crystal Effects on them, and her wings have Stardust Stickes on them. 
Here's a picture of Tilda and the flowers up close:


I also did the inside this time, and really took it up a notch from my usual insides, even for my Magnolia image cards!
Here's a picture of the inside..............
I used another Nestability shape for the Whisper White cardstock inside.  There is a layer of Real Red, then a layer of the Shades Of Spring DSP (retiring).  The flowers are a repeat of the ones on the front of the card, but I added 3 of the Large Daisy punches behind them, and some MS branch punches in Old Olive.  I sponged around the white shape with Pretty In Pink classic ink (SU).  Then I decided the other side of the inside needed something, so I hand cut out one of the printed images from the Shades Of Spring DSP (retiring) from the sheet, and adhered it......
and here is an up close picture of the inside flowers:
Thanks so much for visiting my blog, I appreciate each and every comment you leave!
Here are the copics I used to colour my image:
Dress:  V12, V15, V06, V09
Bib:  V06, V09, R29 (smidgen only)
Leggings:  V12, V15, V06, V09
Socks:  V15, V06, V09
Lace Trim:  R24, R27, R29
Shoes:  R30, R24, R27, R29
Balloons:  R30, R24, R27, R29
Skin:  E0000,E000, E00
Cheeks:  R20, R21, R30
Hair:  Y11, Y21, E97, E99
Bye for now..............  Glenda Mollet

Wednesday, April 21, 2010

Asian Artistry - SCS277 Sketch Challenge

I love being in Tofino, I get so much done here.  I don't know why it is, but I am so much more inspired here and sometimes it just flows out of my brain.  LOL.  I was searching for a sketch to use for a card this morning.  I had no plans really, just any card I could make with the limited resources I have here in the trailer with me.  I went to Splitcoast Stampers, and it was Sketch Challenge Wednesday.  There I found an awesome sketch to start the creative juices flowing.  I brought Bella Bleu DSP with me, and my set Asian Artistry was on the table where my SIL was creating the punchies she missed in my last classes.  So I thought, hey! I can use that....... Here is the result of the sketch (SCS277), and my limited supplies........
and here is a picture of the flowers up close:
I wanted to make the flowers 3D so I stamped the image again on Very Vanilla, cut out the 3 flowers, then took my black marker and went around the outside to cover up the little missed parts of the vanilla cardstock.  Then I coloured them with my Stampin' Write markers.
Here's a list of the supplies I used:
Stamps:  Asian Artistry, Hugs and Wishes
Ink:  Basic Black
Markers:  Regal Rose, Rose Red, Old Olive, Always Artichoke, Basic Black
Paper:  Bella Bleu
Cardstock:  Crumb Cake (aka Kraft), Not Quite Navy, Very Vanilla
Other:  Dimensionals
I did not use much to make this card, the DSP and the 3D flower makes it eye popping, I think.  The sketch is quite easy too, and I did not even use any embellishments - no ribbon, no buttons, no punches.  Weird, I know.  But wait for my next post, I have created another Magnolia card which uses lots of embellies and punches......
Bye for now from sunny awesome Tofino on the beach... Glenda Mollet

Tuesday, April 20, 2010

Seven Dwarfs - Second One - Grumpy

Another one of Ellen Kemper's Seven Dwarfs.  This one is Grumpy!  Don't you just love his eyebrows!!!!
I stayed on the same style as for yesterday's dwarf card HERE with the sketch for the card.  And this one is also quick and easy and uses some ribbon I've had for a while and not used yet (I know, how unusual!! LOL).
Here's what I used:
Stamps:  Hello Again
Ink:  Soft Suede
Paper:  Autumn Traditions DSP
Cardstock:  Whisper White, Soft Suede, Real Red
Other:  Real Red 1" Double Stitched GG Ribbon, Large and Small Oval punches, Trio Flower Punch, Punchie Image
I put a couple of the Trio Flowers punched in real red in behind the large oval real red punch just to jazz it up a bit, it was kind of plain.  Inside it says "Blessings Brighten When We Count Them".

I am finished the next image - Happy - but have not done the card yet.  I will post it when it's done, but I don't need the card until the last Tuesday in May, so it may be a while.

Enjoy and have a great day.......
                       Glenda Mollet

Monday, April 19, 2010

Seven Dwarfs - First One - Sneezy

I had a request to do the Seven Dwarfs in my Monthly Punchie Class.  Ellen Kemper created the seven little men, and I can't thank her enough.  This is the first one in my series - Sneezy.
I was packing to come to Tofino last night when this card hit me and I had to stop everything right there and then and create it.  I wanted to do a Get Well card, and I think this kind of looks like Sneezy is in bed.  Inside I hand wrote "I heard you're feeling a bit Sneezy" and used the stamp sentiment "Get Well Soon". How stinking cute is this guy. Ellen just did the heads, but I had to add bodies.  I got a list from somewhere that lists the colours of hats and tunics for each dwarf.
To make this card I used:
Stamps:  Teeny Tiny Wishes
Ink:  Soft Suede
Paper:  Afternoon Tea DSP (retired)
Cardstock:  Soft Suede, Kraft, Basic Black, Whisper White
Other:  Top Note Die, Perfect Polka Dots Embossing Folder, Pumpkin Pie 1-1/4" Striped GG Ribbon, Modern Label and Word Window punches.
This card went together quite quick and easy which was a good thing as it was almost 11 pm (my pumpkin hour) and at the tail end of two days of fun with our grandson, James.  Go visit Ellen's blog, you will be surprised at the wide variety of punched images she does.
Thanks for visiting today, I will be back as soon as I get my next Dwarf card done........
Glenda Mollet

Sunday, April 11, 2010

Honey Tilda - Magnolia Card

My last day on the beach in Tofino for a week or so.  Last night I created this card using my "Honey Tilda" Magnolia stamp.  This is another image I coloured a while ago and I am just getting around to making the card.  I have 2 more pre-coloured images yet to find homes for.  This card did not end up being anything like the one in my head - weird how that happens to me a lot!!  The sketch is one of the weekly sketch challenges, but for the life of me I can't remember which one.....sorry.  But enjoy the card anyways.........
The background paper is Bridesmaid Specialty DSP from Stampin' Up!  It starts out Very Vanilla, then I sponged some Summer Sun on it, then More Mustard and finally Soft Suede.  The non coloured areas you see is the shiny part of the DSP which does not hold the colour when sponged.  It's super IRL.  I layered the big BG paper onto Soft Suede c/s then onto the Very Vanilla card base.  The three strips are the same DSP sponged the same way but with more of the Summer Sun showing, and also layered onto Summer Sun then Soft Suede c/s.  I used some MS half pearls and some KaiserScrapbook half pearls.  The flowers are two sizes of Marvy Daisy punches with some MS half pearls in th ecenters.  Honey Tilda is sitting on a strip of Summer Sun c/s punched with the new Pinking Hearts Border Punch by Stampin' Up! which is layered onto a strip of Soft Suede to mimic a table.  Tilda and the table are popped up on dimensionals.  I coloured some Whisper White Organza ribbon with Summer Sun Classic ink and wrapped it around the cardfront under the flowers.  The most time consuming part of this card was the sponging.
Here's the inside which I did do this time........
and here is a close up of the flower detail:

If you know which sketch this belongs to, I would appreciate a mention of it in the comment section so I can give it proper credit.  Sometimes I just sketch the sketch into a book I have and usually I write down what sketch it was, but I was interrupted when I was doing this and did not go back to finish.
Thanks for visiting my blog, I appreciate all your comments!   * * * Glenda Mollet

Friday, April 9, 2010

Three Little Words Floral card

I'm back again tonight with another card.  I found this sketch somewhere on the internet, and that stamper used the same colour scheme (sorry can't remember who that was, email me and I will give you proper credit).  I decided to change it up just a bit, and add a sentiment to it.  This card can be used for all sorts of occasions, birthday, thinking of you, get well, sympathy, even masculine if you changed the flower to something else.  Very versatile and quite easy and quick to do......
I used:
Stamps:  Three Little Words, Messages For Mom
Ink:  Rich Razzleberry, Old Olive
Markers: Rich Razzleberry, Old Olive
Paper:  Cottage Wall DSP
Cardstock:  Old Olive, Rich Razzleberry, Whisper White
Other:  Word Window and Modern Label punches, dimensionals, Old Olive Satin Ribbon
Another great day in Tofino, we had sunshine all day long.  It was glorious, but a bit cool in the ocean breezes.  The Gray Whales passed by just in front of the campsite where we are, but too far out to see much.  Dang those trees anyways!!!!
Here is a picture of my favourite spot in our trailer for my morning coffee.....

Yup the window and screen are both wide open and my feet are hanging out the window.  You can see the ocean just beyond the trees, it is quite close.  So as you are sitting tomorrow morning having your morning coffee you can picture me here..........
Thanks for visiting.............  Glenda Mollet

Thursday, April 8, 2010

Heartbreaker Edwin Magnolia Card Share

Wow, can't believe I've had such a productive day, this is card #4 for today!!!  The first time I saw this stamp I knew I needed to adopt him.  I was so enamoured of the stamp, that I told my friend Candy that I needed to adopt him and was going to order him.  Good thing Candy was on the ball as I had already pre-ordered him!!!!  I coloured this image quite a while ago and finally go around to creating a card out of it.  This is for the Magnolia-licious April Sketch Challenge.  Here's my creation.....
And here is a picture of the flowers upclose.....
And this is an upclose of the bling I added to the leaves, the background paper and the paper under the butterflies........

And this is the inside, its very plain.........

I am very limited in the supplies I can use, I only have what I brought with me in 4 shoe boxes, and 3 plastic containers.  Its quite interesting to figure out some "pretties" for a card like this with limited supplies.  I do not own any of the fancy flowers so I have to create all my own.  I did buy some flower punches and this uses 2 of them.  The greenery is the branch from the Stampin' Up! XL 2 Step Bird punch, and the branches are a MS punch.  I used 5 layers for the bottom strip.  The first one is Chocolate Chip, then Bashful Blue that has been embossed with Irridescent Ice Embossing Powder (SU).  I put these together and punched the edge of them with the SU Curly Label punch.  Then my new MS butterfly punch, then another layer of Bashful Blue (outlined with a clear glitter pen) and finally a strip of Sweet Pea DSP.  So many layers made me have to pop Edwin up on double dimensionals!  The background papers are Sweet Pea DSP from Stampin' Up!. I made up some Shimmer Paint Spritz with 70% Rubbing Alcohol and Champagne Mist Shimmer Paint (SU) and liberally spritzed it all over the small backround piece, the flowers, all the greenery, and inside on all the DSP pieces.  It really looks shimmery in real life.  I sure wish there was some way to take a picture to show all the shimmer, but you will just have to take my word for it.
The flowers are 2 sizes of daisy punches - 2 layers of each size - in bashful blue and apricot appeal.  I put a round fire rhinestone brad in the middle of each one, then spritzed well with my shimmer spritz.

Thanks for taking the time to visit my blog, I appreciate each visit and all the wonderful comments you leave.  I wish I had time to reply to each one of them, but please know how much I enjoy reading them.
Bye for now.................Glenda Mollet

Hit The Road - Mojo Monday Sketch

How time flies when you are having fun, I can't believe its been so long since I last posted.  I decided to use this week's Mojo Monday Sketch #133 to create this great card using the new to me set "Hit The Road".  I wanted to make a masculine card as my stash of cards is sadly lacking in that department. 
Here's my take on the sketch.....

Here's the list of ingredients:
Stamps:  Hit The Road, Messages For Mom (sentiment)
Ink:  Baskic Black
Markers:  Pumpkin Pie, Going Gray, Basic Gray, Yoyo Yellow, Creamy Caramel
Paper:  Sweet Pea DSP
Cardstock:  Pumpkin Pie, Taken With Teal, Whisper White
Other:  Nestabilities (2 largest ovals), Modern Label punch, Word Window punch, Whisper White Satin ribbon, dimensionals
I love this sketch, it is so versatile and I see myself using it again.

I am in Tofino on the west coast of Vancouver Island again.  I had a lovely walk about noon on the beach in the sunshine.  It was fabulous, now the wind has come up and it feels like our trailer may just lift off!!!  At least my DH is very smart and does not leave the awning out when he leaves for work.  It is way too hard for short little me to haul in by myself.  But, our neighbours, who are out exploring at this point, left theirs out, I sure hope it stays attached to their trailer, but I doubt it will be unharmed.  Too bad as the trailer looks brand new.  Oh well, live and learn.  I hope they come home soon to rescue it as I am unable to run over there and save it for them and there is no men about right now.........
Bye for now from very windy Tofino!   Glenda Mollet

LinkWithin

Related Posts with Thumbnails