Showing posts with label Craft Fair. Show all posts

Wednesday, December 28, 2011

Mini Note Pad Clips

This was another item I made for my Craft Fair in December .....


I made a whole bunch of these using retired designer series paper and some retired ribbon.  I am so glad I hang onto retired stuff for projects like these.  I admit, I am a "bit" of a hoarder!  These were inspired by the ones Chat W made in THIS POST. I spent 4 days over the holiday break cleaning and purging my craft room.  Now I am back together again and ready to start creating.  Stay tuned for some cards starting tomorrow!
Happy Stampin' ......

Monday, December 12, 2011

Photo Frame Note Pad - More

Well the craft fair is over, thank you to all who joined us!  It was a great weekend.  I have some more of the Photo Frame Note Pads to share with you today ....


Some I added bling, some butterflies, some birds.  They were all different in some way.  Our Grandson, James came by and I helped him pick out one for his pre-school teacher.  He chose the pink one from the last post.  The designer paper behind the frame is 4" x 6". 
Happy Stampin' ......

Saturday, December 10, 2011

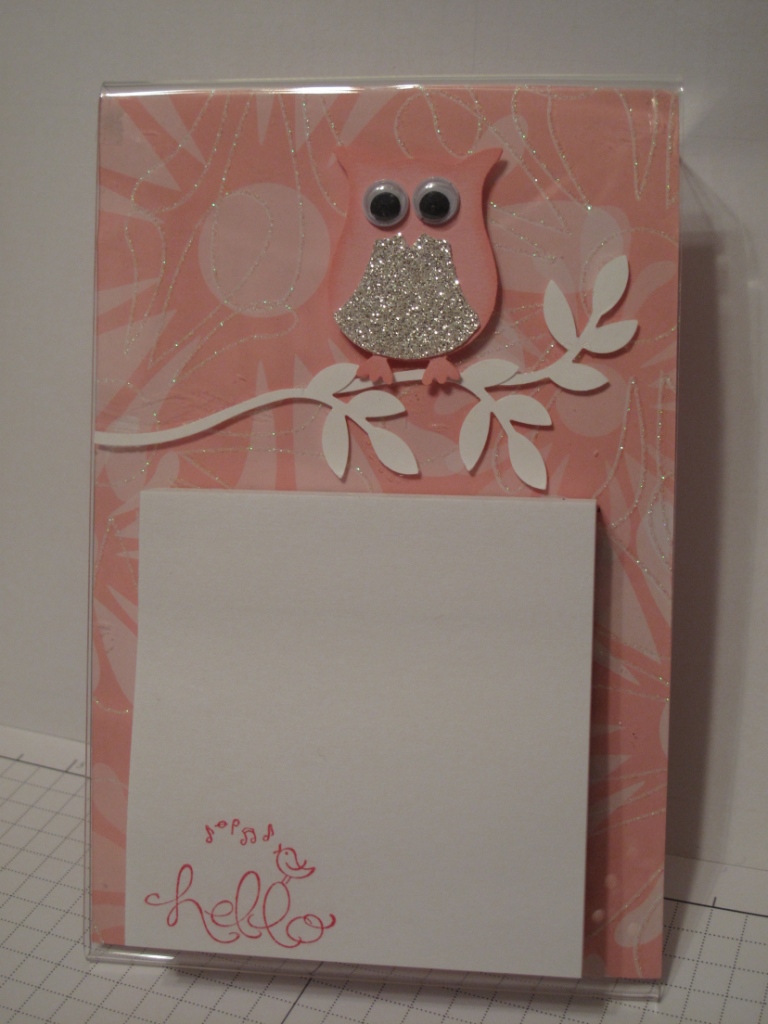
Photo Frame Note Pad #2

All set up for the Craft Fair and ready to go!  Another note pad to share with you today. 


Here is a closer look at how it stands.  Remember this is one of those plastic photo frames that are very cheap ....

More retired DSP (I think I have a "bit" to use up from past catalogues, LOL).  I added a cute pink and silver owl to this one to match the bling on the paper.  Then added some white branches for him to sit on.  The flower in the background kind of looks like a moon, don't you think?
More tomorrow, and when I get a chance I will give you some dimensions, supplies and a recipe.
Hope to see you at the craft fair at the Cup and Saucer Eatery, 4505 Victoria Quay, Port Alberni, BC.
Happy Stampin' ......

Friday, December 9, 2011

Photo Frame Note Pads

Whoo hooo I am ready for the craft fair on Saturday and Sunday.  Everything is made, and packaged, and priced, and packed!  I am feeling good, one day ahead of schedule.  Now I will share with you some of the items I made for the fair.
The first one is cased from a great note pad idea I got from my friend Elsie!  (Hi Elsie!!!)  Last year she kindly gave me one of these and I have it sitting beside by computer.  It's great when you have to jot something down real quick, there it is just waiting for you!

They are made using the plastic picture frames you can buy almost anywhere very cheap.  You slip a piece of designer paper where the picture should be, turn the frame around so the standy up part is on the top, put the note pad (sticky notes) on the bottom and add some embellishments!  Tomorrow I will share with you what they look like from a different angle.  Right now I am heading to bed (this is set to post early in the morning tomorrow).
The designer paper is retired and I used the Five Petal Flower punch and Little Leaves Die to create the floral embellie.
Thanks for your patience, see you soon. 

Monday, December 13, 2010

Lip Balm Holder #2

This is the very last craft fair item, I PROMISE!!!  The craft fair is over and it was a great success.  Thank you to everyone who dropped by.  Oh my the baking was out of this world.  Sitting all day looking at it for two whole days was a bit of a bear, but I manaaged!
Here is the last Lip Balm Holder I made ......
I used Jolly Holiday DSP, Basic Rhinestones and Very Vanilla Taffeta Ribbon.  The tree image comes from Season Of Joy.  I inked my stamp with VersaMark, then Cherry Cobbler Classic Ink (at the same time, it does not affect your Cherry Cobbler Classic Pad at al!).  Then dipped it in Irridescent Ice Embossing Powder and used my Heat Gun. Oh My Goodness, or as Robin would say to Batman, "Holy Bling Batman!!!).  It was so gorgeous.  A few Basic Rhinestones just finished off the blingy effect.  The sentiment is from Merry Chrittermas.
Well, that's it for craft fair stuff.  I am hoping to get some crafty time in during the next couple of weeks and will share with you when I do.  But my posting will be sporatic as we get ready for Christmas.  I have gift wrapping to do today, after I seriously clean my house.
Bye for now, thanks so much for taking the time to visit my blog.  Happy Stampin'   Glenda Mollet

Sunday, December 12, 2010

Lip Balm Holder #1

Yesterday and today is the craft fair at Cup and Saucer Eatery, in Port Alberni.  If you are in town, don't forget to drop by.  Lots of great stuff!
Today begins the 4 part series of Lip Balm Holders I made for the craft fair.  Here is #1 ~ ~ ~

I created the template myself.  I am sure there are lots out there, but I did not look at anyone's before I created these.  I cut the cardstock, folded it, then cut the slits for the lip balm.  Then I added designer series paper - Candy Lane - on the outside, along with decorations.  I purchased a MS punch yesterday to make the snowflakes.  I love how they turned out, they are great with all those rounded ends.  Then I put Basic Pearls in the middle of them.  The sentiment was done with my Stampin' Write Markers.  A bit of Whisper White 3/8" Taffeta ribbon slides through the holes I punched with the slot punch and ties in the front.
Thanks for visiting ....... ........... ..........   Glenda Mollet

Saturday, December 11, 2010

Chocolate Treat Pouch Number Two

I only had time to make 2 of these Lindt Chocolate Treat Pouches.  If they don't sell (fingers crossed!) I guess we will have to eat them, LOL.


I used the same pattern as the first treat pouch, but the background is Bells and Boughs set in VersaMark.  I made another Poinsettia from French Foliage, spritzed it with Champagne Mist Shimmer Spritz, and added a few Basic Pearls to the center.
Tomorrow I will begin my Lip Balm Holder series.  The very last of my Craft Fair items, I promise.  Then I will have some crafting time to make cards.  I can't wait!  Happy Stampin'  Glenda Mollet

Friday, December 10, 2010

Chocolate Treat Pouch

Well I did find some time to make a few more craft fair items.  The next two posts are pouches I created for packages of Lindt Chocolates (oh they are sooooo yummy!).  This first one I was inspired by Pam Browne.  I think her packages of chocolates were smaller than mine.

I added some scalloped real red to the folded over part, and the background is the Christmas Collage background stamp in VersaMark ink.  A basic rhinestone is in the center of the whisper white snowflake punched piece.
Tomorrow another Chocolate Treat Pouch for you.  Happy Stampin'   Glenda Mollet

Thursday, December 9, 2010

Luminaria Second One

Ah finally reached the end of my Craft Fair items.  I have everything priced and in totes.  Just have to get some cards out and price them now.  In 2 days it will all be over for another year.  I can't believe how fast 2010 went! 
Here is the second of my Luminaria (or Luminaries as they are also called) .......


I created this one completely from scratch (and used a LOT of scrap paper too!)  I cut all the sections out, scored them, punched them with the Decorative Label punch, added some cardstock weight vellum, and put them together into this awesome luminarie.
Here's a side view for you .  The berries on the stamped image are coloured with the Smooch Paint (red).

I hope you have enjoyed the journey over the past couple of months.  I will be back doing cards again as soon as the craft fair is over.  Have a great weekend, and Happy Stampin'!!!!
Glenda Mollet

Wednesday, December 8, 2010

Luminaria

I had time to create two Luminarias for the upcoming craft fair.  Will see if I have any time left to make any more ...........

I used the Fancy Favour die for this one.  And that now famous Poinsettia out of the French Foliage stamp set.  After cutting out the box, I ran it through my Big Shot again with Petals A Plenty embossing folder.  Then I used the Smooch Paints Gold Lame and Moonlight along with some red that I already had on the berries and flower centers.  A bit of Deck The Halls DSP, and a bow made out of Very Vanilla Satin ribbon, and its done.  I punched the "windows" out with the Tag punch.  Below is a side view.

One more tomorrow, see you then.  Happy Stampin'!!!  Glenda Mollet

Tuesday, December 7, 2010

Christmas Tags #3

Today I have the last of my 3 sets of Christmas Tags I created for my class today.  The ladies could choose which set they would like to make, all 3 of them if they wanted, and how many of each set.  I am all prepped, and even prepped some to make for the craft fair, and for my own use!
These tags use Deck The Halls designer series paper by Stampin' Up! ... ...


For this first one I created a poinsettia out of the French Foliage stamp set. I got this idea from Connie Babbert.  I added some Champagne Glass Gllitter to the centre (Crystal Effects was used as the adhesive).  I could not resist the pull of "bling" so I also spritzed the leaves and the flower petals with Champagne Mist Shimmer Spritz!


Crumb Cake spritzed with Champagne Mist Shimmer Spritz is the base for this quick and easy tag.  I love the words on this piece of DSP, its the song "Oh Christmas Tree" so I just had to use the tree from the Christmas Classics stamp set.  A bit of bling adorns the star in the form of a Basic Rhinestone!


I used the Ornament die from the Holiday Windows dies (pg 209 Item 116821) to layer the Ornament Punch piece.  Did you know the Movers and Shapers dies layer perfectly with lots of our punches????  Anyways back to the tag.  The stamp is from the retired set "Holiday Best".  I stamped it then punched it out with the Ornament Punch.  Then I stamped it again and cut out the words and popped them up.  A cute bow finishes off the image.  I used a sliver of Brushed Gold cardstock for the hangey part.  I did not use bling on this one, can you believe it???  I can't, LOL.

So I'm off now to get ready for today's classes.  This is the end of my Christmas Tags set, tomorrow I will show you some other things I created for the craft fair.  Bye for now, have a great day! 
Glenda Mollet

Monday, December 6, 2010

Christmas Tags #2

These next Christmas Tags are made with Jolly Holiday Designer Series Paper by Stampin' Up!  ............


On this one I used my Champagne Mist Shimmer Spritz on the designer paper, then put a piece of Whisper White cardstock onto some of the new Multipurpose Adhesive Sheets (page 17 of the Holiday Mini catalogue - item #120805) then ran it through my Big Shot using the new Northern Frost Decorative Strip Die (page 38 of the Holiday Mini catalogue - item #120901).  Then I pulled off the other liner sheet and pushed it into my Dazzling Diamonds Glitter.  Oh my, it is soooooo lovely.  A Basic Rhinestone finishes it off.  The stamp is from Grateful Greetings ... ... ...


This one has a stamp from Christmas Classics.  I used my Stampin' Write Markers to colour it before I stamped it, and then added some Red Glitter with the 2 Way Glue Pen.  Love that BLING!!


And this last one is the small Dasher stamp from the Winter Post set.  I spritz the Early Espresso and Very Vanilla layers with my Champagne Mist Shimmer Spritz and added a red rhinestone (from a $ store) to the reindeer's nose to make him Rudolph!


Thanks for visiting, I have one more set of Christmas Tags for you tomorrow, then some Luminarias after that.  Happy Stampin'!!  Glenda Mollet

Sunday, December 5, 2010

Christmas Tags #1

Well, I'm getting there, I can see the light at the end of the tunnel now.  I have created some great projects for the upcoming Craft Fair at Cup and Saucer Eatery, in Port Alberni, BC.  If you are in our neck of the woods, please join us Sat Dec 11 and Sun Dec 12 from 10 am to 4 pm.  There will be a whole bunch of artisans at our little craft fair.  Cup and Saucer Eatery is located on Victoria Quay, just under the high rise building.  Hope to see you there.
I created 3 different sets of Christmas Tags this year.  The first one I am showing you uses the now sold out Stampin' Up! Candy Lane Specialty Designer Series Paper.  This awesome paper has bling built right into a number of the sheets, so I did not even have to add bling on those ones.  Here's the picture of all three of them for you ... ...

 and individually ~ ~ ~ ~


These were really fun to make.  One day I just sat down with some scraps in front of me and creativity flowed.  This set uses Real Red, Baja Breeze and Whisper White along with the Candy Lane Specialty DSP.  Some punches and Tags Till Christmas set.
Thanks for visiting, back tomorrow with the second set .... ..... ....  Glenda Mollet

Saturday, December 4, 2010

Mini Milk Carton Treat Holders #3

Here is the last set of Mini Milk Carton Treat Holders.
These ones use Real Red cardstock, a stamp from Tags Till Christmas, some Real Red Taffeta Ribbon and more of those mini clips I got on the Clearance Rack at Stampin' Up!  Under the tags is a scallop circle punched piece of Candy Lane DSP.  They are filled with Lindt chocolates and Hershey's Kisses.
That's it for the treat holders.  Tomorrow I will share with you some Christmas Tags I created for my Tags classes this month.
Happy Stampin' ..............  Glenda Mollet

Friday, December 3, 2010

Mini Milk Carton Treat Holders #2

Here is the second lot of Mini Milk Carton Treat Holders I made for the craft fair I will be participating in on Dec 11 and 12.
I used some more Candy Lane Specialty Designer Series Papers for these ones, the Designer Label Punch, Tags Till Christmas, some more mini clips, and the 2-3/8" Scallop Punch.  I also stamped and coloured just a little piece of the stamp set Holiday Lineup.  They are filled with Lindt Chocolates and Hershey's Kisses.
One more set to show you tomorrow, so see you then.  Glenda Mollet

Thursday, December 2, 2010

Mini Milk Carton Treat Holders #1

Wow we had such fun at my annual Customer Appreciation Dinner and Party on Tuesday night.  So many people were able to come, and it was awesome.  Thank you ladies, from the bottom of my crafty little heart!
Now on to the purpose of today's post, the first in my series of Mini Milk Carton Treat Holders .....

I used the Mini Milk Carton Die and my Big Shot to make the cartons.  I punched out one side before I put them together and added a piece of medium weight window sheet to cover the hole.  I had some of the printed window sheets left from last year, they are printed with white snowflakes on them.  So cute, and they worked perfectly for this project.  I used some of my precious, Candy Lane Specialty DSP (no longer available as it is all sold out!) from the Stampin' Up! Holiday Mini catalogue to decorate them.  I also purchased some retired mini clips from the Clearance Rack to hold them together.  Real Red and Garden Green are the cardstock colours.  Then I filled them with Hershey's Kisses and Lindt Chocolates.  Yummmy!
Thanks for visiting, back tomorrow with set #2.   ........... .......   Glenda Mollet

Tuesday, November 30, 2010

Card Organizer #5

Here is the very last of my Card Organizers for you.  This is #5 ... ... ...

I have been hoarding this retired Stampin' Up! Designer Series Paper for a while.  It is called Ginger Blossom and had River Rock, Groovy Guava and Ruby Red in it.  So when the Colour Renovation happened in July to all of Stampin' Up!s colours, I was extatic to see that River Rock was coming back (now just need Groovy Guava too)!  The stamp is Embrace Life, also retired.  This is one of my all time favourite sets, and I don't think I will ever get rid of it.  The sentiment was cut out with Nestabilities Labels Thirteen.  I added Basic Rhinestones in the flower centers and the 3 diamonds across the center of the sentiment.  A few Little Leaves Die cut out from River Rock cardstock finishes it all off.  I also had some River Rock ribbon left over so added some of that too.  Again, its all bound with my Bind It All.
Ah, that's it for organizers.  I have also been doing some Mini Milk Carton Treat Holders, so will start that series tomorrow for you.  I will be back making cards real soon.  I got all my Christmas cards done, and addressed.  Now just have to put stamps on them, put letters into relatives ones, and get them in the mail.
Bye for now, thanks for visitin'.  Happy Stampin' .. Glenda Mollet

Monday, November 29, 2010

Card Organizer #4

Here is Card Organizer #4 for you .... ..... ....
I used Rich Razzleberry, Basic Black and Whisper White cardstocks for this one, and pulled out Cottage Wall DSP.  The current Rich Razzleberry 1-1/4" Striped Grosgrain ribbon was just perfect on the front.  I used nestabilities again to cut out the sentiment, then I stamped one of the swirls from Stampin' Up!s set "Priceless" in Old Olive.  Before stamping it on the sentiment, I stamped it off on some scrap paper so it would be more muted.  I sponged some Rich Razzleberry around the sentiment piece before I popped it up on dimensionals on the front.  I used my Bind It All again to bind the entire thing together.
I love making these organizers, the insides are so simple, and the frame of the outside goes quickly.  Then you have lots of time left over to go wild with the embellishments and decorations on the front.
Thanks for visiting, I'll be  back tomorrow with organizer #5.
Tomorrow night is my Annual Customer Appreciation Party and I can't wait!  We are going to have so much fun.  If you signed up and are coming, we are going to make a FREE card, have some yummy eats, and do the draws for all the FREEBIES I have been collecting all year.  I counted them today, oh my there are LOTS and LOTS of them!
Bye for now..........  Glenda Mollet

Sunday, November 28, 2010

Card Organizer #3

James has gone home, we had such a great time!  I love pajama parties with an almost 3 yr old, and what happens at Gramma's house, stays at Gramma's house!  Ha.
Today I have card organizer #3 for you ... ... ...

 This one uses retired Stampin' Up! designer series paper "Bella Bleu", Not Quite Navy and Crumb Cake cardstock and inks.  The flower stamps are part of the new Growing Green set.  In the middle of each flower is a Glimmer Brad from the Neutrals Collection.  I used Nestabilities Labels 2 and 3 to make the sentiment piece and the Not Quite Navy piece in behind.  I added a few Basic Pearls as well.  Here is an upclose picture of the ribbon and bow treatment and I tried to capture the sparkle from the Champagne Mist Shimmer Spritz I used on the DSP.
Thanks for visiting, hope your weekend went well.  I'll be back tomorrow with organizer #4.
Glenda Mollet

Saturday, November 27, 2010

Card Organizer #2

Back again, now its raining cats and dogs here.  Boy, you never can tell when you go to bed at night, what you will wake up to in the morning!
Here is the second Card Organizer folder I made for the upcoming Craft Fair ....
Some more retired Stampin' Up! Designer Series Paper.  This time it is Tea and Crumpets.  It has Pretty In Pink, Chocolate Chip and Always Artichoke in it. I chose some also retired Chocolate Chip Satin Ribbon to adorne the front.  I cut the sentiment piece out with my Nestabilities Labels 1 and while the die was still on, I sponged around the inside of it with Chocolate Chip Classic Ink.  It leaves a lovely white border around the outside, I added 3 Basic Pearls to the sentiment piece (I printed the sentiment off on my computer).  I made a ribbon rose with the Chocolate Chip ribbon and put a Basic Pearl in the middle.  The ribbon / bow embellishment also has 3 Basic Pearls on each side of the bow.  Once again I used my Bind It All to bind the whole thing together.  The inside pages are made out of more Tea and Crumpets DSP.
Thanks again for visiting.  Hope you have a super weekend.  I will be back tomorrow with Card Organizer #3.  Now off to play with our grandson, James.  He came over last night and we had a "Pajama Party".  We did some "baking" and did some Christmas craft making, and did some punching.  It was a busy day.  He is only 2 yrs and 8 months but LOVES Gramma's craft room! 
Bye for now ........ .........  Glenda Mollet

LinkWithin

Related Posts with Thumbnails