I bought lots of the Stampin' Up! Deck The Halls Designer Series paper because I absolutely love it. The colours are so rich, and the designs are awesome. Yesterday I opened up my stash leftover from Christmas projects and cards and created this double scrapbook page. I used a sketch I found on a website for another company's page kits. The sketch was awesome and I love how this turned out.
As per my agreement with our DIL I opened this picture in My Digital Studio and placed a punched image over our Grandson's face, then lowered the opacity a bit so it is not to "in your face". He is the cutest thing in the universe!
When the last Holiday Mini catalogue came out, I purchased a couple of the black jewel scrolly things called Black Flourish Designer Jewels. I knew one of them was destined for my Christmas 2010 scrapbook page. It fits nicely on the right hand side in a "white space". This page is made almost 100% out of retired items from the Holiday Mini. The buttons along the top, the designer series paper, and the designer jewels. I used a nestability to make the shape behind the "2010". This page has no journalling area on it, but I am working on how to get some information onto it. Maybe I will just write it on a piece of cardstock and adhere it to the back of the page. I always date my pages on the back as well. I did a lot of fussy cutting on these pages. The poinsettias in both corners are cut out and the flowers that are cut out are also popped up on dimensionals. I also fussy cut out the ribbon and bell at the bottom of page 2. The word "traditions" has been cut out of Textured Very Vanilla cardstock, and the numbers out of Always Artichoke Textured cardstock, using Timeless Type Jr. Alphabet dies ( a set exclusive to Stampin' Up!) and my Big Shot.
Thanks for looking, Have a great "hump day"! Glenda Mollet
Showing posts with label Deck The Halls DSP. Show all posts
Wednesday, January 5, 2011
Thursday, December 9, 2010
Luminaria Second One
Ah finally reached the end of my Craft Fair items. I have everything priced and in totes. Just have to get some cards out and price them now. In 2 days it will all be over for another year. I can't believe how fast 2010 went!
Here is the second of my Luminaria (or Luminaries as they are also called) .......
I created this one completely from scratch (and used a LOT of scrap paper too!) I cut all the sections out, scored them, punched them with the Decorative Label punch, added some cardstock weight vellum, and put them together into this awesome luminarie.
Here's a side view for you . The berries on the stamped image are coloured with the Smooch Paint (red).
I hope you have enjoyed the journey over the past couple of months. I will be back doing cards again as soon as the craft fair is over. Have a great weekend, and Happy Stampin'!!!!
Here is the second of my Luminaria (or Luminaries as they are also called) .......
I created this one completely from scratch (and used a LOT of scrap paper too!) I cut all the sections out, scored them, punched them with the Decorative Label punch, added some cardstock weight vellum, and put them together into this awesome luminarie.
Here's a side view for you . The berries on the stamped image are coloured with the Smooch Paint (red).
I hope you have enjoyed the journey over the past couple of months. I will be back doing cards again as soon as the craft fair is over. Have a great weekend, and Happy Stampin'!!!!
Glenda Mollet
Wednesday, December 8, 2010
Luminaria
I had time to create two Luminarias for the upcoming craft fair. Will see if I have any time left to make any more ...........
I used the Fancy Favour die for this one. And that now famous Poinsettia out of the French Foliage stamp set. After cutting out the box, I ran it through my Big Shot again with Petals A Plenty embossing folder. Then I used the Smooch Paints Gold Lame and Moonlight along with some red that I already had on the berries and flower centers. A bit of Deck The Halls DSP, and a bow made out of Very Vanilla Satin ribbon, and its done. I punched the "windows" out with the Tag punch. Below is a side view.
One more tomorrow, see you then. Happy Stampin'!!! Glenda Mollet
I used the Fancy Favour die for this one. And that now famous Poinsettia out of the French Foliage stamp set. After cutting out the box, I ran it through my Big Shot again with Petals A Plenty embossing folder. Then I used the Smooch Paints Gold Lame and Moonlight along with some red that I already had on the berries and flower centers. A bit of Deck The Halls DSP, and a bow made out of Very Vanilla Satin ribbon, and its done. I punched the "windows" out with the Tag punch. Below is a side view.
One more tomorrow, see you then. Happy Stampin'!!! Glenda Mollet
Tuesday, December 7, 2010
Christmas Tags #3
Today I have the last of my 3 sets of Christmas Tags I created for my class today. The ladies could choose which set they would like to make, all 3 of them if they wanted, and how many of each set. I am all prepped, and even prepped some to make for the craft fair, and for my own use!
These tags use Deck The Halls designer series paper by Stampin' Up! ... ...
For this first one I created a poinsettia out of the French Foliage stamp set. I got this idea from Connie Babbert. I added some Champagne Glass Gllitter to the centre (Crystal Effects was used as the adhesive). I could not resist the pull of "bling" so I also spritzed the leaves and the flower petals with Champagne Mist Shimmer Spritz!
Crumb Cake spritzed with Champagne Mist Shimmer Spritz is the base for this quick and easy tag. I love the words on this piece of DSP, its the song "Oh Christmas Tree" so I just had to use the tree from the Christmas Classics stamp set. A bit of bling adorns the star in the form of a Basic Rhinestone!
I used the Ornament die from the Holiday Windows dies (pg 209 Item 116821) to layer the Ornament Punch piece. Did you know the Movers and Shapers dies layer perfectly with lots of our punches???? Anyways back to the tag. The stamp is from the retired set "Holiday Best". I stamped it then punched it out with the Ornament Punch. Then I stamped it again and cut out the words and popped them up. A cute bow finishes off the image. I used a sliver of Brushed Gold cardstock for the hangey part. I did not use bling on this one, can you believe it??? I can't, LOL.
So I'm off now to get ready for today's classes. This is the end of my Christmas Tags set, tomorrow I will show you some other things I created for the craft fair. Bye for now, have a great day!
These tags use Deck The Halls designer series paper by Stampin' Up! ... ...
For this first one I created a poinsettia out of the French Foliage stamp set. I got this idea from Connie Babbert. I added some Champagne Glass Gllitter to the centre (Crystal Effects was used as the adhesive). I could not resist the pull of "bling" so I also spritzed the leaves and the flower petals with Champagne Mist Shimmer Spritz!
Crumb Cake spritzed with Champagne Mist Shimmer Spritz is the base for this quick and easy tag. I love the words on this piece of DSP, its the song "Oh Christmas Tree" so I just had to use the tree from the Christmas Classics stamp set. A bit of bling adorns the star in the form of a Basic Rhinestone!
I used the Ornament die from the Holiday Windows dies (pg 209 Item 116821) to layer the Ornament Punch piece. Did you know the Movers and Shapers dies layer perfectly with lots of our punches???? Anyways back to the tag. The stamp is from the retired set "Holiday Best". I stamped it then punched it out with the Ornament Punch. Then I stamped it again and cut out the words and popped them up. A cute bow finishes off the image. I used a sliver of Brushed Gold cardstock for the hangey part. I did not use bling on this one, can you believe it??? I can't, LOL.
So I'm off now to get ready for today's classes. This is the end of my Christmas Tags set, tomorrow I will show you some other things I created for the craft fair. Bye for now, have a great day!
Glenda Mollet
Wednesday, September 29, 2010
Angelic Joy and Deck The Halls Designer Series Paper
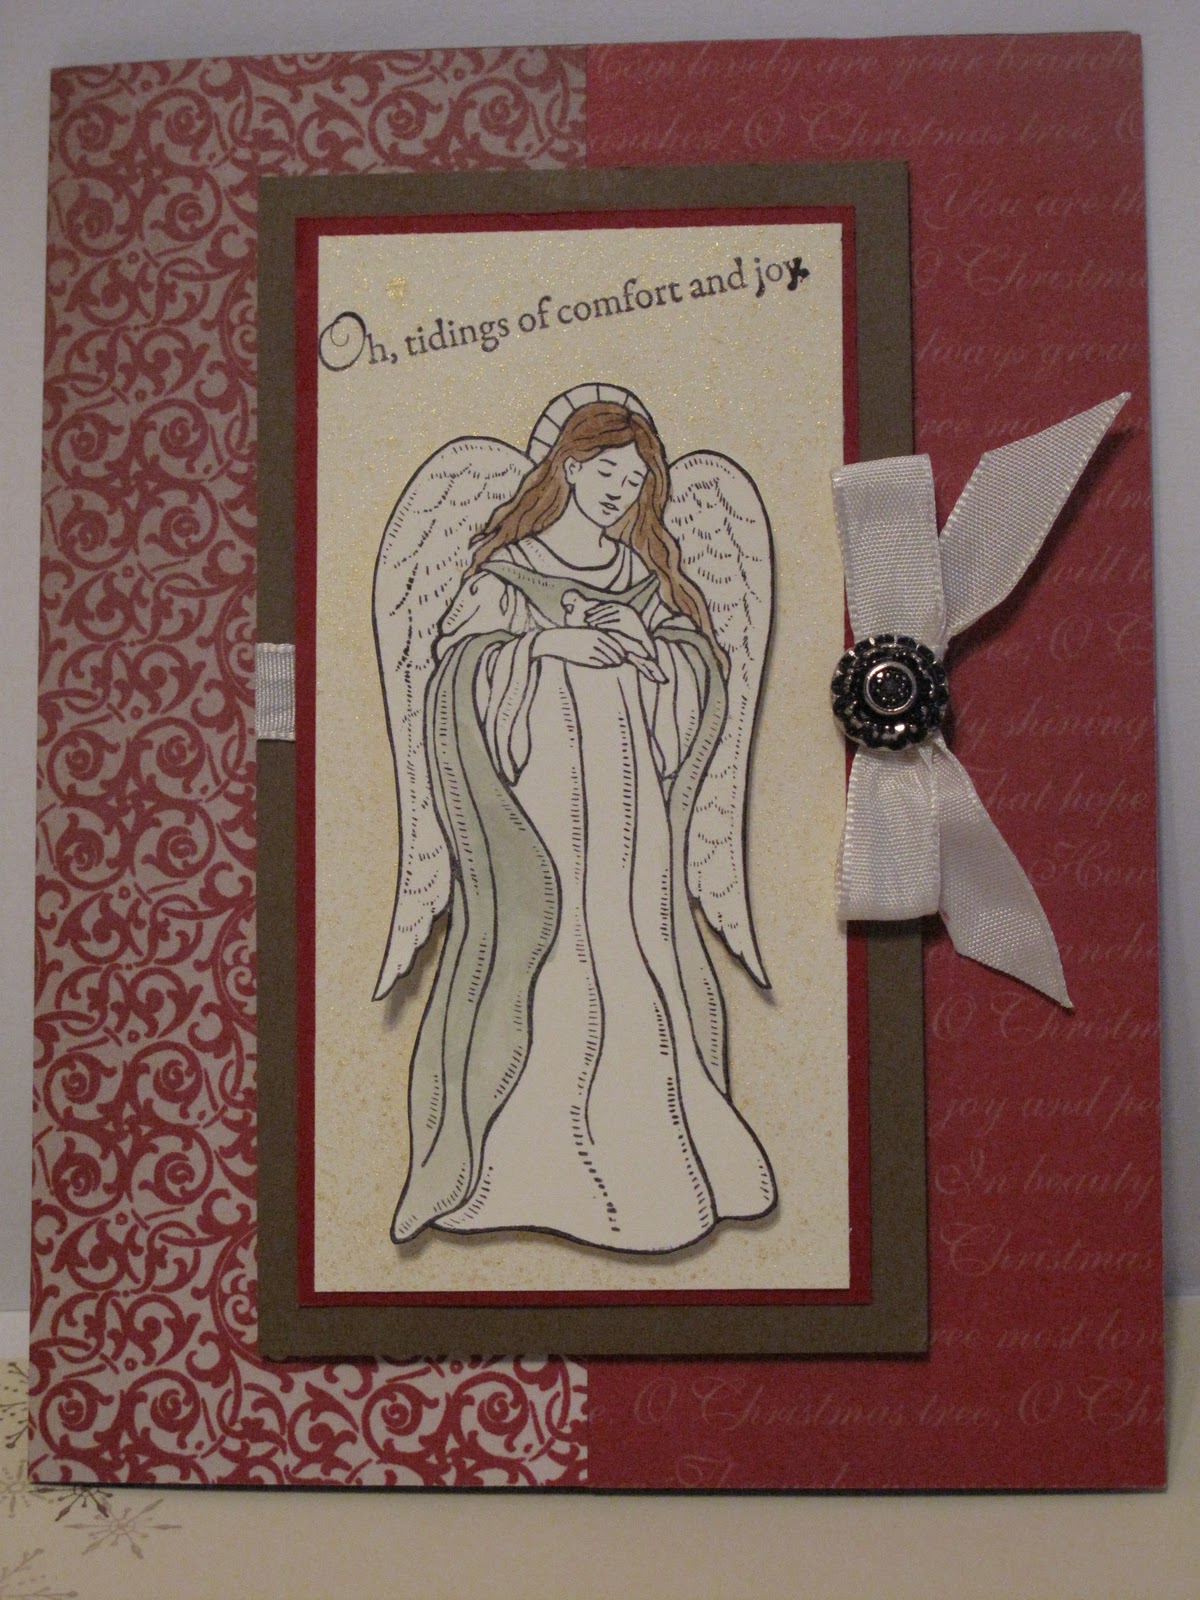
I was asked to re-create the Angelic Joy card from page 23 of the Stampin' Up! Holiday Mini catalogue for an upcoming class. I did not want to case it directly, but wanted to jazz it up just a bit. Here is what I came up with ... ... ...
I did the ribbon a bit different, the bow is sideways and I added a wonderful Stampin' Up! Vintage Brad to it. Then I spritzed the 2x4" piece of Very Vanilla cardstock with Gold Glow Smooch Spritz. The Angel I stamped on Very Vanilla cardstock with Basic Black ink, then hit it with the heat gun to set the ink. Then I took my Aqua Pen and Always Artichoke and Soft Suede Classic Ink Pads and did a bit of colouring. Her robe is Always Artichoke and her hair is Soft Suede. This colouring worked really well on the Very Vanilla cardstock as I did not use a lot of water. I think it makes a soft and elegant statement! The background paper is two of the Deck The Halls designs, I just LOVE LOVE LOVE this awesome paper. The cardbase is Cherry Cobbler but you can't see it.
Here is an upclose picture of the stamped and coloured image and you can see some of the Gold Glow shimmer behind her ... ... ...
Thanks for visiting, and Happy Stampin'!!!
~ ~ ~ ~ ~ Glenda Mollet ~ ~ ~ ~ ~
I did the ribbon a bit different, the bow is sideways and I added a wonderful Stampin' Up! Vintage Brad to it. Then I spritzed the 2x4" piece of Very Vanilla cardstock with Gold Glow Smooch Spritz. The Angel I stamped on Very Vanilla cardstock with Basic Black ink, then hit it with the heat gun to set the ink. Then I took my Aqua Pen and Always Artichoke and Soft Suede Classic Ink Pads and did a bit of colouring. Her robe is Always Artichoke and her hair is Soft Suede. This colouring worked really well on the Very Vanilla cardstock as I did not use a lot of water. I think it makes a soft and elegant statement! The background paper is two of the Deck The Halls designs, I just LOVE LOVE LOVE this awesome paper. The cardbase is Cherry Cobbler but you can't see it.
Here is an upclose picture of the stamped and coloured image and you can see some of the Gold Glow shimmer behind her ... ... ...
Thanks for visiting, and Happy Stampin'!!!
~ ~ ~ ~ ~ Glenda Mollet ~ ~ ~ ~ ~
Monday, September 13, 2010
Season Of Joy - Cherry Cobbler - Deck The Halls DSP
I used the new Stampin' Up! Deck The Halls Designer Series Paper for this quick and easy card. The colours of the DSP are Cherry Cobbler, Always Artichoke and Very Vanilla, so those are the colours I used on this card. Here it is ... ... ...
I stamped the tree from Season Of Joy three times in Always Artichoke on Very Vanilla cardstock, hand cut them out, and attached 2 flat on the card, and popped the middle one up on dimensionals. The sentiment, from Curly Cute, is stamped in Basic Black on Cherry Cobbler and matted in Always Artichoke. The ribbon and bow is actually the new Stampin' Up! Always Artichoke Seam Binding. Hah! no bling on this one, can't believe it!!!!
Thanks so much for visiting today and I hope you have a great week.
... ... ... ... ... Glenda Mollet ... ... ... ... ...
I stamped the tree from Season Of Joy three times in Always Artichoke on Very Vanilla cardstock, hand cut them out, and attached 2 flat on the card, and popped the middle one up on dimensionals. The sentiment, from Curly Cute, is stamped in Basic Black on Cherry Cobbler and matted in Always Artichoke. The ribbon and bow is actually the new Stampin' Up! Always Artichoke Seam Binding. Hah! no bling on this one, can't believe it!!!!
Thanks so much for visiting today and I hope you have a great week.
... ... ... ... ... Glenda Mollet ... ... ... ... ...
Subscribe to:
Posts (Atom)