Showing posts with label Calendars. Show all posts

Friday, February 7, 2014

2014 Calendar - 3D Class

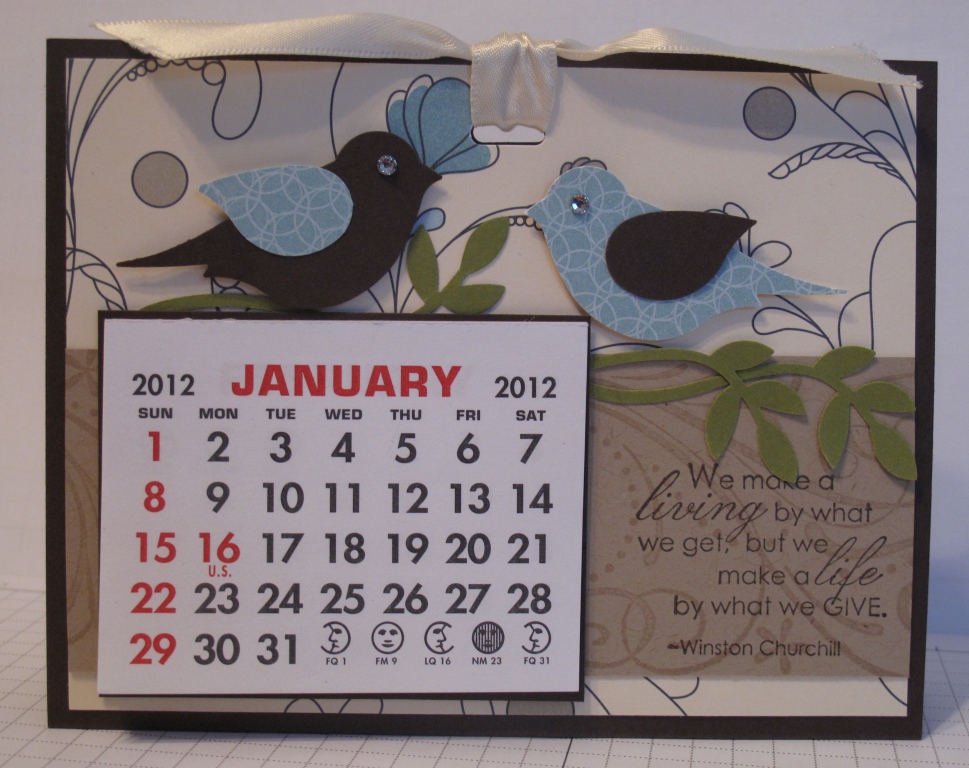
This year I am trying to add some 3D items into my class mix.  This month we made this great 2014 Calendar ....


I used the basic calendar base from the one I made last year, and used my ultra, very favourite Designer Series Paper by Stampin' Up - Modern Medley.  I keep letting the powers that be know that I would really appreciate it if they kept this DSP in the next catalogue!  Oh Please!!!!
Ah-hem, back to the task at hand - - - LOL.  Every September I order a whole bunch of these mini calendars with no idea what I will do with them.  I make them available to my customers, so if you are looking for some (in Canada) let me know and I will add you to the list for this year.

  Stamps:  Flower Shop
  Ink:  StazOn
  Paper:  Basic Black, Very Vanilla, Silver Glimmer, Modern Medley DSP
  Other:  Pansy Punch, Bird Punch, XL Rhinestones, 2014 calendar

I have my calendar sitting on my desk right beside my monitor where I can look at it all the time.  Give one of these calendars a try.  You cut a piece of basic black cardstock 10-1/2 x 5-1/2, score it at 4-1/4, 5-1/4 and 6-1/4.  Decorate it as desired. I used two velcro dots to hold the top together, but you can punch a hole in it and tie it with twine or ribbon, or use adhesive.  If you want to mail it, it fits into a regular sized card envelope.

Happy Stampin' .... ..... .....

Thursday, December 22, 2011

Standing Calendars - Final Day

Here are the last 3 Standing Calendars I made for the Craft Fair ....


A cute owl from the Owl Builder Punch on the top one.
For the middle one I used the Magnetic Movers and Shapers die from the Holiday Windows set.  Then I embossed the bird with the Square Lattice Embossing Folder.
The last one has more cute birds from the Bird Builder Punch.
Happy Stampin' .....

Wednesday, December 21, 2011

Standing Calendars - day 4

I did say I made quite a few of these.  Each one is different so I want to share them all with you ...


The top one has a flower made from the 5 Petal Punch, and it has lots of Champagne Mist Shimmer Spritz on it.  I used the Little Leaves Die to make the leaves behind the flower.
The bottom one has two more birds on it.
Happy Stampin' ....

Tuesday, December 20, 2011

Standing Calendar - even more

I made quite a few of these little gems, so thought I would share them all with you.  Here are two more ....


More retired DSP but oh so bright and colourful.  The top one has a satin bow on the top of it and a couple more birds.  The bottom one I used the Floral Fusion Die and cut out some flowers in matching cardstock, the layers are up on Dimensionals to give them a bit of interest.  I love how the Flamingo and Blue Bird worked out, they were printed on the DSP.
Happy Stampin ....

Monday, December 19, 2011

Standing Calendar - two more

Two more of the standing calendars to share with you today.  I posted one last week in THIS POST


Both of them use retired designer series paper.  The top one has one of the red flowers cut out, shaped and popped up on Dimensionals and some Basic Pearls added for bling.  The pink one has two birds punched out using the Bird Builder Punch.  The bird's eyes are Basic Rhinestones.
Hope you are all ready for Christmas.  Wishing you are your families all the best this season, and in the coming New Year!
Happy Stampin' ....

Thursday, December 15, 2011

Standing Calendars

I also made a few of these great Standing Calendars.  I ordered the calendar part online and created the background for it.  I got this idea from a fellow demo, Petty Wong, in Victoria.

These are very easy to make.
   Cardstock 10-1/2 x 5-1/2
   Score it at 4-1/4x 5-1/4 and 6-1/4
   Designer Series Paper 5-1/4 x 4
   Cardstock or Coordinating DSP 5-1/4 x 2
   Cardstock to frame calendar
   Ribbon 6"
   Embellish and decorate as desired
Fold the cardstock on score lines.  Punch a slot (I used the retired slot punch) at the top of both sides to tie the ribbon through.  Assemble and decorate as desired.  Run ribbon through slots and tie in a knot or a bow.
For this one I took a small piece of ribbon and wrapped it around the top through the slot and taped it down at the back.  Then I tied a bow and put it on top of the ribbon for something a bit different.  I will show you some more over the next few days so you can see the 3 different ribbon treatments I did.
Here are some pictures of one of the calendars from the side so you can see how to fold it.


These fold up and you can fit them right into a regular card size envelope.  Depending on how you finish them, they will also mail for the cost of a single stamp.
Happy Stampin' ......    

Monday, November 21, 2011

2012 Calendar

Last year I received one of these calendars from a fellow Vancouver Island Demonstrator, Petty Wong.  It has taken me this long to re-create it.  Why so long?  Well it took me that long to get the calendars.  I will be making some of these for the craft fair I am participating in on Sat and Sun Dec 10 / 11 at Cup and Saucery Eatery in Port Alberni, BC.  Hope to see you there!


Don't forget the Online Extravaganza Sale at Stampin' Up! begins today.  It lasts until November 28 (a whole week).  There is also two special items on sale for only 24 hours (until 11:59 pm tonight).  The Simply Scored scoring tool Reg $38.95 on SALE for $31.16 and the Sweet Pressed Cookie Stamps Reg $20.95 on SALE for $16.76!
Click on the picture below to go to my online store and see what all is on Sale.  There are items 20 to 60% off - stamp sets, decore elements, ribbon, buttons, digital downloads ......

Bye for now, and Happy Stampin' .....

Monday, March 7, 2011

Flip Over Calendar Instructions

As promised, I have completed the instructions for THIS Flip Over Calendar.

Flip Over Calendar Instructions


And here are the calendars for you to download and print out. The first one is just one 12 month calendar, the second one is 2 12 month calendars .....
Flip Calendars 2011 - 1 set

Flip Calendars 2011 - 2 sets

Have fun making these, they are awesome and I plan on making a bunch for 2012 for craft fairs around Christmas.
Happy Stampin' ... ... ...            

Saturday, March 5, 2011

Flip Over Calendar - CASEd

I was lucky enough to be the recipient of one of Barb Tripp's Flip Over Calendar at Stampin' Up!s recent Vancouver Regional Seminar. It is awesome, thanks Barb! 
EDIT:  Barb got it from Susan Easter (part of our Vancouver Island Demo Group) who got it from a friend in the USA.  Contact me if you are the originator and I will gladly give you credit!!
I CASEd it and made some minor changes and will give this to my workshop Hostesses this weekend.  Here are some pictures ......
This is the calendar standing ......
and from the side .....
and here it is open and lying flat ....
and the bottom stand part .....

It is quite ingenious, the stand part is attached on one side, and removeable from the other, when you want to change the calendar to the inside ones, just slip the removeable side out, flip the calendar over, and re-insert the stand.  Voila! 
Here is the Winter page ....

and closer up of the ribbon and heart embellishment ...

And this is Spring ......

And the bird closer up, notice the rhinestone for the eye .....

And now for summer (Barb showed me how to make this flower, I love it) ....

I used Champagne Mist Shimmer Spritz on the flower, you can just see it here .....

And last but not least Fall ....

Of course the use of the Owl Punch was mandatory, don't you just love these little cuties ....

I made these calendars while away in our trailer so I had limited supplies.  I forgot to bring the Snowflake Die with me for the Winter page, and had to make do with a Valentine's theme instead.
UPDATE:  If you would like instructions and downloadable calendars, please see THIS post from Mon. Mar 7, 2011
Thanks again, Barb, for sharing your awesome creation, I hope I have done it justice.
Happy Stampin' ...  ...  ...  ...  ...  ...   ...          

Tuesday, December 15, 2009

Kit Offer - 2010 Coaster Calendar

I have enough supplies left for another 8 kits for my 2010 Coaster Calendar - Go to the "Calendar" link in the left hand side bar for pictures and details - or click HERE. I am going to offer the Calendar Kits for $30.00 Canadian if anyone is interested. The kit will come complete with 12 4" coasters, printed sheet of all 12 months of 2010, all embellishments and papers cut and ready to assemble. I will include pictures of each month with details for completion. All you will need to do is provide your own stamps, adhesives, crystal effects, sponges, a corner rounder punch and either a Bind-It-All or split rings for putting it together. Shipping is included. I will include stamped images of the Rubber Boots from April for you as this set is no longer available.
If you are interested, email me (link on the top left of my sidebar) and we will make arrangements! Here is a picture of January 2010 page:
Thanks for looking in today. We had a snowfall last night, and it is still hanging around. I love snow!
* * * * * * Glenda Mollet * * * * * *

Monday, November 16, 2009

2010 Coaster Calendar - December

Here it is the twelfth and final installment of my 2010 Coaster Calendar. I hope you have enjoyed them and found at least a bit of inspiration in them. I have tried to incorporate a few techniques but not enough to make it too onerous to make.

This time I used:
Stamps: Four The Holidays
Ink: Real Red
Paper: Ski Slope DSP (retired)
Cardstock: Real Red, Whisper White, Baja Breeze
Other: Jumbo Snowflake punch, CB Embossing Folder, Dazzling Diamonds Glitter, Dimensionals

The Sentiment piece is popped up on Dimensionals, the calendar piece is on dimensionals on the right hand side only. I slipped the Jumbo Snowflake punchies under the corners of the sentiment and the calendar. Of course Dazzling Diamonds Glitter is applied almost everywhere. Its on the raised areas of the WW embossed piece, and around the sentiment and the calendar.

Well, that's it for this series. I used my Bind-It-All to put the entire calendar together. Please email me if you have any questions from any of the months, there is a link to my email address at the top of the left hand side of my blog. Its been great, now off to create some more................
............................. Glenda Mollet

Sunday, November 15, 2009

2010 Coaster Calendar - November

Almost to the end now. This is page number 11 - November. I wanted it to be simple but bring in the Remembrance Day theme. I did not have a Poppy stamp, so I used one of the flowers from Simple Friendship. The flower is stamped in Basic Black and Real Red using masks all around the calendar piece. I put real light pencil marks on the Whisper White cardstock where I was going to mount the calendar, this gave me lines to put the flowers around. The centers are inked in YoYo Yellow using the marker, then I added Diamond Stickles overtop of the centers.

Here's the picture:These are the supplies I used:
Stamps: Simple Friendship
Ink: Basic Black, Real Red
Cardstock: Real Red, Basic Black, Whisper White
Other: Diamond Stickles, YoYo Yellow marker, dimensionals

I popped the calendar up on dimensionals os it looks like the flowers are in behind it. This flower gets used a whole bunch in my cards. It makes fantastic images for inside the cards and on the envelopes. See ya tomorrow for post number twelve - December!!!
............................. Glenda Mollet

Saturday, November 14, 2009

2010 Coaster Calendar - October

Now the fall colours are being brought in. I used a stamp set that I just "had" to buy, Autumn Days. It is very versatile and has a lot of great images in it.
Here's the Ingredients:
Stamps: Autumn Days
Ink: Soft Suede, More Mustard, So Saffron, Pumpkin Pie
Paper: Autumn Traditions DSP
Cardstock: Soft Suede, More Mustard
Other: More Mustard 1/4" Grosgrain ribbon, Antique Brass Jumbo Eyelettes, Crop-A-Dile

I sponged the Pheasant in More Mustard then a tiny bit of Pumpkin Pie to brighten him up and add a bit of depth. The tops of the grasses and the Pheasant are all popped up on Dimensionals.

Thanks so much for taking the time to visit my blog. I'll be back tomorrow with November...........
Glenda Mollet ..........

Friday, November 13, 2009

2010 Coaster Calendar - September

For this page I wanted to try sponging some Bride Specialty DSP. That turned out great, and I used colours to match three Lillies from Fifth Avenue Floral I had hanging around which are done using Shimmery White cardstock, white embossing powder and the Water Colour and Reinker technique first introduced to me by Patty Bennett HERE. I hope my ladies don't mind making a few more of these flowers. I love this technique. The picture is taken at quite an angle, but I wanted to show you the shimmer of the Bride Specialty DSP and the Shimmery White cardstock used for the flowers. The first flower is flat on the cardstock, then the two in the front are popped up on the top using dimensionals, I adhered the bottoms of the flowers flat to the cardstock.

And now the supplies:
Stamps: Fifth Avenue Floral
Paper: Bride Specialty DSP
Cardstock: Whisper White and Shimmery White, Old Olive
Ink: Versa Mark, Apricot Appeal and Regal Rose
Other: Swirly die, sponges

I sponged the Bride Specialty DSP with Apricot Appeal and Regal Rose classic inks. The flowers were done in Pretty in Pink, Regal Rose, Cameo Coral and Summer Sun. Here is that wonderful Swirly die again, its so versatile and just finishes off some things really well. The calendar does not have any cardstock behind it, I just sponged the edges with Apricot Appeal and Regal Rose a bit. Then the calendar is popped up on Dimensionals over the flowers.

Thanks for looking, I'll be back tomorrow with October!

************ Glenda Mollet *************

Thursday, November 12, 2009

2010 Coaster Calendar - August

Cottage Wall DSP is one of my all time, most favourite papers. It just hits my comfort zone on the nose. I love the colours and the patterns. So of course it would make its way into my Coaster Calendar for 2010. Here is my August page where I use three different patterns from Cottage Wall DSP:

This page was a challenge for what embellishments to use on top of the DSP. I did not want them to cover too much of it, they had to coordinate, but not get lost in the paper. I think this turned out not too bad.

Here's the list of supplies:
Stamps: None
Ink: None
Paper: Cottage Wall DSP
Cardstock: Rich Razzleberry, Orchid Opulence, and Old Olive
Other: Big Shot, Little Leaves die, 5 Petal punch, White button from Button Latte buttons

Now the pages will start into the fallish colours and themes. Stay tuned tomorrow for September! TFLooking....... Glenda Mollet

Wednesday, November 11, 2009

2010 Coaster Calendar - July

This page was so fun to do. I had to wait until my Love Bug set arrived, but when it did the little bugs were so fun to use. I stamped and coloured them, then cut them out and popped them up on dimensionals. The background is Pretty Petals and I used Stampin' Write markers to colour it, then stamped it on Whisper White cardstock. A bit of Crushed Curry cardstock behind the calendar part and voila! Here's the picture:

And here is a list of the supplies I used:
Stamps: Love Bug, Pretty Petals backgrounder
Ink: StazOn Black
Markers: Bermuda Bay, Crushed Curry, Melon Mambo, Rich Razzleberry, Old Olive, Real Red
Cardstock: Bermuda Bay, Crushed Curry, Whisper White
Other: Dimensionals

Have a great day, and stay tuned for August tomorrow.......

........... Glenda Mollet

Tuesday, November 10, 2009

2010 Coaster Calendar - June

Back again with the sixth installment of my Coaster Calendar - June. This page is easy and quick to do (I don't want to have all of them difficult, don't want to overwhelm my Stampin' Ladies!). I knew I wanted to use Kaleidoscope DSP for this page but was stumped as to what stamps or embellishments I could use. Then it came to me RIBBON, only RIBBON and use some delicious colours that match the DSP. This is what I came up with:


Here's what I used:
Stamps: none at all
Ink: none at all
Paper: Kaleidoscope DSP
Cardstock: Regal Rose
Other: 5/8" Grosgrain Ribbon in Certainly Celery and Regal Rose, Summer Sun Corderoy button
Half way done the posts for this year's Coaster Calendar. I hope you are enjoying them, and are getting some ideas. Please feel free to be inspired by or copy my ideas to share with your customers, friends and family.
............ Glenda Mollet .............

Monday, November 9, 2009

2010 Coaster Calendar - May

The fifth month, May is my favourite month. It just may be the month of my birthday! But that's not the only reason, I love the leaves popping out on all the trees, the spring flowers, and the warmth returning to the days. A fabulous time of the year.
Here's what I used for May:
Stamps: Eastern Blooms
Ink: Summer Sun, Apricot Appeal, Perfect Plum
Paper: Groovy Guava DSP (retired)
Cardstock: Whisper White, Old Olive
Other: Big Shot and Swirly die

I was real hesitant to purchase this Swirly die for my Big Shot. But once I saw it in use, well I just could not resist. I love the cut out part and the negative part which I plan to use as waves, when I get a chance to create another card of course. But I have used the punched out pieces on lots and lots of projects.
Have a tremendous day!!!! I'll be back tomorrow with June...........

.......................... Glenda Mollet ......................

Sunday, November 8, 2009

2010 Coaster Calendar - April

I posted a tutorial on how to make these cute umbrellas HERE. This was another fun month to make. I went wild with the rubber boots and umbrellas, who doesn't need those supplies in April when "April showers bring May flowers"???? The boots have Crystal Effects on them, but you can't tell that from my picture. They are also popped up on Dimensionals.
Here's the recipe:
Stamps: Scene In A Garden (retired, what a bummer!)
Ink: StazOn Black
Paper: Pink Flamingo and Tea Party DSP
Cardstock: Whisper White, Pretty In Pink, Close to Cocoa
Other: Punched Umbrellas
I love how the Pink Flamingo DSP looks like it is raining flowers!!! So cool.
I hope your day is a wonderful one and you don't need to use your rubber boots! Unless you are running through mud puddles with children / grandchildren, of course. I LOVE running through puddles, isn't that what Gramma's are for, to introduce our Grandchildren to puddles, splashing and getting really wet. Then inside for a nice warm drink, some chocolate and a big cuddle to get warm............. hmmmmmmm. May have to call and book time with James today.
Thanks for taking the time to visit my blog. Tomorrow will be the May page.
~ ~ ~ ~ ~ ~ Glenda Mollet ~ ~ ~ ~ ~ ~

Saturday, November 7, 2009

2010 Coaster Calendar - March

Here is the third installment for my 2010 Coaster Calendar - March.

Supplies I used:
Stamps: Fresh Cuts
Ink: Handsome Hunter (and H Hunter stamped off once), Garden Green
Cardstock: Garden Green, Whisper White

When I stamped the main Fresh Cuts image, I inked it up in Garden Green, then I daubed some Handsome Hunter in places. This month was real quick and easy to do. Funny how sometimes the images are in my head and work out the first time, and other times the image will not work no matter how many times I try it!

Bye for now, talk to you tomorrow with April............... Glenda Mollet

LinkWithin

Related Posts with Thumbnails