Showing posts with label dragonfly garden. Show all posts

Monday, July 4, 2022

Scrappy Strip Technique With Dragonfly Garden!

Hi Friends!

Welcome to the International Blog Hightlights!  I hope you will vote for my card. The top 10 cards get to participate in a blog hop!

CLICK HERE to vote today.

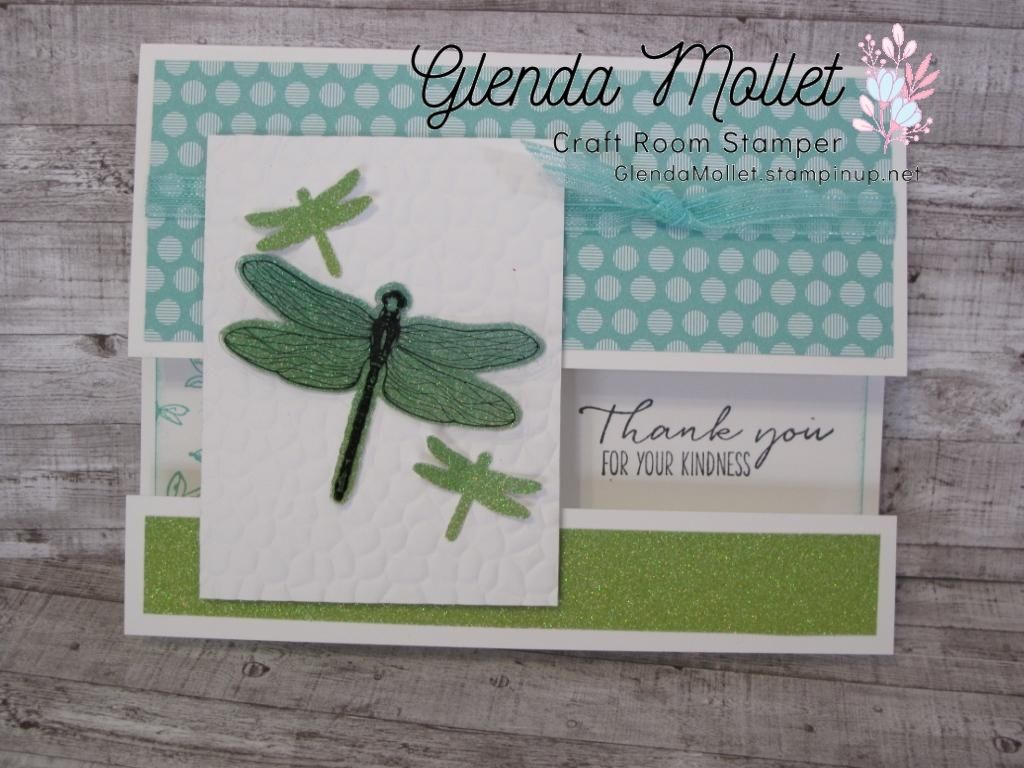
One viewer suggested using the left over cut offs from making custom envelopes out of 6x12 designer paper. What a great idea!  Those pieces are almost the right size!

Here's the card I originally created, the one in the video is pink and uses some now retired designer paper. But this technique can be done with ANY designer papers!


I shared all the measurements in the video below.


Please consider subscribing to my YouTube Channel so you don't miss any of my videos, tutorials and Live Stamping. Once you have subscribed, click on the bell icon to get notification when I add to my channel.

Stampin' Smiles!


Wednesday, June 29, 2022

Scrappy Technique Sneak Peek

 Hi Friends!

I will be live on my Facebook Page and in my VIP Group tomorrow, Thurs. June 30th, at 8:00 pm (PT) to share with you a great way to use up those small designer paper scraps.

My Friend Leanne did this one during a live presentation, and I just love it!

You can use any designer paper and stamp set/bundle/suite you want. 

I hope you can join me tomorrow night.

CLICK HERE to go to my Facebook Page

CLICK HERE to go to my VIP Group where you will find the Zoom Link to join me live.

Stampin' Smiles!


Thursday, May 6, 2021

Dragonfly Garden Meets Peony Garden Designer Paper

 Hi Friends!

I hope you were able to join me on Monday night in my VIP Group for some live stamping!


I used the Peony Garden designer paper one last time. I will sure miss this soft, elegant paper.  But there is a lot of gorgeous new papers in the Stampin' Up! 2021 Annual Catalogue.  CLICK HERE to download your copy! As you can see, I also created a custom envelope and finished off the inside as well.  Between the envelope (8x8) and the card front (5-1/8 x 3-7/8) and the inside (5-1/4 x 4) I used almost an entire 12x12 sheet of designer paper (DSP).

Here's the video for you ...

And the recipe:

Thick Basic White cardstock 8-1/2 x 5-1/2

Gray Granite 5-1/4 x 4

Peony Garden DSP 5-1/8 x 3-7/8

Basic White 2 x 3-1/2 (for the dragonfly) and 2 x 2-3/4 (for the die cut) and 5-1/4 x 4 for the inside

See how I cut the sentiment label without an extra piece!

Thank you so much for visiting my blog today, I hope you enjoy the rest of your day.

Stampin' Smiles!


Friday, January 22, 2021

Thursday Stamping Fun

 Hi Friends!

During my Thursday Stamping Fun in my Facebook VIP Group we created this beautiful card.

Join me every Thursday morning at 10 am (Pacific Time) to see what I am up to.

Here's a sneak peek of the first card I made. This one uses Misty Moonlight, but I used Blackberry Bliss instead and I will post the video on Monday for you.


Join me in my Facebook VIP Group for all the details how to make this shimmery Dragonfly card!

Stampin' Smiles


My Links:

Online Store -> Shop With Me Now

Facebook -> Catch All The Fun

Facebook VIP Group -> Join The Fun

YouTube -> Watch All The Fun

Pinterest -> See What I Have Been Up To

Blog -> Read About It All


Monday, November 30, 2020

Dragonfly Garden Glimmer Card

 Hi Friends!

I tried something different this week for my Monday Mystery Stamping.

I asked my facebook peeps to choose "This or That". I showed 2 pictures and they chose which one I would use for the Monday stamping.  I went with the option that got the most votes.

Here are the choices:

Brights Designer Paper was chosen.
 

Dragonfly Garden was the stamp set
 

Rainbow Glimmer Paper was the favourite.
 

We used ribbon on the project.
 

Yes to embossing, but no to the seabed folder 


We created a beautiful card using Coastal Cabana designer paper, the Dragonfly Garden bundle, Rainbow Glimmer paper, ribbon and an embossing folder.

I had no idea last night what we were going to do, but then it popped into my head.  A fun fold and a technique using acetate and glimmer paper.

We stamped the Dragonfly image onto a piece of window sheet (acetate) using StazOn ink and set it aside to dry before punching it out with the Dragonfly Punch. Then we punched a dragonfly out of rainbow glimmer paper and  layered them together.


 For the card, you use a standard card base, then cut off 2 inches from the bottom. Cut that strip into 2 1" pieces and use one of them for the bottom. It is connected to the top using an embossed piece of Thick Whisper White.

Wow, did it ever turn out great!  I enjoyed it so much I made a second one using the Melon Mambo designer paper.

I did a video of the process and I will share that tomorrow once it's finished uploading to my YouTube Channel. But you can head over there now and see all my other videos too! CLICK HERE and please subscribe to my channel while you are there. Thank you!

Enjoy your day, and I will talk to you tomorrow

Stampin' Smiles


My Links:

Facebook -> CLICK HERE

YouTube -> CLICK HERE

Pinterest -> CLICK HERE 

LinkWithin

Related Posts with Thumbnails