Here is the final installment of my series of 24 boxes from the Stampin' Up! Candy Countdown Calendar kit available on page 34 of the Holiday Mini catalogue (item 120926 - $24.50 Canadian price).
And now for box 24
For this final box I punched a 1" x 11" piece of real red cardstock with the Scallop Trim Edge punch. Then I spritzed it with Silver Foil Smooch Sprtiz, ran it through the crimper and added some silver glitter to the edge. Then I put a piece of the new Multi Purpose Adhesive Sheets on some real red cardstock and punched it out with the 1" circle punch. Using this I gathered the punched and decorated strip around in a circle. Then I attached the number piece on the top of this. I stamped the Greeting Card Kid in basic black on Shimmery White cardstock and coloured her with Stampin' Write Markers and put her on the box as well. A great ending to my box journey, and a great beginning for our Grandson, James, who will be opening these wonderful Advent boxes beginning the first of December.
Happy Stampin, now back to some card making. Glenda Mollet
Showing posts with label Candy Countdown Calendar. Show all posts
Thursday, November 11, 2010
Wednesday, November 10, 2010
Candy Countdown Calendar Kit - Day 23
Ta - da, almost done. This and one more box to go. As I said at the beginning my kit only contained 24 boxes. Stampin' Up! replaced the kit with a brand new one, but did not request the old one be sent back. So I am saving it for a Giveaway at my annual Customer Appreciation Get Together on November 30. If you are in the area, email me and drop by for some laughs, free card, food, and lots and lots of prizes.
Back to the box .....
I wrapped some Raven 1/2" Lace Trim (black) around the background layer before I put it on the box. Then I popped it up on dimensionals. Then I added a bow made from the Real Red Satin Ribbon to put it on top. Well, one more for you tomorrow, then this journey is over.
Bye for now, Happy Stampin' .... Glenda Mollet
Back to the box .....
I wrapped some Raven 1/2" Lace Trim (black) around the background layer before I put it on the box. Then I popped it up on dimensionals. Then I added a bow made from the Real Red Satin Ribbon to put it on top. Well, one more for you tomorrow, then this journey is over.
Bye for now, Happy Stampin' .... Glenda Mollet
Tuesday, November 9, 2010
Candy Countdown Calendar Kit - Day 22
Here we are again, welcome back! I have box #22 for you today.....
I used the biggest snowflake from the Northern Frost Decorative Stip in brushed silver cardstock. I cut out the number piece by hand just outside the green circle so that it fits inside the snowflake. Another bow made from the Whisper White Organza Ribbon finishes off this box.
Talk to you tomorrow .. .. .. Glenda Mollet
I used the biggest snowflake from the Northern Frost Decorative Stip in brushed silver cardstock. I cut out the number piece by hand just outside the green circle so that it fits inside the snowflake. Another bow made from the Whisper White Organza Ribbon finishes off this box.
Talk to you tomorrow .. .. .. Glenda Mollet
Monday, November 8, 2010
Candy Countdown Calendar Kit - Day 21
Almost there now, thanks so much for going on this journey with me. I have learned a lot about my creative side . . . . mostly that it is very fussy!!!
Here is box #21 .. ... .... .....
I ran some Brushed Silver cardstock through the Big Shot using the Northern Frost Decorative Strip to make these cute snowflakes. Then I added a Real Red Glimmer Brad to one. I stamped the holly stamp from Tags Till Christmas in Garden Green on Whisper White cardstock. Then I added some Christmas Red Stickles. I matted the number piece in real red cardstock and added the stickles around the outside as well. I layered 3 of the holly images onto the snowflakes and put them all on the box. So cute. Only 3 more to go. I'll be back tomorrow with box #22, hope you can make it. Glenda Mollet
Here is box #21 .. ... .... .....
I ran some Brushed Silver cardstock through the Big Shot using the Northern Frost Decorative Strip to make these cute snowflakes. Then I added a Real Red Glimmer Brad to one. I stamped the holly stamp from Tags Till Christmas in Garden Green on Whisper White cardstock. Then I added some Christmas Red Stickles. I matted the number piece in real red cardstock and added the stickles around the outside as well. I layered 3 of the holly images onto the snowflakes and put them all on the box. So cute. Only 3 more to go. I'll be back tomorrow with box #22, hope you can make it. Glenda Mollet
Sunday, November 7, 2010
Candy Countdown Calendar Kit - Day 20
Yeay, I hit the 20s with the boxes. Only 4 more left! Here's number 20 .. ... ...
I used a few more embellishments on this box. Starting at the top, I used some retired real red stitched grosgrain ribbon and made a bit of a differenty type of bow. Then I stamped the sentiment, punched it out with the Small Tag punch, and layered it with Real Red cardstock punched with the Large Tag punch. I cut a piece of real red cardstock to layer behind the number piece, and cut off the corners a bit. Then I added some Basic Rhinestones.
The boxes are getting fussier, I can feel it..... Glenda Mollet
I used a few more embellishments on this box. Starting at the top, I used some retired real red stitched grosgrain ribbon and made a bit of a differenty type of bow. Then I stamped the sentiment, punched it out with the Small Tag punch, and layered it with Real Red cardstock punched with the Large Tag punch. I cut a piece of real red cardstock to layer behind the number piece, and cut off the corners a bit. Then I added some Basic Rhinestones.
The boxes are getting fussier, I can feel it..... Glenda Mollet
Saturday, November 6, 2010
Candy Countdown Calendar Kit - Day 19
Today I have another box from the Stampin' Up! Candy Countdown Calendar Kit available in the Holiday Mini (link on the left sidebar of my blog).
I punched some Baja Breeze cardstock with the new Decorative Label punch (twice). Then used a 2 Way Glue stick and added lots and lots of Dazzling Diamonds Glitter. Then I added a bow made with Whisper White Organza Ribbon. These boxes are easy and quick to decorate. The hardest part was coming up with 24 completely different themes for them.
Hope your weekend is going awesome! ... .... .... Glenda Mollet
I punched some Baja Breeze cardstock with the new Decorative Label punch (twice). Then used a 2 Way Glue stick and added lots and lots of Dazzling Diamonds Glitter. Then I added a bow made with Whisper White Organza Ribbon. These boxes are easy and quick to decorate. The hardest part was coming up with 24 completely different themes for them.
Hope your weekend is going awesome! ... .... .... Glenda Mollet
Friday, November 5, 2010
Candy Countdown Calendar Kit - Day 18
Closer and closer now, almost done. Here is box #18 for you ......
Lots of bling on this one. I layered the background piece onto Baja Breeze cardstock then using Crystal Effects, I added some Champagne Glitter, for the number I matted it on Real Red cardstock which has some Red Glitter on it. I used dimensionals behind the number piece to pop it up a bit. Then I made a cute little bow out of Real Red Satin Ribbon. Ah, gotta love BLING!!!
Glenda Mollet
Lots of bling on this one. I layered the background piece onto Baja Breeze cardstock then using Crystal Effects, I added some Champagne Glitter, for the number I matted it on Real Red cardstock which has some Red Glitter on it. I used dimensionals behind the number piece to pop it up a bit. Then I made a cute little bow out of Real Red Satin Ribbon. Ah, gotta love BLING!!!
Glenda Mollet
Thursday, November 4, 2010
Candy Countdown Calendar Kit - Day 17
On the downhill slide now, almost done. I only have 7 more to do!!! Here is #17:
I stamped one of the stamps from the Bells and Boughs set from Stampin' Up! for this box. I used my Water Colour Wonder Crayons and an Aqua Pen to colour the image. Then layered the number piece onto Basic Black cardstock. I used some red stickles for the berries on the stamped image.
Tomorrow #18 .......... Glenda Mollet
I stamped one of the stamps from the Bells and Boughs set from Stampin' Up! for this box. I used my Water Colour Wonder Crayons and an Aqua Pen to colour the image. Then layered the number piece onto Basic Black cardstock. I used some red stickles for the berries on the stamped image.
Tomorrow #18 .......... Glenda Mollet
Wednesday, November 3, 2010
Candy Countdown Calendar Kit - Day 16
Getting towards the end of the boxes now. I can't wait until the end of November when I can deliver it to my son and his family to use as a real Advent Calendar. Ah all the neat things we can put in those little boxes!
This one uses a bunch of circle punches:
2-3/8" Scallop Circle Punch - Garden Green
2-1/2" Circle from Circles #2 Die - Basic Black
1-3/4" Circle Punch - Real Red
I also added more of the 1-1/4" Striped Grosgrain Ribbon in Real Red and some Gold Stickles. More bling, I love it!!! .......... Glenda Mollet
This one uses a bunch of circle punches:
2-3/8" Scallop Circle Punch - Garden Green
2-1/2" Circle from Circles #2 Die - Basic Black
1-3/4" Circle Punch - Real Red
I also added more of the 1-1/4" Striped Grosgrain Ribbon in Real Red and some Gold Stickles. More bling, I love it!!! .......... Glenda Mollet
Tuesday, November 2, 2010
Candy Countdown Calendar Kit - Day 15
Box #15 to share with you today. .. ... .... .....
For this one I got a bit creative. I cut 3 wide ovals from Garden Green, then used the 1" circle punch to punch out bites to make them look like Holly Leaves. Then I used 3 of the now retired Stampin' Up! Real Red Corderoy Buttons. Then I spritzed the entire thing with Gold Smooch Spritz, as well as the number piece. But you can't see the bling too well in this picture.
****************************************** Glenda Mollet
For this one I got a bit creative. I cut 3 wide ovals from Garden Green, then used the 1" circle punch to punch out bites to make them look like Holly Leaves. Then I used 3 of the now retired Stampin' Up! Real Red Corderoy Buttons. Then I spritzed the entire thing with Gold Smooch Spritz, as well as the number piece. But you can't see the bling too well in this picture.
****************************************** Glenda Mollet
Monday, November 1, 2010
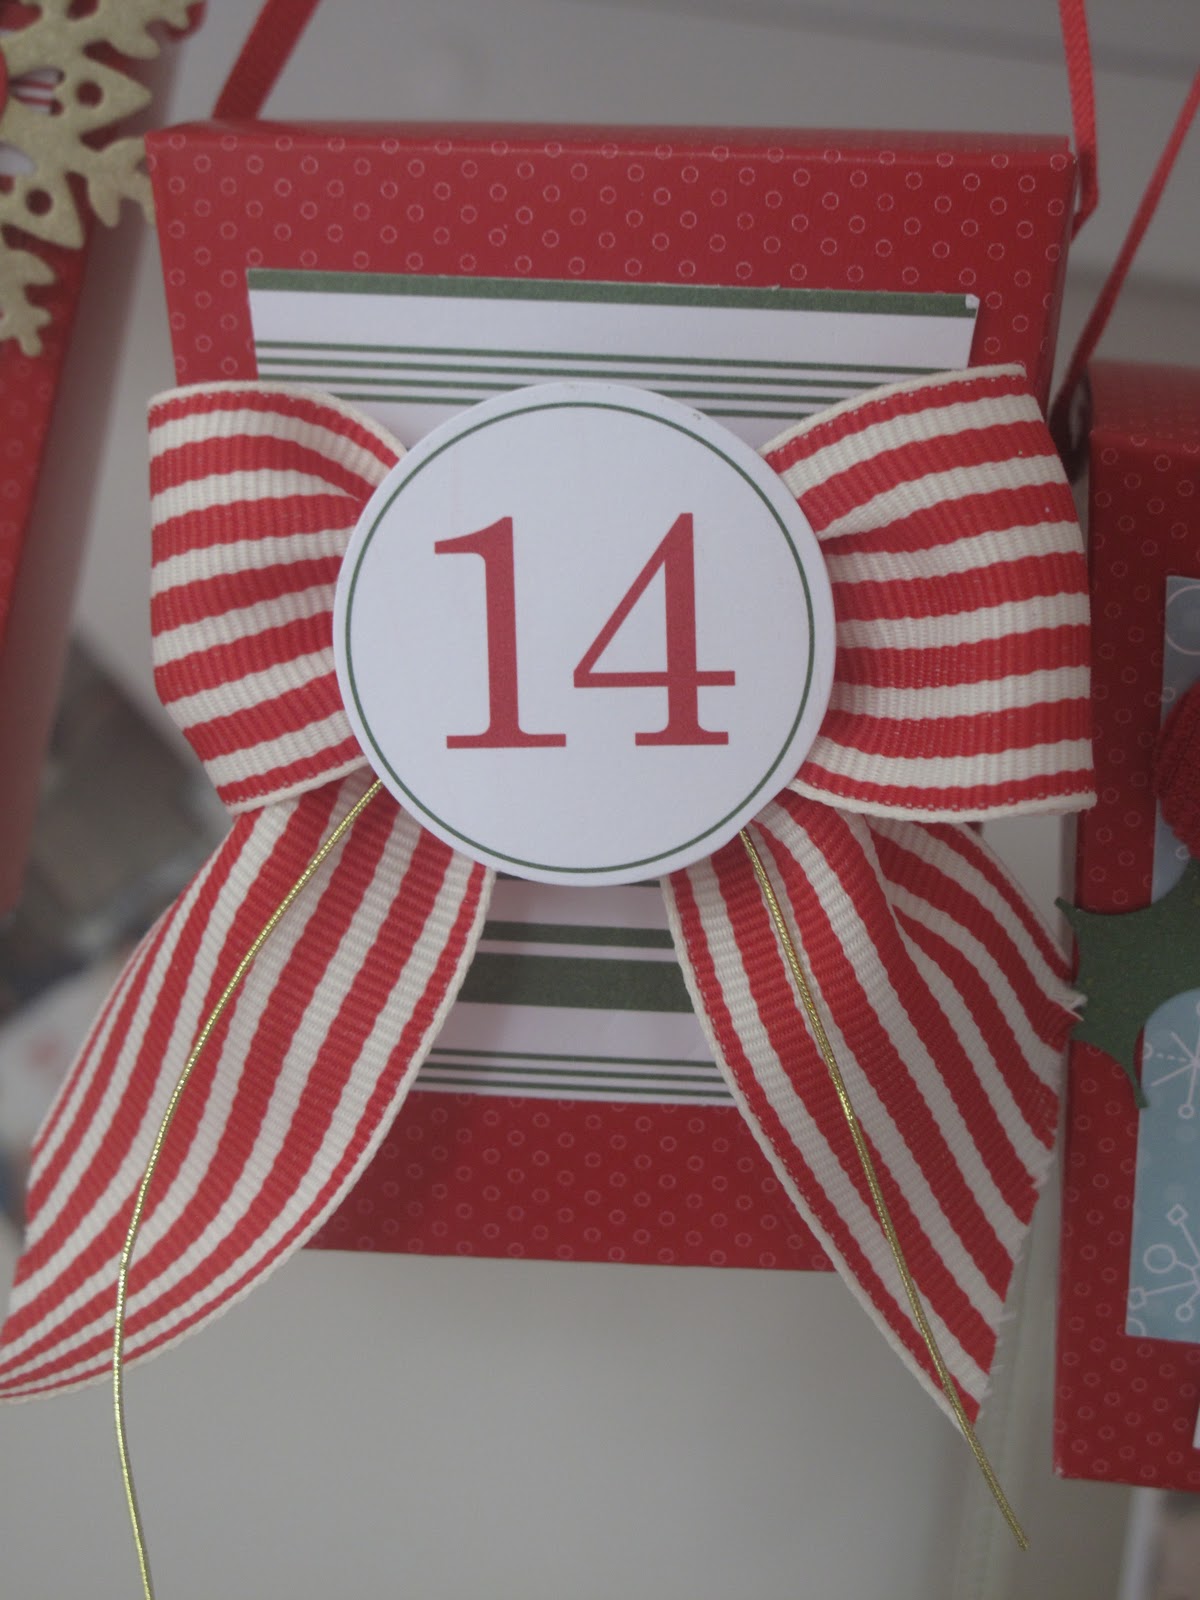
Candy Countdown Calendar Kit - Day 14
Are you tired of seeing boxes yet? I sure enjoyed embellishing these wonderful boxes. Here is #14 ....
Some more of the wonderful Stampin' Up! 1-1/4" Striped Grosgrain Ribbon this time in Real Red, and I added some Gold Cord in the bow as well. Then I popped the number layer up on top of the bow. This ribbon runs completely around the box.
Ta ta, off to do some stampin'. .. .. .... ... Glenda Mollet
Some more of the wonderful Stampin' Up! 1-1/4" Striped Grosgrain Ribbon this time in Real Red, and I added some Gold Cord in the bow as well. Then I popped the number layer up on top of the bow. This ribbon runs completely around the box.
Ta ta, off to do some stampin'. .. .. .... ... Glenda Mollet
Sunday, October 31, 2010
Candy Countdown Calendar Kit - Day 13
Over the hump and on the downward slide now. I have over half of the boxes done. I have really enjoyed making these little gems, and I know the rest of them will go smoothly. But they will be more embellished, I just feel it! Here is box #13 ........
I used a lot of gold on this one. The snowflakes are in Brushed Gold cardstock and I used the new Northern Frost Decorative Strip Die available in the Stampin' Up! Holiday Mini Catalogue (page 38) and ran it through my Big Shot with the Brushed Gold cardstock. I put a circle of Real Red cardstock in the middle of two of them then added some Glimmer Brads. And then, to add even more bling, I spritzed the number piece with Gold Smooch Spritz. Heehee, did I mention I LOVE bling!
Happy Hallowe'en to all the Ghouls and Ghosts out there.
Back tomorrow with box #14. . . . . . . . Glenda Mollet
I used a lot of gold on this one. The snowflakes are in Brushed Gold cardstock and I used the new Northern Frost Decorative Strip Die available in the Stampin' Up! Holiday Mini Catalogue (page 38) and ran it through my Big Shot with the Brushed Gold cardstock. I put a circle of Real Red cardstock in the middle of two of them then added some Glimmer Brads. And then, to add even more bling, I spritzed the number piece with Gold Smooch Spritz. Heehee, did I mention I LOVE bling!
Happy Hallowe'en to all the Ghouls and Ghosts out there.
Back tomorrow with box #14. . . . . . . . Glenda Mollet
Saturday, October 30, 2010
Candy Countdown Calendar Kit - Day 12
Ha! Another day another box. This one is #12, and I am half way done.
A little bit of Old Olive 1-1/4" Striped Grosgrain Ribbon is all I added to this box. It just did not seem to need anything else.
Whew! I will be back tomorrow with box #13! Glenda Mollet
A little bit of Old Olive 1-1/4" Striped Grosgrain Ribbon is all I added to this box. It just did not seem to need anything else.
Whew! I will be back tomorrow with box #13! Glenda Mollet
Friday, October 29, 2010
Candy Countdown Calendar Kit - Day 11
Getting tired of seeing boxes yet? I sure was having fun making these cute little things. As I progressed, the boxes got more and more embellished and cuter! Here is #11 .............
I added some of the new Silver Glass Glitter by Stampin' Up! and put Dazzling Diamonds Glitter on the background piece. This one is very sparkley!!
Bye for now .......... Glenda Mollet
I added some of the new Silver Glass Glitter by Stampin' Up! and put Dazzling Diamonds Glitter on the background piece. This one is very sparkley!!
Bye for now .......... Glenda Mollet
Thursday, October 28, 2010
Candy Countdown Calendar Kit - Day 10
Here's the next box for you ...............
I stamped the holly from Christmas Classics stamp set using my Stampin' Write Markers (Garden Green and Real Red). Then I added some red stickles where the berries are, and along the bottom of the number piece. I also used the stickles on the background paper. So cute!!
~~~~~ Glenda Mollet
I stamped the holly from Christmas Classics stamp set using my Stampin' Write Markers (Garden Green and Real Red). Then I added some red stickles where the berries are, and along the bottom of the number piece. I also used the stickles on the background paper. So cute!!
~~~~~ Glenda Mollet
Wednesday, October 27, 2010
Candy Countdown Calendar Kit - Day 9
Here's number 9 of my Candy Countdown Calendar share .....
I put a piece of Real Red cardstock (1-3/4" circle punch) behind the number then added Dazzling Diamonds Glitter. Whisper White Satin Ribbon is wrapped around the box, then I made a bow out of the Real Red Satin Ribbon.
Visit tomorrow for box #10 .............. Glenda Mollet
I put a piece of Real Red cardstock (1-3/4" circle punch) behind the number then added Dazzling Diamonds Glitter. Whisper White Satin Ribbon is wrapped around the box, then I made a bow out of the Real Red Satin Ribbon.
Visit tomorrow for box #10 .............. Glenda Mollet
Tuesday, October 26, 2010
Candy Countdown Calendar Kit - Day 8
Another Candy Countdown Calendar kit box. These are from Stampin' Up! and are available in the Holiday Mini Catalogue .......
Some basic black and garden green cardstock and silver stickles finish off this box. I created a 3D flower medallion behind the number piece to raise it up off the box a bit.
Thanks for visiting. ...... Glenda Mollet
Some basic black and garden green cardstock and silver stickles finish off this box. I created a 3D flower medallion behind the number piece to raise it up off the box a bit.
Thanks for visiting. ...... Glenda Mollet
Monday, October 25, 2010
Candy Countdown Calendar Kit - Day 7
Some Snowflakes punched with the Stampin' Up! Snowflake Punch were added on this box. I actually punched them out of Shimmery White Cardstock .. ... ...
Real Red is punched with the 2-3/8" Scallop Punch, then Basic Black with the 2-1/2" Circle Punch. I punched out 5 snowflakes, and added a Glimmer Brad to the center of one and put that one on top of the number piece. All remaining ones are between the supplied background paper and the real red scallop layer.
Back again tomorrow, bye for now. ............... Glenda Mollet
Real Red is punched with the 2-3/8" Scallop Punch, then Basic Black with the 2-1/2" Circle Punch. I punched out 5 snowflakes, and added a Glimmer Brad to the center of one and put that one on top of the number piece. All remaining ones are between the supplied background paper and the real red scallop layer.
Back again tomorrow, bye for now. ............... Glenda Mollet
Sunday, October 24, 2010
Candy Countdown Calendar Kit - Day 6
Here is the sixth box for my Stampin' Up! Candy Countdown Calendar Kit ...............
I used a few more embellishments on this one! First I punched Garden Green cardstock with the new 2-3/8" Scallop Circle Punch, then Basic Black with the 2-1/2" Circle Punch, then Real Red with the Ornament Punch. I added some red stickles on the scallops to add a bit of bling.
Still having fun creating, 6 down 18 more to go.......... Glenda Mollet
I used a few more embellishments on this one! First I punched Garden Green cardstock with the new 2-3/8" Scallop Circle Punch, then Basic Black with the 2-1/2" Circle Punch, then Real Red with the Ornament Punch. I added some red stickles on the scallops to add a bit of bling.
Still having fun creating, 6 down 18 more to go.......... Glenda Mollet
Saturday, October 23, 2010
Candy Countdown Calendar Kit - Day 5
Box #5 for my Stampin' Up! Candy Countdown Calendar for Christmas - or Advent Calendar ......
I used some Stampin' Up! Brushed Gold cardstock on this project. I punched it with the new Dotted Scallop Ribbon Border punch. I punched 4 sections and framed the included designer paper piece before I put it on the box. Then I added some Gold Cord behind the number piece to add more bling.
Back tomorrow with Box #6 ~ ~ ~ ~ Glenda Mollet
I used some Stampin' Up! Brushed Gold cardstock on this project. I punched it with the new Dotted Scallop Ribbon Border punch. I punched 4 sections and framed the included designer paper piece before I put it on the box. Then I added some Gold Cord behind the number piece to add more bling.
Back tomorrow with Box #6 ~ ~ ~ ~ Glenda Mollet
Subscribe to:
Posts (Atom)