Friday, January 29, 2016

Our Tiny House Then and Now Project Life Scrapbook - #2

Hello everyone!  I am back today with the second installment of my Project Life By Stampin' Up! scrapbook of the purchase and renovation of our Tiny House (aka cabin).
Here are some pictures from 2014 ....


The Mollet flotilla of boats, and the poor cabin before the new deck was begun.


We had to do the deck in stops and starts all during the summer.  We could only work on the parts that were in the shade, and only in the mornings.  Then it was swim time.


Having a float cabin has its advantages, and definitely disadvantages when you have scrap to get rid of.  We can't just take it ashore and leave it because we only own up to the high water mark.  So we had to take the old deck boards home.  But that's ok, it makes great firewood for camping.


The cabins are lifted up off the deck on 4x4 posts, and they all needed to be replaced as well.  I was the official "taker out of the nails person".


The front and side looking real good.

The old fridge (original to the cabin) was not working well.  Each month Ted had to clean out the jets for the cooling system (propane) and encourage it to work again.  Then we installed a new stove!  Not that I cook all that much up at the Tiny House either.  LOL

My hubby, Ted, is truly amazing.  He can do anything I dream up.  I laughingly tell him I didn't marry him for his money, I married him for his fixabilities!!!  Usually I break things and he fixes them.  But now with our Tiny House, we spend all winter dreaming up renovations and things to build, then we make them a reality in the summer months.  Yes I help him with most of the projects and I am getting pretty handy with hammers and saws. Ok, I am getting really good at swimming and suntanning too!  heeheehee
We can only work part of each day as it usually hits 40 deg C by 11 a.m.  Then we spend the afternoon lazing around, puttering and swimming.  Then do a bit more "work" in the evening.  I can't tell you how much I enjoy this piece of heaven and I can't wait until we have it safe enough, for the grand children to come up.  They are still a bit young, but the time will come!

Have a crafty day!  Glenda Mollet

Thursday, January 28, 2016

Customer Appreciation Dinner - Spinach and Strawberry Salad Recipe

Last night I held my Annual Customer Appreciation Evening and Dinner for all my wonderful customers.  Everyone is invited and we have so much fun!

I provide Bacon Wrapped Date appies, Lasagna, Spinach and Strawberry Salad, Baking Powder Biscuits, and desert squares.  In the past I bought the lasagna and deserts, and made everything else.  Because of allergies, my hubby was unable to eat any left over lasagna,  So this year, I made the lasagna as well!  A lot of work, but my fabulous customers are so worth it.

The recipe for the Bacon Wrapped Date appies is HERE IN THIS POST.  If you scroll down my blog, on the left side is a list of tags, then find the Recipes one, and it is there, and I will be pinning this one there as well as I have been asked for the salad dressing recipe.  I did still purchase the desert squares because I really don't like to cook, and attempting to bake along with everything else, was overwhelming to me.  Oh well, maybe some day!!!

Here is a picture of the lasagna before it was cooked, and our grandson helping me by rolling all 4 lbs of bacon worth appies (you cut each bacon piece in half, so you can imagine how many we made, the container to the back of the picture was full!) ...


Here's the recipe for the salad .....

Spinach
Strawberries - sliced
Pecans - can toast if you like
You can also use feta or goat cheese if you like
Dressing:
3 tbsp strawberry jam warmed
3 tbsp olive oil
2 tbsp balsamic vinegar
Using a whisk, stir the dressing until it blends together well.  The jam being warm really helps in this.

Hope you enjoy it, it is one of my favourite salads.  I don't like eating raw spinach, but its great in this salad.

Have a crafty day!  Glenda Mollet

Wednesday, January 27, 2016

Our Tiny House Then and Now Project Life Scrapbook - #1

You asked for it, and here it is.  I finally took pictures of the pages of my Project Life scrapbook of our cabin (aka Tiny House).  We owned this cabin way, way back and sold it in 1992 when we moved away.  We re-purchased it in 2013 when the owners decided to sell it.  
It was like walking back in time.  There had been virtually no work done to it since we left in 1992.  The walls, floors and ceilings were the same paint job we did in 1990.  Guess that was good paint we used.  I opened the cupboards (which were the same) and looked at the dishes, pots, pans, cutlery, etc.  It was all the stuff we left there.  I had been missing a casserole that was a little special to me as my Mother-In-Law and I had gone to a pottery shop where she lives and purchased it.  She is still alive (just celebrated her 96th birthday) but the pottery shop is gone.  Well, there it was in the cabin cupboard!
The sleeping mats our boys had when they were in Cub Scouts were there with their names still on them.  It was truly an amazing experience.  On top of that, it was every bit as tranquil and relaxing as we remembered it being.
I still have some pictures from "then" to put in it, and some "now" from the end of last season as well.  But here are the 2013 pages and one page of "then" first  .....


This is the "then" page with pictures from 1992.  That was our son who is now ahem "older"  LOL


Some flashback pictures of the unchanged inside


More flashback pictures


And the renovations begin.  First, a new ceiling .....


Always time for sunshine and swimming.  Lots of heat on the front deck as well.


Then we started on the wall refinishing.  Also pictures of our dinner spot.


Our son, Phil, came up to help with new anchoring lines and new flotation underneath.  Yes this is the same son who is in the "then" picture with our puppy Popi on his lap.


The sunsets are spectacular.


Project Life by Stampin' Up! is an amazing scrapbooking system.  It comes complete with inserts, embellishments, and overlays to pop into the sectioned pages.  All you do is slip your photos in the pockets, then fill the remaining pockets with inserts, journalling pages, and embellishments.  Voila!  There you go.  No electricity required - we have no electricity, internet, or cell service at our Tiny House.  I print the pictures at home and do the filling and journalling there.

Well, that's it for today.  I will be back again on Friday with pictures from 2014.
Have a crafty day!  Glenda Mollet

Tuesday, January 26, 2016

Stampin' Up! Weekly Deals - Jan 26 to Feb 1, 2016

It's Tuesday, so that means new Weekly Deals from Stampin' Up!

Here is the picture of the deals available this week at a 25% discount (click on the picture to go directly to my online store for more information, or to place an order).

http://www.stampinup.com/ECWeb/ItemList.aspx?categoryid=110100&dbwsdemoid=2028928

I would be happy to place an order for you any time (if you don't already have a demonstrator) in Canada!  EMAIL ME and we can do that for you.

Have a crafty day!  Glenda Mollet

Monday, January 25, 2016

Botanical Garden Bundle card for Sunshine Club Ladies

Last Wednesday morning at the local over 50 club Stamp Crafts, we did a great card using the Botanical Garden Bundle.  


I just love this bundle, and the co-ordinating designer paper is truly amazing.  There are sheets where all the decorating is done, and you just have to cut it and use it.  But then there is this design where the artist has left parts of it un-decorated so you can use your imagination.  The leaf centers and some of the flower centers are added using the Botanical Blooms stamp set and the colours of your choice.  Here is what the paper looks like ....


I cased this card off of Pinterest from Claire Daly, then I embossed the Cajun Craze flower with the Elegant Dots embossing folder.  There are lots and lots of cards around made from this wonderful bundle, and I have not seen one yet that I did not like.

Have a crafty day!  Stampin' Smiles  Glenda Mollet


Friday, January 22, 2016

Project Life by Stampin' Up! and our Tiny House

Hello Everyone!
Not all papercrafters are scrapbookers, and I know that from personal experience.  But sometimes it's nice to put pictures onto pages and memorialize them.
I have not scrapbooked a lot in my papercrafting career, but there are some things I felt I needed to capture in a special way.
Recently I created a scrapbook of the ongoing renovation of our "Tiny House" (aka our cabin) on Powell Lake in Powell River, BC.  This is a float cabin with water access only and it is our tiny bit of heaven.  There is no cell / internet service unless we hook up and start our cell booster, there are no phones, and you can only arrive there by boat or plane.  We purchased our "Cabin" back in 1990 when we lived in Powell River, and our children were young.  Then layoffs affected my husband's work and we moved way, way up to northern British Columbia and we had to sell to friends of ours.
Speed jump ahead to 2013. We were once again living on the southern coast of BC on Vancouver Island and we received a call from the people who purchased the cabin and they had decided to sell it.  We had kept in touch over the years and told them if they ever decided to sell, we would like first refusal.  Hmmmm who in their right mind would refuse this golden opportunity, NOT US!  We jumped at the offer and bought back our cabin.  After 23 years it was a little "tired" so we had some renovations to do. 


It's the ugliest cabin on the lake, it's made from 2 very old office trailers.  But with scenery like this, it is heaven.


The first summer we spent doing inside ceilings and walls and installing a new stove.  
The second summer we redecked the outside.  That was a HUGE job and took us all summer.
The minute we bought the cabin I began to take pictures of everything.  It was like walking back in time when we first entered it.  I had been missing a casserole and could not find it anywhere.  Lo and behold, there i was!  Along with pots, pans, dishes, linens, bedding mats, etc.
Then I began my Project Life Album.  There is also no electricity at our "Tiny House" (which is what we now call it LOL) so everything had to be done during the day, and I did all of it, except for printing the pictures) at the cabin.  

Enough babbling on, my point today is, that you can scrapbook anytime, any where with the  Project Life by Stampin' Up! system.  Here is a video by Stampin! Up! on how this system works. 


Our Tiny House does not look quite so tired any more, but we sure were after all those renos.  It is wonderful to be able to look back and see the changes.  It makes all the work worthwhile.  I also added some pictures from way back in the 90's when we first owned it.  Maybe I will share them, along with the scrapbook pages in blog posts every once in a while.

Have a crafty day!  Glenda Mollet

Wednesday, January 20, 2016

Stampin' Up! Botanical Gardens Suite and Color Me Irresistable Paper

Hello Everyone!
This is the second card we did during this month's Monthly Stamper Club.  I uses the most awesome suite in the new Stampin' Up! Occasions Catalogue called Botanical Gardens.


You can order the Botanical Garden Bundle consisting of the Botanical Blooms stamp set (Photopolymer), the Botanical Builder Framelits Dies, and Botanical Gardens Designer Series Paper at a 15% discount from purchasing them separately!  Isn't that a great price?  Only $64.25 Canadian, and you qualify for one FREE Sale-A-Bration Item too!  This card uses the Hello stamp set from the Sale-A-Bration brochure .
There are lots and lots of amazing cards made using this suite of products all over the internet. I have been sharing a few of the ones I made recently.
Here are the supplies I used to create this card:
Stamps:  Hello
Ink:  Soft Sky, Memento Tuxedo Black, Melon Mambo
Paper:  Whisper White, Soft Sky, Pear Pizazz, So Saffron, Rich Razzleberry, Blushing Bride, Color Me Irresistable designer paper
Other:  Dauber, Sponge, Circle Die #6 (counted from the center out), Botanical Builder Dies, Rhinestone Embellishments, Wink of Stella Brush - Clear

To do the background piece of Color Me Irresistable paper, you sponge it lightly with Soft Sky ink.  I didn't do this completely, I did it so there was various "levels" of colour. Because the dots are embossed, the ink does not stick on them and they remain white.  This is called Emboss Resist Technique, and I love how Stampin' Up! has done the hard work for you on this paper.  I used the Wink Of Stella Clear brush to put sparkly glitz to the Rich Razzleberry center on the big Blushing Bride flower. 

I cased this card from Nicole Tugrel on Pinterest.

EMAIL ME if you have any questions, or would like to place an order.
Have a crafty day!  Glenda Mollet

Tuesday, January 19, 2016

Stampin' Up! Weekly Deals - Tues Jan 19 to Mon Jana 25, 2016

Hello Everyone!

Here are this week's Weekly Deals, click on the picture to go to my online store for more information or to place an order (Canadian)

http://www.stampinup.com/ECWeb/ItemList.aspx?categoryid=110100&dbwsdemoid=2028928

Thanks for visiting today!  I will be back tomorrow with another great card share for you.

Have a crafty day!  Glenda Mollet

Monday, January 18, 2016

Stampin' Up! Butterfly Card Share

Hello Everyone!
Each month our Monthly Stamper's Club get together for some socializing and card making.  We usually do 2 projects and they are mostly cards.  Sometimes I throw a kink into things and do a 3D item, but this month it was cards.
Here is the first one ......


This card is cased from Becky Roberts at Inking Idaho.  The simplicity and elegance of this card is stunning.  Of course, anything with butterflies on it is wonderful!

Here are the products we used:
Stamps:  Perpetual Birthday Calendar set, Cottage Greetings set
Ink:  Sahara Sand, Memento Tuxedo Black
Paper:  Sahara Sand, Gold Foil, Blushing Bride, Sahara Sand Patterns Designer Paper
Other:  White Tea Doililes, White Perfect Accents, Butterfly Dies, Bold Butterfly Dies, 2-1/2" Circle Punch, Curvy Corner Trio Punch

Have a Crafty Day!  Glenda Mollet

Friday, January 15, 2016

Stampin' Up! Bloomin' Hearts Die Valentine's Day Card

Hello Everyone!  Today's share is a card we made in my recent get together with the Sunshine Club in our town.  This is a club of over 50 people who gather to do fun things.
About 7 years ago I was invited to the Stamp Craft group to do a card with them.  I started out once a month, then went to twice a month while I was still "working" at my job.  All this time later they are still inviting me back, and I go every Wednesday morning now!
We have grown significantly in numbers as well.  We started out with 6 dedicated ladies who have been making cards for a long time.  Now we have 18 members and still growing.  I have such a great time with them, they are truly an inspiration and all of them have become friends.
This is the card we made last Wed. morning ....


It uses the new Stampin' Up! Bloomin' Hearts dies and Blushing Bride Glimmer Paper.When cutting this die using glimmer paper, you have to cut from the back side (the white side) because of the thickness of the paper and the delicacy of the die.  Some people I know pull the back cardstock layer off of the glimmer paper, so that would work as well.  I just find that too much bother, I just want to get on with it!!!
Other products in this card include:  
Stamps:  Bloomin' Love
Cardstock:  Whisper White and Real Red
Ink:  Real Red and Blushing Bride (on the inside)
Other:  Large Number dies, Sizzix Brush & Pad set, Happy Heart embossing folder, pearl embellishments and Wink Of Stella - Clear brush

Now I have to come up with a Valentine card for our 3 grand children.  I have so much fun creating cards for them for all sorts of reasons.

Have a crafty day!  Glenda Mollet

Wednesday, January 13, 2016

January Botanical Gardens Bundle Stamp-A-Stack Class card #3

Hi!  The third, and final card, from my January Botanical Gardens Bundle Stamp-A-Stack Class is below ....


This is one of Amy Koenders fabulous cards.  I love the CAS (clean and simple) way Amy creates her cards.  This was another hit at the class.  I did use the Wink Of Stella Clear Glitter Brush on the flower centers, then during the class I added more around the flowers.  Hee hee I can see my going through a LOT of these brushes ....

http://www.stampinup.com/ECWeb/ProductDetails.aspx?productID=141897&dbwsdemoid=2028928
Here's the information on the Botanical Gardens Bundle (click on the pictures to go to my online store to see all the great products in this suite)  ....

This bundle can be found on pages 26-27 of the Occasions 2016 catalogue and includes:
     Botanical Blooms photopolymer stamp set,  Item #140757  $21.00
     Botanical Builder Framelits Dies, Item #140625  $41.00
     and the Botanical Gardens Designer Series Paper, Item #140583  $13.75

http://www.stampinup.com/ECWeb/searchresults.aspx&dbwsdemoid=2028928

http://www.stampinup.com/ECWeb/searchresults.aspx&dbwsdemoid=2028928


When you order it in a bundle you save 15% and it is only $64.25 (Item #140819) which qualifies you for one FREE item from the Stampin' Up! 2016 Sale-A-Bration brochure.  For this class I chose Perfect Pairings in clear mount (Item #141261)  it is also available on wood blocks (Item $141258).  This set was used on this card, it has lots of different sentiments and you can choose which one suits what you are looking for ....


That's it for today.  EMAIL ME if you have any questions, would like to receive copies of the current Stampin' Up! catalogues, or would like to order amazing products. 

Have a crafty day!
Glenda Mollet

Tuesday, January 12, 2016

Stampin' Up! Weekly Deals - Jan 12 to 18, 2016

Today is Tuesday, that means that Stampin' Up! releases their Weekly Deals for the next 7 days.
You can save 25% on these great products from now until Mon Jan 18th.

http://www.stampinup.com/ECWeb/ItemList.aspx?categoryid=110100&dbwsdemoid=2028928

Click on the picture above to go directly to my online store for more information, or to place your order.  I would be happy to place your order for you, just EMAIL ME

I was browsing Pinterest yesterday looking for a card to create.  Yesterday was a not so good day for me and I wanted to create a card that was time consuming, not difficult, that I didn't have to think too hard to make, and I could case.  I found this one created by Karen Muller somewhere in Europe (her blog is a different language that I could not read, but cards are universal after all)    ...


I used Whisper White and Silver Foil papers and added one of the Botanical Garden Jewels.  This card was very therapeutic and I was so glad I made it.

Have a crafty day!
Glenda Mollet

Monday, January 11, 2016

January Botanical Gardens Bundle Stamp-A-Stack Class card #2

Hi!  I am back with you today to share the second card in my January Botanical Gardens Bundle Stamp-A-Stack class .....


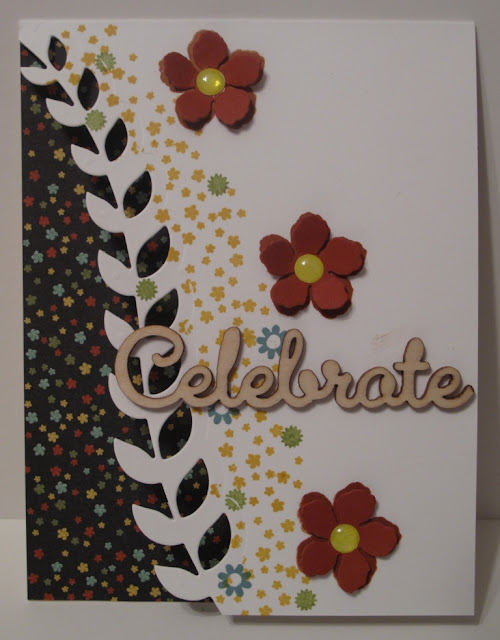
I cased this from Miranda Mols on Pinterest.  I used the Thick Whisper White cardstock for the card base.  The designer series paper i on the inside of the card, and you use the long leaf die from the Botanical Builder Framelits Dies to cut off the front of the card base so you can see through to the inside.  I used the Wink of Stella Clear Glitter Brush on the flowers and the Expressions Natural Elements "Celebrate".


There is nothing like Bling to finish off a card.  My "ladies" at the class loved this card for its clean simplicity.  Due to the new Botanical Gardens Bundle from Stampin' Up! of course!!!

Here's the information on the bundle:


This bundle can be found on pages 26-27 of the Occasions 2016 catalogue and includes:
     Botanical Blooms photopolymer stamp set,  Item #140757  $21.00
     Botanical Builder Framelits Dies, Item #140625  $41.00
     and the Botanical Gardens Designer Series Paper, Item #140583  $13.75

When you order it in a bundle you save 15% and it is only $64.25 (Item #140819) which qualifies you for one FREE item from the Stampin' Up! 2016 Sale-A-Bration brochure. You can choose from any of the 11 super exclusive products in the brochure.

I used the Expressions Natural  Elements for on this card.  You get 15 pieces, 5 of each of the three in the picture below, for only $6.25 (plus shipping and tax).  You can find them on page 160 of the Stampin' Up! Annual Catalogue  Item #138395.  Click on the picture below to go to my online store to view them.  If you don't have an Annual Catalogue, I would love to send you one.  EMAIL ME if you don't already have a Stampin' Up! Demonstrator.

http://www.stampinup.com/ECWeb/ProductDetails.aspx?productID=138395&dbwsdemoid=2028928


If you would like to order this bundle, or anything else from the Occasions 2016 catalogue, and don't already have a demonstrator, please contact me and I would be pleased to place the order for you.  Or you can order direct from my ONLINE STORE (Canadian shoppers only please).  Make sure you allow me to know who you are, and I will send you one of my hand made cards as a Thank You!

If you would like to join me for a class, EMAIL ME and we will get together.

Have a crafty day!
Glenda Mollet

Friday, January 8, 2016

January Botanical Gardens Bundle Stamp-A-Stack Class card #1

Each month I present a class I call a Stamp-a-Stack where we make 3 different cards using the same stamp set, or bundle, or other product.  This month the class showcased the awesome new Botanical Gardens Bundle from the Stampin' Up! 2016 Occasions Catalogue. 

Here's the first card (I will share the other 2 cards, one on Monday and one next Wednesday.

I cased this card from Pinterest somewhere and forgot to write down who the original artist was.  So I went in today to search for it, and I can't find it.  If this card is yours, or you know who originated it, please let me know so I can give proper credit.  I used the Wink of Stella Clear Glitter Brush on the flower.  Oh these brush pens are amazing!!  I think it is probably my favourite item in the new catalogue!

Here's the info on the Botanical Gardens Bundle:


This bundle can be found on pages 26-27 of the Occasions 2016 catalogue and includes:
     Botanical Blooms photopolymer stamp set,  Item #140757  $21.00
     Botanical Builder Framelits Dies, Item #140625  $41.00
     and the Botanical Gardens Designer Series Paper, Item #140583  $13.75

When you order it in a bundle you save 15% and it is only $64.25 (Item #140819) which qualifies you for one FREE item from the Stampin' Up! 2016 Sale-A-Bration brochure.  For this class I chose Perfect Pairings in clear mount (Item #141261)  it is also available on wood blocks (Item $141258).


If you would like to order this bundle, and don't already have a demonstrator, please contact me and I would be pleased to place the order for you.  Or you can order direct from my ONLINE STORE (Canadian shoppers only please).  Make sure you allow me to know who you are, and I will send you one of my hand made cards as a Thank You!

Have a crafty day!
Glenda Mollet

Wednesday, January 6, 2016

New Catalogue Tea Party - Occasions Catalogue and Sale-A-Bration Brochure Edition 2016

Yesterday I promised to be back today with pictures from my New Catalogue Tea Party from Monday.

I had LOTS and LOTS of samples displayed along with the products they were made from.  Some of these cards I cased from other sources - in the catalogue and online.

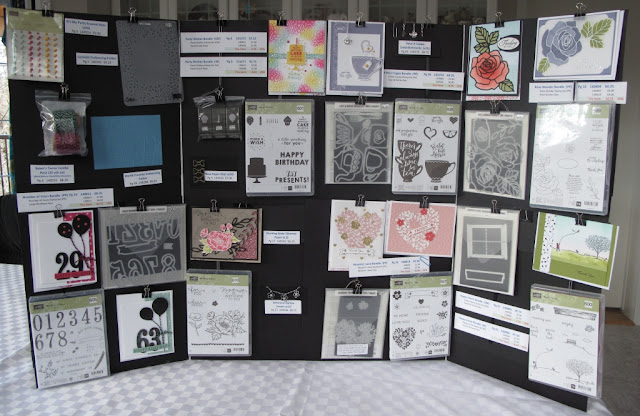
This was my main display board.  I included stamp sets, die sets, and embellishments along with the projects


 Then I had some smaller boards which were done up in the same way to display bundles and / or coordinating products.


When I did not have a bundle myself, I used the catalogue as the display and just added the information in larger printing.


There was a make 'n take for everyone to make.  I shared that card HERE in this post.


I also had some retired products for sale at great prices.


This was the main display board on the table as you came in.  I also added a whole Sale-A-Bration section to showcase those products, and added more items that did not make the display boards.


The table was set up to sit and have a Nice Cuppa and browse the catalogues.  I always have cards hanging on my inspiration walls. This time they are all cards I received in swaps during the past year. 
We laughingly call this my "studio", it used to be the eating area in our kitchen.  But the only reason I have a kitchen is because it came with the house!  We only eat at the table when we have family or company over.  Then I take all the crafting stuff off for a few hours.

More displays along this wall too.


Lots of goodies to choose from.

And finally, a table where the ladies could try out the new Wink Of Stella Brushes in Clear and Gold and pick up their catalogues. I also made up a "Scavenger Hunt" with questions about products in the new catalogue and brochure.  Anyone who completed the form, and handed it to me, had their name in a draw for some of the new Honeycomb Embellishments.  
The winner was Donna J
I also had two Door Prizes.  If you attended, your name was in the draw. 
The winner of the Wink Of Stella Brush - Clear was Marilyn H
The winner of the It's My Party Enamel Dots was Diana J

Congratulations to all the Winners!!!


If you would like to be invited to my Stampin' Up! events, just EMAIL ME.  I would love to be your demonstrator (in Canada and if you don't already have one).  I have the Annual Customer Appreciation Dinner coming up at the end of January.  This is a free event for all of my customers.  Maybe you would like to join us?????

Have a crafty day!
Glenda Mollet

LinkWithin

Related Posts with Thumbnails