Friday, August 30, 2013

All Dressed Up and Ready For Afternoon Tea

The Dress Up Dies by Stampin' Up! are so much fun to "play" with ....


I really like how you can make so many different dresses with this die.  And it does not stop at dresses, there are so many talented paper artists out there doing some phenomenal things with this die.  And now Stampin' Up! has come out with exclusive Pop 'n Cuts dies by Sizzix and one of the inserts match this die!!!  How stinkin' cute is that????

   Stamps:  All Dressed Up
   Ink:  Real Red marker (used on the sentiment stamp for only part of it)
   Paper:  Whisper White, Basic Black, Polka Dot Parade DSP
   Other:  Perfect Polka Dots EF, Apothecary Arts Die, Dress Up die, Whisper White Stitched GG Ribbon, Basic Pearls, Word Window punch

Thanks for visiting today, I truly appreciate it when you do.  I hope you get some time in your craft room too.

Happy Stampin' ....    

Wednesday, August 28, 2013

Faux Tile Technique

This technique is so easy to do.  All you need are a couple of supplies .....


To do this technique, score a 5-1/8 x 3-7/8" piece of Whisper White at every inch, using your Simply Scored Tool by Stampin' Up!  After the scoring is done you will see the tiled surface.  You do all of your stamping after the scoring is done, and don't push too hard.  This will result in the stamp staying on top of the "tile" and not getting into the "grout lines".  Some of mine did, but it really did not matter too much.  Once your stamping is complete, lightly sponge some ink (I used Crumb Cake on mine) over the tiled pattern making sure you do not go down into the grout lines.  You will get darker ink at the edges of all the grout lines and lighter in the center of the tiles.  Super easy and really fun to do!
   Stamps:  Flowering Fourishes, Itty Bitty Banners
   Ink:  Riding Hood Red, Baja Breeze, Crumb Cake
   Markers:  Riding Hood Red, Baja Breeze
   Paper:  Whisper White, Riding Hood Red, 
   Other:  Simply Scored Tool, Sponge, Baja Breeze Seam Binding, Basic Rhinestones, Bitty Banners Die
Some of these colours are now retired, but you could do the card using Cherry Cobbler, Pool Party and Crumb Cake.

Happy Stampin' .... 

Monday, August 26, 2013

Stampin' Up!s My Paper Pumpkin Try It Kit


If you are unsure if you want to commit to the My Paper Pumpkin Monthly Kit, you can order the "Try It" kit.  

Here is a picture of what you get in the kit ....


And this is what they suggest you make with your Try It kit ....


Well .............  I couldn't just make what they wanted me to make, now could I?  So I took the colours that coordinate with the butterfly stickers (Island Indigo, Bumball Green and Summer Starfruit) and went to the Designer Series Paper section of my Stampin' Up! Annual Catalogue (pgs 150-154) and looked for the paper that had those colours listed in the descriptions.  I recently did a New Catalogue Share where I ordered each of the new Designer Series Papers and shared them with a bunch of customers.  I made sure I saved a 6 x 12 piece of each of those DSP for myself.  So the choice was wide open to me.  There it was, Soho Subway DSP has Island Indigo and Summer Starfruit in it!!!  Whoopeeeee.  
I measured the notebook and cut a piece 7-1/4 x 5-1/2 inches, then rounded the corners with the Corner Rounder Punch.  I scored the center of the DSP twice 1/8" apart to make a spine, and adhered the back cover to the DSP.  Then I found some coordinating Chevron Ribbon which happened to be Pear Pizzazz.  I did not want it too dark so this was perfect.  I adhered it to the front part of the DSP, then wrapped the Summer Starfruit Baker's Twine (exclusive to this kit) around 3 times and tied a bow just like in the picture above.  Here is my finished project .....


I moved the stamps to the bottom to balance the bow, and added three butterflies above the dots.  To change the butterflies from a sticker to like cardstock so they did not stick so I could 3D them, I just poofed them with my Embossing Buddy.  Then some Basic Rhinestones (cuz a girl can never have enough bling) finished off the butterflies.  The rhinestones look pink because I was wearing my Strawberry Slush Stampin' Up! Hoodie and it reflected in them!  Looks cool doesn't it????


And to use the remaining butterflies (you get 12 of them in the kit) I just added them to the pages inside, staggering where they were on the pages.


Now I have a cute journal to keep in my purse and when I am away from my craft room, and get inspired for a card I have some graph paper with me to draw it out and jot it down.  Or if I get a call from our Grandson, James, I can jot down what time and where to pick him up!  Never again will I be without paper in my purse.  It is also a great way to show potential customers the kind of work I do.  Hmmmm  maybe I should make a pocket out of  a couple of pages and insert a few business cards and 50% off or Free Card Class cards.

Contact me if you would like to sign up for My Paper Pumpkin, or any of my classes.  See my Class Schedule page HERE is the link, or just look at the top of my blog under the header and click on "Newsletter and Classes".

Happy Stampin' ....  

Friday, August 23, 2013

Spooky Hallowe'en Banner - Stampin' Up! Style

What do you get when you cross the Stampin' Up!
 Build a Banner Simply Created Kit
 (Holiday Catalogue, pg 31, Item #133507 - $24.95) 
and the Stampin' Up! 
Halloween Banner Simply Created Accessory Kit
(Holiday Catalogue, pg 31, Item #132698 - $11.95)?  
Well this is what I got ....


I used the instructions with the Halloween kit and did it exactly as they said.  Isn't this just so much fun?  I know our Grandsons will love it, they are HUGE Halloween fans!
Here are some up close pictures for you ....


 I did not use any extra supplies for this banner, and I still have 12 canvas pennants leftover.  I think I will do a Christmas one as well.  If you run out of pennants and twine you can purchase just them in the Banner Simply Created Refill Kit (Holiday Catalogue, pg 30, Item #132699 - $11.95).  You get another 18 canvas pennants and 9ft of twine to play with.  
And .....  if you have a smart phone (I-phone or android) you can download the "Layar" app and view a video on making this banner right from page 31 of the Holiday Catalogue.  Anywhere in the catalogue you see this little red icon ....
(click on the picture to go to the Holiday Catalogue Flip Book)
just scan over it with the app on the phone and you will get a video right away on how to use that product!  It is the coolest thing ever.
Want to order your very own banner kits?  Just email me and I will make that happen!!!!
Happy Stampin'

Wednesday, August 21, 2013

My Paper Pumpkin - Welcome Kit Cards


Stampin' Up! has a promotion on the My Paper Pumpkin monthly kit if you sign up before August 31st.


(click on the image to go to the My Paper Pumpkin site)

Sign up by August 31st, 2013 and receive your first two months for only $12.50 (plus applicable taxes)!
The very first kit you get is the Welcome kit.  This one includes all the makings for 4 cards, plus the stamps, a Basic Gray ink spot, an acrylic block and instructions.  This kit is the first one for everyone because it includes the acrylic block you will need to complete all of the other kits that magically appear on your door step each month!
This is what the Welcome Kit looks like, and this is the screen where you will sign up for the monthly kit.  If you notice at the bottom of the picture there is "Add Promo Code".  That is where you will type PUMPKINDEAL all one word and all in capitals.  That will change the price to $12.50!

Today I am going to share with you the 4 cards I created from this kit.  You can make them up exactly as the kit suggests and you will get this card ....

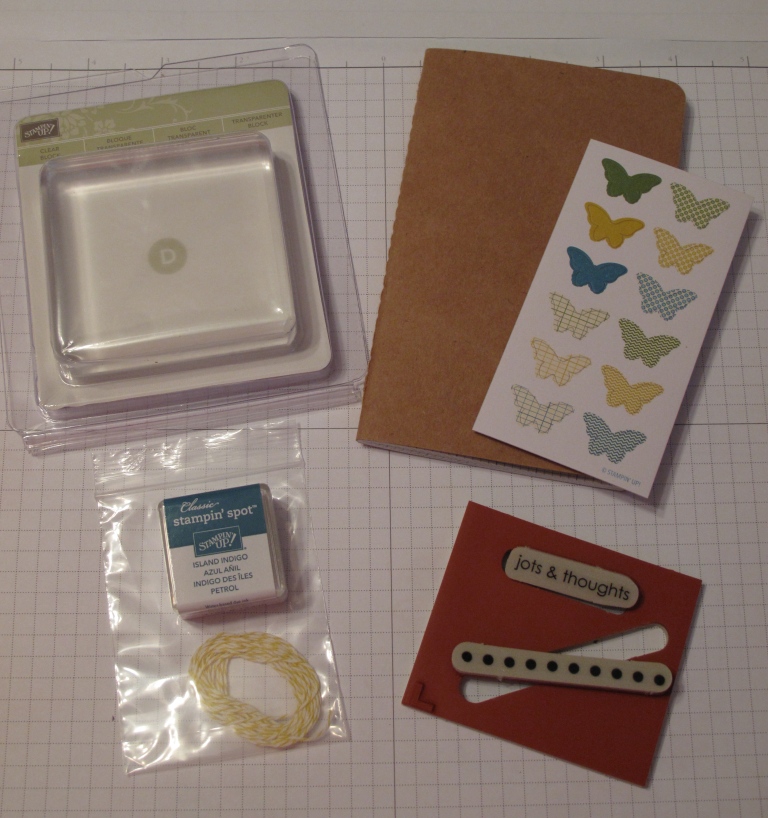
The blotches and the hey there friend are the stamps you get in the kit.  This kit coordinates with Basic Gray, Daffodil Delight, Lucky Limeade, and Tempting Turquoise.  So for the next 3 cards I used these colours and added a few more supplies .....
 
 A bit of Tempting Turquoise and Basic Gray cardstock, and some White Baker's Twine.  The flags, circle and scallops all come in the kit.
I pulled out some Daffodil Delight cardstock and the new Label Bracket Punch to layer under the circle sticker and the button, then added a bit of White Baker's Twine in the button.  The Bitty Butterfly was punched out out of Tempting Turquoise cardstock and I added some Basic Rhinestones for it's body.
 And a card is not complete without some bling and a few butterflies.  I shortened the DSP to 2.5" and used the left over piece to punch out some butterflies.  Then I added some Basic Pearls to finish them off.  I also used tge 7/8" Scallop Circle Punch and the leftover DSP to layer behind the button.  I used a piece from the sticker sheet to make faux thread in the button.
 
Then I pooled them all together in a "Baggie Book" so I can take it to classes, parties and workshops to hopefully inspire other stampers.  The kits are so much fun, and creating all of these cards with coordinating insides and envelopes, and the baggie book only took a couple of hours.  For my inspiration I went to the Stampin' Up! Demonstrator only site called Stampin' Connection.  It has tens of thousands of samples there that we can get inspired from.  I visited Sandra Nitschke's photos for inspiration, then just took the cards to another level.
I would be happy to help you sign up for the monthly kit, just call or email me and I will set you on your way to having your very own surprise package arrive on your doorstep once a month.  It is truly exciting.

Happy Stampin'    .......................     

LinkWithin

Related Posts with Thumbnails