Friday, September 30, 2011

Holiday Stockings

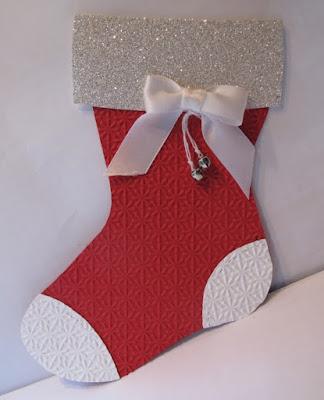
I had fun playing with the new Holiday Stocking Die (Holiday Mini Catalogue, page 24, Item #124098 - $40.95) and the Red and Silver Glimmer paper (Holiday Mini Catalogue, page 41, Red Item #121790, Silver Item #124005, $5.95).  Here are a couple of Holiday Stockings .....
 The white one is embossed with the Northern Frost Embossing Powder and has Red Glimmer Paper for the cuff.  I spritzed the toe and heal with Champagne Mist Shimmer Spritz on both stockings.
The red one is embossed with the Snow Burst Embossing Folder and uses the Silver Glimmer Paper for the cuff and I added a couple of the new Mini Jingle Bells ( Holiday Mini Catalogue, page 30, Item #124116 - $3.95).
Stamps:  Pines and Pointsettias (Holiday Mini, Page 21, Item #123762 Wood - $24.95, Item #123764 CK - $17.95)
Ink: Real Red
Cardstock:  Whisper White, Real Red, Red and Silver Glimmer Paper
Other:  Holiday Stocking Die, Whisper White and Real Red Satin Ribbon, Northern Frost and Snow Burst Embossing Folders, Champagne Mist Shimmer Spritz, Mini Jingle Bells, White Baker's Twine.
I can see these strung around the room with MERRY CHRISTMAS - one letter on each stocking!
Happy Stampin' .....  

Thursday, September 29, 2011

Sail Away With Me Anniversary Card

Today's card is a masculine Happy Anniversary card.  I purchased the stamp Sail Away when it was in the Summer Mini catalogue.  I was happy when Stampin' Up! continued the stamp set Open Sea, but truly disappointed when Sail Away was retired.  This was a super masculine stamp and it was a single stamp.  Here is my card for you ....
You can't tell in this picture, but I used the new Pewter Embossing Powder (Holiday Mini Catalogue Page 2, Item #124114, $5.95) on the sailboat image and I love how it turned out.  A bit of bling and still manages to be masculine!!
Stamps:  Sail Away, A Word For You
Ink:  VersaMark
Markers:  Cherry Cobbler, Night Of Navy
Cardstock:  Very Vanilla, Night Of Navy, Cherry Cobbler
Other:  Houndstooth Embossing Folder, Pewter Embossing Powder, Ticket Corner Punch (retired)
Happy Anniversary to everyone who had and Anniversary in September!
Happy Stampin' ......   

Wednesday, September 28, 2011

Fall Medallion Wreath

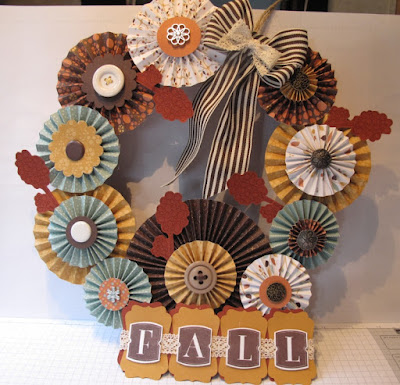
On page 6 of the new Stampin' Up! Holiday Mini there is the most awesome wreath made with medallions created out of designer series paper and the new Simply Scored scoring tool.  Today I created my own wreath for Fall.  I had limited supplies (created this in my trailer while we were in Powell River) so I could not put leaves on it.  But I added some images from the Raining Flowers set.....
 I used the retired DSP Autumn Vine and created a whole bunch of medallions .....
 Then added some medallion "toppers" using more medallions, buttons, brads, etc ....
 Also added some champagne mist shimmer spritz on the Cajun Craze stamped images and the "FALL" banner .....


Stamps:  Letter It, Raining Flowers
Ink:  Cajun Craze, Chocolate Chip
Cardstock:  Chocolate Chip, Cajun Craze, More Mustard, Whisper White
Paper:  Autumn Vine DSP (retired)
Other:  Simply Scored tool, Filigree Brads, Vintage Brads, 5/8" Brads, retired buttons, Decorative Label punch, Victoria 5/8" Lace, Early Espresso 1-1/4" Striped Ribbon, Champagne Mist Shimmer Spritz
So much fun to do, give one a try!
Happy Stampin' and Scorin' .......  

Tuesday, September 27, 2011

Stocking Builder Punch Hobby Horse

Yesterday I showed you a Reindeer made from the Stocking Builder Punch (Holiday Mini Catalogue Page 34, Item #124095 - $22.95).  Today I have a Hobby Horse for you that I also made out of this punch ....
I punched the "head" out of Soft Suede cardstock, then I used my bone folder and curled the cardstock both ways until it started to separate the layers.  I pulled apart the cardstock exposing the inside that looks like suede, then I glued the layers back together with the suede sides out.  Voila a realistic looking horse!  Think I will try one of the reindeer this way too, soon.  The eye is punched out of basic black cardstock using the smallest eye part of the Owl Builder Punch and the mane, forelock and bridle are all hand cut.
Cardstock:  Soft Suede, Crumb Cake, Early Espresso, Basic Black
Other:  Stocking Builder Punch, Owl Builder Punch

UPDATE: here is the blog post by Patty Bennett where I saw both of these images

Happy Stampin' ......    

Monday, September 26, 2011

Stocking Builder Punch Reindeer

I saw these cute reindeer on the internet (several different places) and decided to make one.  Here you go .....
So darned cute.  Can you imagine this on top of a Christmas Pencil poking out of a stocking, or on top of one of the 1"x8" treat bags Stampin' Up! now sells (page 11 Holiday Mini Catalogue, Item #124134  $3.25 for 50 bags!!)?  You can fill those little bags with all sorts of goodies.  For the little bit older child you could put some great things in there, not just candy.
Cardstock:  Soft Suede, Early Espresso, Red Glimmer Paper, Silver Glimmer Paper
Other:  Northern Frost Embossing Folder, Silver and Gold Brad, Champagne Mist Shimmer Spritz, Stocking Builder punch, Itty Bitty Flower and Circle punches, Snowflake punch.
Happy Stampin' and Creatin' ......  

Sunday, September 25, 2011

Fabulous Florets - Flower Garden card

With the weather being so "fallish" and dark I needed to stamp a summer flower garden.  Here is the card I created to brighten your day (and mine too!) ...
 I stamped a flower garden and then added one in the corner that I popped up on dimensionals and added a Brights Glimmer Brad.  Here is a closer view.....
Stamps:  Fabulous Florets, Well Scripted
Ink:  Poppy Parade, Lucky Limeade, Island Indigo
Cardstock:  Whisper White, Lucky Limeade
Other:  Lucky Limeade Stampin' Write Marker, Decorative Label punch, Brights Glimmer Brad
Hope your day is bright and sunny even if the weather outside is not so good!
Happy Stampin' ......    

Saturday, September 24, 2011

Raining Flowers in Calypso Coral

The other night on Global TV they were doing a special report on the Great Bear Rain Forest and the Spirit Bear.  We used to live in that area and sailed those waters.  I looked at the graphics when they were previewing the special and I saw what I wanted to use in a card - yup inspiration can come from anywhere.  The graphic was done in greens and had sort of a wavy split line between the two colours with a third colour peering out in the slit.  This is the card I came up with using the split line .....
 It took me a bit to figure out how to make the Calypso Coral cardstock the size I want and still have the split in it.  I did not want the split to be even, I wanted it smaller at the top and wider at the bottom.  So I cut the Whisper White cardstock the size I wanted. Then cut the Calypso Coral cardstock 1/4 inch bigger both ways.  Then I hand cut the slit and adhered it to the Whisper White layer and cut off the excess Calypso Coral cardstock.  Then I had to spritz it with Champagne Mist Shimmer Spritz, cuz with me it's all about the bling!!!  Here is a closer view of the flower and sentiment pieces .....
The flower is from Raining Flowers set and stamped in Calypso Coral and Basic Black and hand cut.  I used 2 different flower images.  The sentiment is done using the Decorative Label punch.  In THIS POST I showed you a really tiny punch out from the punch (and a link to Patty Bennett's blog where she has a tutorial on how to do it).  For this one I did the same thing, just used the long side of the punch instead of the short side.  Then I punched out a Wide Oval in Basic Black and hand cut it to layer the white piece.
Stamps:  Raining Flowers (page 111, Item #122765 Wood - $48.95; Item #122767 CM - $35.95), Create A Cupcake (Page 65, Item #121915 Wood - $27.95; Item #121982 CM - $19.95)
Ink:  Calypso Coral, Basic Black
Cardstock:  Whisper White, Basic Black, Calypso Coral
Other:  Decorative Label punch, Wide Oval punch, Basic Black 1/8" Taffeta Ribbon, Champagne Mist Shimmer Spritz, In Colour Printed Brad, Basic Rhinestones
   Whisper White - 8.5  x 5.5
   Basic Black - 5.25 x 4
   Whisper White - 5-1/8 x 3-7/8
   Calypso Coral - 5-3/8 x 4-1/8
Happy Stampin' .....   

Friday, September 23, 2011

Fall Trees Birthday

I combined the Splitcoast Stampers Colour Challenge 341 and Sketch Challenge 351 on this card.  I also used Connie Babbert's idea to use the Doily Triple Layer Punch for fall trees....
 I absolutely love this idea for the Doily Triple Layer Punch, thanks Connie!!!  Here is a closer view of the trees for you....
Stamps:  Curly Cute
Ink:  Cajun Craze
Cardstock:  Very Vanilla, Tempting Turquoise, Pumpkin Pie, Old Olive, Cajun Craze, Chocolate Chip
Other:  Square Lattice Embossing Folder, Doily Triple Layer Punch, Large Oval
This card was quick and easy to make, lots of punching and not much stamping. 
   Very Vanilla - 8.5 x 5.5
   Tempting Turquoise - 5 x 2-5/8
   Very Vanilla - 3 pieces 2-3/8 x 1-1/2

UPDATE:  Many people have asked how I did the tree trunks.  I punched a Large Oval in Chocolate Chip, then used the large oval punch to punch out "bites" on each side.  Then I just cut off the bottom flat. Hope that answers the questions.
Happy Stampin' .......

Thursday, September 22, 2011

Cupcake Challenge Birthday Card

I used the Utah Divas International Colour Challenge from Sept 20/2011 for this card - Peach Parfait, Melon Mambo, Lucky Limeade, Garden Green and Daffodil Delight ......
 I used Whisper White as my neutral, and a Texture Plate to add fun to the background.  Here is a closer look of the cupcakes ....
A little bit of Dazzling Diamonds Glitter added to the icing makes them pop a bit.
Stamps:  Easy Events, Very Vintage Jumbo Wheel
Ink:  Lucky Limeade, Basic Black, Garden Green
Markers:  Daffodil Delight, Melon Mambo, Peach Parfait
Cardstock:  Whisper White, Garden Green, Lucky Limeade
Other: Texture Plate, Scallop Edge Punch, Dazzling Diamonds Glitter
   Whisper White - 8.5 x 5.5
   Garden Green - 5.25 x 4
   Whisper White - 5-1/8 x 3-7/8
   Lucky Limeade - 1-1.2 x 5-1/8
The cupcakes on the plates are popped up on dimensionals and so is the sentiment.
Happy Stampin' ......

Wednesday, September 21, 2011

Pink Piggy Container - Button Buddies

At convention I saw this super cute little pink piggy container made out of the pig image in the new Button Buddies stamp set (page 71, Item #122735 Wood, $36.95; Item #122737 CM, $26.95).  I have a workshop coming up and I wanted to make something special for the hostess.  Here is my Pink Piggy Container ....

I filled it with some Pretty In Pink ribbons and buttons. 
Stamps:  Button Buddies
Ink:  Pretty In Pink
Cardstock:  Whisper White, Pretty In Pink (for the rear end and tail)
Other:  Pretty In Pink button, Basic Rhinestones, Circles 2 Die - 1-1/2" Circle (for rear end)
Happy Stampin' ....... 

Tuesday, September 20, 2011

Tote-ally Tess Black and White

Today's card was inspired by my friend Mi Ran (you met her in this post from convention).  Mi Ran is the queen of black and white.  A while ago she sent me a card that my stampin' ladies have been falling in love with ever since.  So today I created one along the same lines ....
 I used the stamp set Tote-ally Tess (page 73, Item 117076 wood, $27.95; Item 118595 CM, $20.95).  First I stamped the image in VersaMark onto Basic Black cardstock, then I embossed it in Clear Embossing Powder.  A bit of fussy cutting and I had the image I wanted.  I did cut off her head and arms (so sorry Tess!) to get what I wanted.  Here is a closer view of the image where you can see the clear embossing powder outline on the black cardstock ....
 For the sentiment, I used Word Play (page 156, Item #120308 Wood, $51.95; Item #120651 CM, $35.95)  and I had to be a bit "bad" and add some real red.  I stamped the arrow part of the sentiment again in Real Red and cut it out.  It is popped up on dimensionals.
Stamps:  Tote-ally Tess, Word Play
Ink:  Basic Black, Real Red, VersaMark
Cardstock:  Basic Black, Whisper White
Other:  Clear Embossing Powder
   Whisper White - 8.5 x 5.5
   Basic Black - 5.25 x 4
   Whisper White - 5 x 3.75
Have a super day, and Happy Stampin' . . . . . . . .

Monday, September 19, 2011

Fall Season of Friendship

I was sitting looking out at our gully and all the leaves on the trees turning golden colours and faling to the ground.  It inspired me to create a card with the tree from Season Of Friendship (page 102, Item 111776, $29.95).  It is one of those sets I purchased and have not gotten around to using until now!  Here is the fall card I came up with .....
When we were at Convention in July, one of the demonstrations was how to make these cute little flowerette medallions with the 1/2" Scallop Dots Ribbon (page 195, Item 124140, $10.95).  You just cut a length of ribbon (I used 3") and gather it with a bit of thread (I used crochet cotton) and tie it into a circle.  Then I added a Brights Glimmer Brad (page 199, Item 121006, $6.50) to the middle to keep with the fall colour scheme.  Here is a closer view for you ...
 Last week Patty Bennett shared how to use the Decorative Label punch (page 209, Item 120907, $22.95) to make the cute little punch out I used for the sentiment.  HERE is a link to the video tutorial on Patty's blog on how to do this....
You can also see what I did to the background of the Riding Hood Red layer.  I used the Fancy Fan Letterpress (page 217, Item 123129, $9.95) and VersaMark ink.
Stamps:  Season Of Friendship, Really Retro
Ink:  More Mustard, Riding Hood Red, Chocolate Chhip, Always Artichoke, VersaMark
Cardstock:  More Mustard, Riding Hood Red, Chocolate Chip, Shimmery White
Other:  Decorative Label Punch, needle, crochet cotton, Fancy Fan Letterpress, More Mustard Scallop Dot Ribbon, Brights Glimmer Brad
    More Mustard - 8.5 x 4.25
    Riding Hood Red - 5-1/8 x 3-7/8
    Chocolate Chip - 3.75 x 3.5
    Shimmery White - 3.5 x 3.25
Happy Stampin' ......

Sunday, September 18, 2011

Snowman Shaker Card

New in the Stampin' Up! Holiday Mini Catalogue are the Shaker Frames (page 38, Item 124155, $5.95).  It can't be any easier now to make awesome shaker cards.  Also in the catalogue is the new Mica Flakes (page 21, Item 124115, $4.50 for a LARGE container), Snow Burst Textured Impressions Embossing Folder (page 33, Item 124096, $9.75) and Pewter Stampin' Emboss Powder (page 31, Item 124114, $5.95).  I combined all four of these products to create this card for you .....
 Here is a closer view of the shaker part.  I used the Button Buddies snowman for the image in behind.  But I have a "note to self" to use less Mica Flakes in the future!  I found out you can't remove the window sheet once it is adhered to the shaker frame!!!
 And here is the sentiment where I used the Pewter Embossing Powder.  It really makes a crisp clean image.
Stamps:  Button Buddies, Jolly Old St. Nick, Many Merry Messages
Ink:  Pool Party, Basic Black, VersaMark
Cardstock:  Whisper White, Pool Party
Other:  Pewter Embossing Powder, Snow Burst Embossing Folder, Shaker Frames, Mica Flakes, Pool Party Ruffled Ribbon, Champagne Mist Shimmer Spritz, 1-3/4" Circle Punch
The Shaker Frames are sized to fit Stampin' Up! punches as well ~~ 1-3/4", 1-1/2", 1-1/4", 1", 3/4" and 1/2' .  Easy Peasy, I hope you get a chance to give them a try!
Happy Stampin' ....

Saturday, September 17, 2011

Pink Butterfly Birthday Card

I used the retired designer series paper "Tea Party" to create this colourful birthday card ....
I needed to create a Workshop-In-A-Box for my Wednesday morning Sunshine Club ladies.  The only criteria for me was that I could not use anything that I needed at other classes / workshops because I am loading up everything it takes to make this card, and the card kits, into a box and dropping it off for them to create without me!  Should be a lot of fun for them, I hope they don't have too many "issues"!!!
Stamps:  Butterfly Prints, Confetti,  God's Blessings
Ink:  Pink Pirouette, Pretty In Pink, Basic Black, Certainly Celery
Paper:  Tea Party DSP
Cardstock:  Pink Pirouette, Lucky Limeade, Regal Rose, Whisper White
Other:  2-3/8" Scallop Circle punch, Modern Label Punch, Movers and Shapers die, Circles #2 die, Pretty In Pink Satin Ribbon, Basic Pearls
Have fun, ladies!
Happy Stampin' ..... 

Friday, September 16, 2011

Advent Calendar 2011

On page 36 of the Stampin' Up! Holiday Mini Catalogue there is a super stunning Advent Calendar made using the new Peekaboo Frames Bigz L Die (page 36, Item 124587, $40.95) and the 25 & Counting stamp set (page 37, Item 123792 - $54.95 Wood; 123794 - $40.95 CM).  Today I completed my version of the Advent Calendar.  I tried to keep to what was done in the catalogue, but had to make a few minor changes because I did not have some items......


I mounted them on a 12x12 piece of Textured Very Vanilla Cardstock, then adhered that to a 12x12 artist canvas.  I wrapped some 5/8" Early Espresso Satin Ribbon around the edge (can't see it on these pictures).  A lot of work, but really worth it.  Now to decide if I want to make some for Christmas Craft Fairs!!!
Happy Stampin' .......        

LinkWithin

Related Posts with Thumbnails