Tuesday, May 31, 2011

Strength and Hope Birthday Card

Today I created another card with the stamp set "Strength and Hope".  I absolutely love the versatilty of this set of 4 stamps!

I created the background piece by stamping first the words in Peach Parfait, then I randomly stamped the butterfly in VersaMark and used White Embossing Powder on it.  Then I used So Saffron ink and daubed it over top of the butterflies so they popped out.  Lots of white on this card.  After I made it I really did not like it a lot, but now that it has dried and the inks have mellowed a bit, it is growing on me.
Stamps:  Strength and Hope, Build A Cupcake
Ink:  VersaMark, Peach Parfait, So Saffron, Cajun Craze
Markers:  Tangerine Tango
Cardstock:  Whisper White, Tangerine Tango, Peach Parfait
Other:  Lots of Tags - Label 3, Basic Pearls, Vintage brad, Peach Parfait 1/2" Stitched Poly ribbon
Thanks for visiting today, Happy Stampin' .....    

Monday, May 30, 2011

Snail Punchie Card

As promised, I am back today with the second punch image card we will be making on Tuesday, May 31st, at my Monthly Punchie Class. 
This image is just so darned cute, and for a snail too!  I loosely used the Unscripted Sketch #109 for my inspiration for this card.
Stamps:  Bugs & Wishes, Family Phrases
Ink:  Crumb Cake, Concord Crush
Designer Paper:  Certainly Celery Patterns DSP
Cardstock:  Whisper White, Concord Crush
Other:  Perfect Polka Dots EF, Modern Label punch, Snail punch image
I stamped the snail from Bugs & Wishes on whisper white cardstock and cut them out.  This was another quick and easy card to make, once the punchie image was done.

Update:  I heard from the originator of this awesome punch art image.  Her name is Bonnie and she is uber creative.  Here is a link to her blog where you can purchase the tutorial for this image, and many more as well.

Happy Stampin'  ... ... ... ... ... ... ... ... ... ... ... ... ... ... ... ... ... ... 

Sunday, May 29, 2011

Giraffe Punchie

Well, I am back!  I have been gone for a while, we went to Disneyland for 6 days and had such an awesome time.  I took two more things off my "bucket list".  First hubby and I tried a Funnel Cake.  Our first time, and oh man it was delicious!  The second thing was to ride "California Screamin'" in California Adventure Land.  Now that was totally AWESOME.  We went with my sister and her family who love that type of ride, after the frst time I was hooked and rode it 5 more times.  Thank goodness for "FastPass" tickets!
I thought I would share a picture with you before I get onto today's card .....
I am the one in the back row on the right hand side.  This was trip #2.  The rest are my sister, her daughter and her hubby.
Now onto today's card......

On Tuesday I am having my Monthly Punchie Class. This month we are doing this cute giraffe, and tomorrow I will share the second card with you.  This image is so tall I had to make a longer card to fit it on, so it fits into a #10 envelope (9" x 4" finished size).
Stamps:  Family Phrases
Ink:  Bashful Blue, Chocolate Chip
Cardstock:  Whisper White, Chocolate Chip, Bashful Blue, Certainly Celery
Other:  Perfect Polka Dot embossing folder, Build A Cupcake XL punch, Tasteful Trim die, daubers
I used the cupcake top from the cupcake punch to make the clouds, and the Tasteful Trim die to make the grass.  A very quick and easy card to make once you have the punchie image completed.
Thanks for coming back for a visit today.

UPDATE: I heard from the originator of this awesome punchie.  Her name is Bonnie (she is very talented) and HERE is a link to her blog where you can purchase the tutorial on this Giraffe.  Thanks, Bonnie, for letting me know you are the creator.
Happy Stampin'    ................................. 

Tuesday, May 17, 2011

Swirly Birthday- The Negatives

Yesterday I posted THIS card using the swirls from the Swirly Die.  Today I have a card for you that uses the negative pieces that are leftover when you remove the swirly pieces from the cardstock.  I think it is quite effective .....
I just adhered the negative pieces (which were originally 2" x 7") to a piece of whisper white cardstock (5 1/2 x 4) making sure where the swirls were removed was left open so the white from underneath shows through.  Then in the middle where the 2 pieces meet, I added some Baja Breeze Seam Binding and a double bow. The sentiment is stamped in Baja Breeze on whisper white cardstock and punched out with the scallop oval punch.  Very simple but, oh  my, so effective.  Don't you think so??  I did the Quilting Technique again on this card.
Stamps:  Sincere Salutations
Ink:  Baja Breeze
Cardstock:  Baja Breeze, Whisper White
Other:  Square Lattice Embossing Folder, Swirly Die (negatives used), Scallop Oval punch
There you go, a card made out of pieces that are usually thrown away, or saved in a scrap bin for later!
Now go out and create a card of your own!
Happy Stampin'   ~ ~ ~ ~ ~ ~                     

Monday, May 16, 2011

Swirly Birthday - Unscripted #106

A chance today to make another card or two.  This time I looked up the current Unscripted Sketch #106 challenge and found an awesome sketch.  Here is the card I came up with for the sketch ....
 Here is a closer view of the 3D flower ....
I used the "Quilted Card" technique as well for this card.   It rained and rained today in North Vancouver.  Oh well, a great day to create in my travelling craft room!
Stamps:  Four Frames, Silhouette Sentiments
Markers:  Baja Breeze, Peach Parfait
Cardstock:  Whisper White, Baja Breeze, Peach Parfait
Other:  Square Lattice Embossing Folder, Swirly Die, Decorative Label punch, mini oval punch, Blossom Party die (for flower), In Colour Glimmer Brad
Happy Stampin, and come back tomorrow to see what I did with the "negatives" from the Swirly Die!

Sunday, May 15, 2011

Embossed Regal Wedding Card

I am back into my comfort zone today after my card yesterday.  I am finding I love the simplicity of Whisper White with one other colour and have to stretch myself to use more than one colour on a card.  But I persevere sometimes and they do work out!
Here is today's card for you .....
 and a bit closer view of the sentiment, bow and some of the pearls .......
I ran the whisper white 5 1/4 x 4" piece through my Big Shot with the Elegant Lines embossing folder.  But I only went part way through so it just embossed the top of the cardstock.  Then I pulled out my Perfect Polka Dot embossing folder and embossed the bottom of the cardstock so there is two different embossings on the piece.  I love this look!  Then I put a bow made with Whisper White Satin ribbon over the part where the two embossings meet so you don't see it.  I punched two Decorative Label pieces out of Regal Rose and offset them behind the whisper white Four Frames piece I also punched out with the Decorative Label punch.  Basic Pearls added throughout the card just finish it off.  You could make this wedding card out of any colour to match the colours of the wedding, and it would look just as awesome.
Stamps:  Four Frames, Always Elegant
Ink:  Regal Rose, Basic Black
Cardstock:  Whisper White, Regal Rose
Other:  Decorative Label punch, Elegant Lines and Perfect Polka Dot Embossing Folders, Whisper White Satin Ribbon, Basic Pearls
If I had been at home I probably would have used my pink sharpie marker to colour the pearls a nice light pink to go with the colour scheme.   Maybe next time!
Happy Stampin' ......................                                   

Saturday, May 14, 2011

Aviary Twisted Easel Card

Today I have my version of a Twisted Easel card for you.  Here is a video tutorial by Monica on how to made the basic card base.
Here is my card, I used the stamp set Aviary ... ... ...


We are in North Vancouver, BC at the moment and it is pouring rain.  Yesterday was awesome.  I had a brief trip to IKEA to pick up some storage for my stampin' supplies. Then after dinner hubby and I went for a walk on Ambleside Beach along the beach trail.  Oh my it was beautiful.  We walked back to the trailer at dusk just as all the lights were coming on.  We are in a park just under the Lions Gate bridge and the lights on the bridge were quite spectacular.  So today is a crafting day due to the rain outside.  I am not complaining!!!
Stamps:  Aviary, and a sentiment stamp that I can't remember what set it came from but it is retired
Ink:  Melon Mambo, Wild Wasabi, Marina Mist
Cardstock:  Melon Mambo, Basic Black, Marina Mist, Whisper White
Other:  Scallop Oval punch, Dotted Ribbon punch
Have a great day and I'll see you soon.    .... .... ....  Glenda

Wednesday, May 11, 2011

Some New Thank You Notes

Today I created the latest batch of customer Thank You notes to go in with my latest batch of orders.
This Fabulous Florets set is quickly becoming one of my all time favourite sets.  Right now it is my "go to" set when I want to create something quick and stunning.
Stamps:  Fabulous Florets, Occasional Quotes (sentiment)
Ink:  Wild Wasabi, Concord Crush
Cardstock:  Wild Wasabi, Basic Black, Whisper White
Other:  Dimensionals (yup that's it, not much else on this one)
I see I stamped the sentiment crooked!  Bummer, oh well, they are hand made after all.  LOL
Tomorrow we move from the wonderful Okanagan Valley - West Kelowna, to North Vancouver. I am excited to be visiting the "lower mainland" of B.C. for the next 4 days.  I forsee IKEA in my future and maybe a visit or two to some crafty stores.
Bye for now, it may be a day or two before I get back to you.    

Flower Garden Embossed Birthday Wishes

There has been a few awesome cards being shared lately, made with Stampin' Up!s new Flower Garden Embossing Folder.  Today I decided I would make my own version of this card. 

I spritzed the whisper white with Champagne Mist Shimmer Spritz before I embossed or stamped it.  I hope you can see some of the bling in this picture.


I also used on of the Subtles Glimmer Brads on the sentiment piece.


Inside I embossed and used the dauber again to match the outside of the card.

 Then I thought, why not do the envelope to match!  So I did ....

Today was a picture perfect day in the Okanagan Valley.  The temps were over 20 deg cel. and there was not a cloud in the sky.  I hope your day was just as perfect wherever you are!
Stamp:  So Happy For You (sentiment)
Ink:  Pretty In Pink
Cardstock:  Whisper White, Pretty In Pink
Other:  Flower Garden Embossing Folder, Champagne Mist Shimmer Spritz, Dauber, Subtles Glimmer Brad,  Pretty In Pink 1/8" Taffeta Ribbon
Happy Stampin' ~ ~ ~ ~ ~                      

Monday, May 9, 2011

Magnolia Card - Loves Me Tilda

Every month Magnolia-Licious Highlights blog has a challenge.  I have not had the time to participate in one yet, but this month is different.  There is a sketch by Suzanne Dean this month and I created a card with the sketch and I am entering it in the challenge.
Here's my card, it uses the Magnolia image "Loves Me Tilda" ...... ..... .....

Here is an up close picture of the coloured image.  I used Copic Markers this time ....

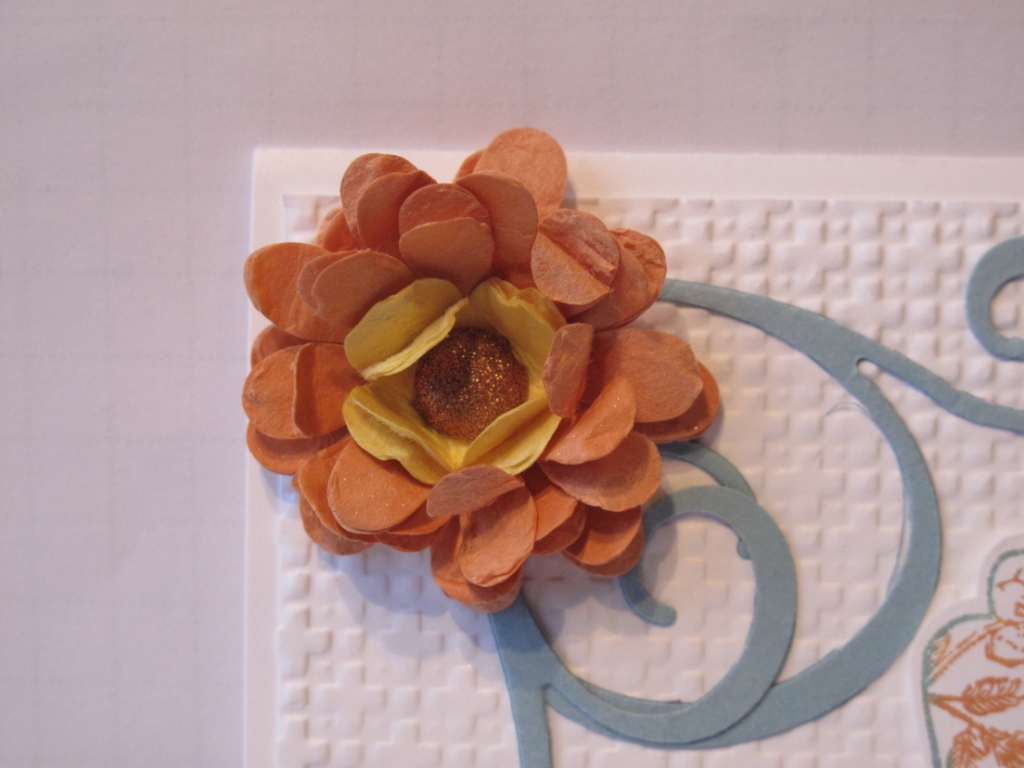
And the flower treatment from the bottom left hand corner.  I punched, coloured and shaped the flowers by hand.
The butterfly is a "MS" punch.  I double punched it and glued it together at the body.  Then added some bling.

Another view.  You can just see the inside on this one.


This is a picture of the inside.


And an upclose view of the flowers inside the card.

I used Stampin' Up! cardstock, designer paper and basic rhinestones to creat this card.
Stamps: Magnolia - Loves Me Tilda
Ink:  Pacific Point, Tangerine Tango, Memento Black
Paper:  Beyond The Garden DSP
Cardstock:  Whisper White, Pacific Point, Wild Wasabi, Irridescent White
Other:  MS Butterfly punch, Flower punches, Whisper White Satin Ribbon, Basic Rhinestones, Fun Flowers Die, 2 Step Bird Punch
Colouring:  Copic Sketch Markers
Thanks for visiting today.  Happy Stampin' ......  

Saturday, May 7, 2011

Fabulous Florets - Mojo Monday #189

This weeks Mojo Monday sketch is a great one!  HERE is the link to that post.  I really wanted to do a card using this sketch, and today I finally got the chance.
I pulled out my new "stuff" from the Summer Mini Catalogue - Fabulous Florets stamp set and Beyond The Garden Designer Paper and White Baker's Twine.  I followed the sketch, but used my "creativity" for the piece where the sketch has the strip with the brads on it.  This did not fit the theme of my card, so I used the smaller flower and leaf images from the Fabulous Florets stamp set and ran them off to the right hand side.  For the "brads" I used some Dazzling Diamonds Glitter on the images.  Here it is up closer for you .... 
Stamps:  Fabulous Florets, Build A Cupcake (sentiment)
Ink:  Wild Wasabi, Pacific Point
Paper:  Beyond The Garden DSP
Cardstock:  Whisper White, Wild Wasabi, Melon Mambo
Other:  Finial Press Embossing folder, Scallop Border Punch, XL Oval Punch,Word Window Punch, 1/16" Punch, Dazzling Diamonds Glitter, 2 Way Glue Pen, White Baker's Twine
Today in West Kelowna, BC, the weather has been awesome.  I have been able to leave the trailer windows open and do some sitting outside in the sun on the sandy beach.  We are located right be low the Mission Hills Winery which has a 12 storey bell tower.  Today we have been so lucky to have heard the bells ringing more than half a dozen times.  It is truly magical!
Thanks for visiting, I hope you have a super weekend.
Happy Stampin' .....................................................    

Thursday, May 5, 2011

Strength and Hope Note Card - Cased Myself!

Today I cased myself!  I posted THIS card earlier this week, and decided I wanted to make it in pink and white.  So here is what I did .....

I used Whisper White and Pretty In Pink cardstock.  The ribbon is Pretty In Pink Satin Ribbon.  I think it looks even better in this colour combination.  I made one of these for my Mom for Mother's Day.
We moved our trailer from the Shuswap area (Sicamous) in British Columbia to the Okanagan Valley.  We are now in West Kelowna in a resort campsite right on Okanagan Lake.  Oh my its awesome here, just wish it was a bit warmer so we could go swimming.
Here is a picture for you looking out our back window.  The back of the trailer is only about 3 feet from the sandy beach.

Well, I am off to walk the beach now.  Have a super day and Happy Stampin'

Wednesday, May 4, 2011

Strength and Hope card share

Yesterday was the most beautiful day of the year so far. Hubby did not have to work until 2 pm so we did some touristing in Sicamous. We went to the golf club restaurant and had their Sunday Buffet, then we did a round of golf. The temperature was in the mid teens, there was not a cloud in the sky anywhere. We had such fun golfing, the course here is great for a relaxing round. Here is a picture of our trailer parked beside the golf course. In front of the trailer is hole no. 4, and behind the trailer about 15 feet runs the Eagle River. There are only 4 trailers here and two are unoccupied at the moment. Talk about pure bliss!

Today I decided to create another Strength and Hope card for my June Stamp-A-Stack. I got out the pinks to keep with the Breast Cancer theme of this very versatile set.
I used the Eyelette Border Punch on the bottom of the Pretty In Pink layer, then used it again to create the strip flower embellishment. I cut a piece of Pretty in Pink cardstock 1-1/8`wide and punched it on both sides. Then I added some Basic Pearls in the middle to finish it off. I also did a LOT of spritzing with Champagne Mist Shimmer Spritz on most of the layers of this card. The bling IRL is quite amazing!
Here is the butterfly up closer ....

and the twine and punch embellies ....
Stamps: Strength And Hope
Ink: Pink Pirouette, Pretty In Pink, Regal Rose
Paper: Presto Patterns Specialty DSP
Cardstock: Whisper White, Pretty In Pink, Regal Rose
Other: Basic Pearls, White Baker`s Twine, Dazzling Diamonds Glitter, Eyelette Border Punch, Champagne Mist Shimmer Spritz
I hope you were able to get out yesterday and enjoy the outdoors. We move tomorrow to Kelowna, BC which is in the sunny Okanagan Valley. We will be camped alongside Okanagan Lake. Don`t think it will be swimmable at this time of the year, but I hope to at least dunk my toes in the water!

Happy Stampin` . . . . . . . . . . . . .

Sunday, May 1, 2011

Strength and Hope note card

Sorry I have been MIA lately. We are on another business trip, and I can’t get internet in our trailer. I have to walk up to the club house of the Eagle River Golf Club in Sicamous where we are presently staying. It is truly beautiful here in the Shuswap and today we had sunshine and it was almost warm!


I have a card for you today that I made using the Strength and Hope set. Stampin’ Up! Is donating $2.00 from every set sold to Breast Cancer Research. Here is the card I created for you …….

and a closer view of the ribbon .....
and the butterfly part ....

Stamp set: Strength and Hope
Ink: Early Espresso, Baja Breeze
Cardstock: Very Vanilla, Early Espresso
Other: Baja Breeze Seam Binding, Basic Pearls, Framed Tulips Embossing Folder, Scallop Trim Border Punch
I pulled a few threads from the middle of the seam binding (length wise) to gather it a bit then attached it to my card. The butterfly is hand cut then I put a couple of dimensionals under the wings to make them stay popped up.
My Stamp-A-Stack class in June will be using this awesome stamp set, stay tuned for more cards.
Hope you have a great weekend. I will be back as soon as I can, bye for now.


LinkWithin

Related Posts with Thumbnails