Wednesday, April 27, 2011

Awash With Flowers Birthday Card

My very talented downline, Shanna, had a card that used this image from Awash With Flowers, and she had coloured the center of the flower with a yellow marker so it looks like a daisy.  I absolutely love her card, and decided I would use the idea of the image on a card as well.  Here is what I came up with....
I used one of the new products from the upcoming Summer Mini Catalogue that goes live on May 1st.  It is the Early Espresso Baker's Twine.
Stamps:  Awash With Flowers, Create A Cupcake (sentiment)
Ink:  Early Espresso, Always Artichoke, Daffodil Delight Stampin' Write Marker
Cardstock:  Whisper White, Early Espresso
Other:  Perfect Polka Dots Embossing Folder, Modern Label and Word Window punches, Early Espresso Baker's Twine
Happy Stampin'    ~ ~ ~ ~  

Tuesday, April 26, 2011

Quilted Anniversary Card

This card popped into my head this afternoon while I was having some "tv therapy"!  Our grandson, James, was supposed to be having his nap, but he decided today that would not happen.  He is so funny to listen to when he is supposed to be sleeping, all that talking to his Puppy and Monkey who keep him company in his bed.  Then there is the singing .......  I love it!
I have wanted to make one of the "Quilted" cards that are so popular right now, and this is what I came up with.  Both birds have rhinestone eyes, but for some reason the one on the right is not showing up.
Stamps:  Something To Celebrate (sentiment)
Ink:  Rose Red
Paper:  Springtime Vintage DSP
Cardstock:  Very Vanilla, Always Artichoke, Rose Red, Pear Pizzazz, Daffodil Delight
Punches:  5 Petal Flower, Boho Blossom, 1/4" Circle, Double Circle (retired can use smallest eye part from the 2 Step Owl Punch), Itty Bitty Shapes circle, Scallop Oval, Large Oval, 2 Step Bird
Other:  Square Lattice Embossing Folder, Basic Rhinestones
I hope you get a chance to try one of these cards soon.  All you do is assemble your entire card front, then run the whole thing through the Big Shot using the Square Lattice Embossing Folder.  It looks quilted in real life.  I also made and put the flower on the sentiment through the embossing folder.  Then I added the rhinestones and put the sentiment on the front.
Hope you can come back soon, Happy Stampin' ..... 

Monday, April 25, 2011

Christmas All Year Long - Magnolia Blog Hop - April 2011

Here we are again on the 25th of the month, doing our monthly Magnolia-Licious Christmas All Year Long blog hop.  Welcome to my blog.  If you arrived here from Danielle Champagne's blog, you are on the right track.  If not, and you would like to start at the beginning, click on THIS LINK to return you to the beginning of the hop.
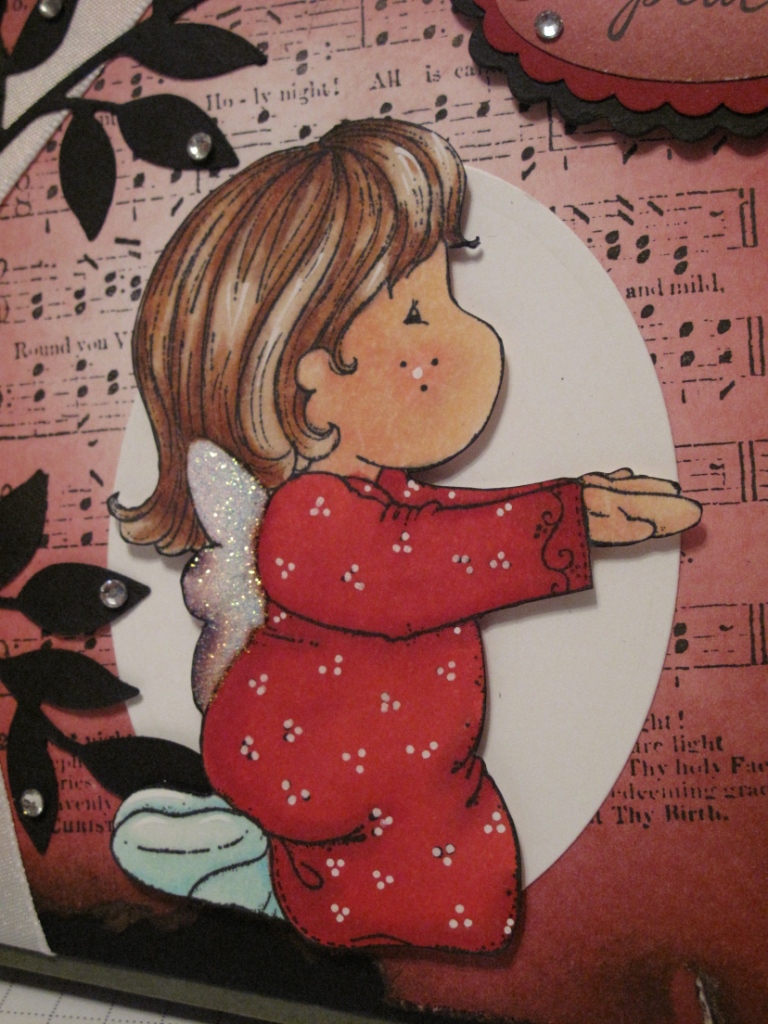
My card for you today uses So Heavenly Tilda from the 2008 So Heavenly, Travel and School Collection.  You do not need to have one of the images from a Christmas collection to create a Christmas card.  I also used the Silent Night background from the 2008 Santa collection.
Here is my card for you ....

I brayered the Whisper White cardstock background with Cherry Cobbler, then Bravo Burgundy and finally Chocolate Chip.  Then I distressed all the edges, then really got into the vintage thing and ripped and tore a whole lot.  Then I sponged the edges with Chocolate Chip ink again.  Then I stamped the Silent Night backgrround stamp in Basic Black.  That is layered onto Basic Black cardstock on an Always Artichoke card base.
I stamped So Heavenly Tilda on Irridescent Cryogen paper and coloured her with Copic Sketch markers.  Then I cut her out.  I used Diamond Stickles on her wings and a White Sharpie Poster Pen for the dots on her nightie.  When I put her on the card, she blended in too much, so I put a Whisper White oval behind her.  I think it kind of looks like she is in the moonlight.

Here is a closer view of the ribbon treatment ....

And the sentiment.  I also brayered this piece of Whisper White cardstock, then adding some Basic Rhinestones for a bit of bling....
And finally the inside of the card - I used some Deck The Halls DSP (now retired) from Stampin' Up!

All supplies are Stampin' Up! except for the image, the image paper, and the colouring.
Thanks for visiting and hopping along on our blog hop.  Your next stop is Jessica Hammond's blog, I know she will have a super cute creation for you today.
Happy Stampin' ...................... 

Sunday, April 24, 2011

New - Thank You Notes

Here is the latest of my Thank You notes for customers who place an order with me.  I love making these little notes that show my appreciation.  If you would like to receive one of these little cuties, or any of my other note cards, all you need to do is place an order through me.  Click HERE to go to my online Stampin' Up! store, or EMAIL me to place your order for you.
Here is my card ....
I used the stamp set "Strength and Hope".  $2 for every set purchased will go to Breast Cancer Research.  This set is awesome, I love the images included in it.
Stamps:  Strength and Hope, Tiny Tags
Ink:  Pretty In Pink, Rich Razzleberry, VersaMark
Cardstock:  Whisper White, Pretty In Pink
Other:  White Embossing Powder, Basic Pearls, Small Oval punch, Jewelry Tag Punch
I stamped the butterfly in VersaMark, then embossed it with White Embossing Powder.  I popped the wings up, and glued the body directly to the card.  Then I added 3 Basic Pearls to it to jazz it up a bit.
Hope you are having a great Easter weekend.  We managed to get out on our sailboat for an afternoon cruise today.  It was simply amazing, so quiet and peaceful.
Happy Stampin' .................................................................. 

Thursday, April 21, 2011

Magnolia Card - Tilda and Her Bunny

Welcome!  I hope you are all ready for Easter (or a long weekend if you don't observe Easter).  I decided to colour the Magnolia image "Tilda and Her Bunny" for Easter cards for our children this year.  I used StazOn black ink to stamp the image onto Stampin' Up! Watercolour Paper. Then I used Stampin' Write Markers and an Aqua Pen to colour the image.  This one is so darned cute!!!
I had just finished doing a Brayering Class and had this card sitting out on my craft table.  I thought it would make a great background for the image.  I coloured this image almost 2 weeks ago now, and have only just had the time to put them (have to make 2 cards) onto cards.  HERE is where I originally posted details and pictures of this card. Here is an closer view of the coloured image for you .....
Since this picture, I put some Liquid Applique on the bunny tale and heated it so it puffed up.  Oh my the tail is so cute!!!
Thanks for taking the time to visit my blog today.  I always appreciate your comments and love reading each and every one of them.
Happy Easter to you and your family......   

Monday, April 18, 2011

Nature Silhouettes Grad Card

Yesterday I shared with you a grad card I made using the 2 Step Owl Punch (HERE is that post).  Today I have another grad card for you using the same colour scheme, but this time I used the Nature Silhouettes stamp set and a brayered background. ......


I brayered Perfect Plum in the sky area, and Pear Pizzazz in the ground area using a 1-1/4" circle mask for a moon.  Then I stamped the tree and grass from the stamp set in Basic Black.  Then I put sticky notes on top of what I already stamped, and stamped the grass part of the tree and grass stamp again to make the grassy area longer.  Finally I stamped the buck in Basic Black.  I did not like that it did not stamp solidly, so I went over it with my Basic Black Stampin' Write marker.  This filled it in completely, but it also made him stand out more than the tree and grass, which was a bonus!  The sentiment is computer generated.
Stamps:  Nature Silhouettes
Ink:  Perfect Plum, Pear Pizzazz, Basic Black
Cardstock:  Brilliant Blue (retired), Brushed Gold, Whisper White
Other:  Brayer, Backgrounds 1Texture Plate
This week is Grandchildren Week, they will hold your hand only a little while, but your heart for a life time!!!!

Happy Stampin' ...................  

Sunday, April 17, 2011

Owl Punchie - Grad Owl Card Share

As promised I am back today with the card I created to put "Graddy" on.  I shared how to create the Grad Owl Punch image in THIS post
Here is the card I created ............


the owl image up close ....


and this is the inside ....


These little owl images are just so much fun to create.  Every one is different, and the possibilities are limited only by the imagination of all the super talented papercrafters out there.
Stamps: Punch Bunch (SAB)
Ink:  Soft Suede
Cardstock:  Brilliant Blue (retired), Basic Black, Brushed Gold, Whisper White
Other:  2 Step Owl Punch, 2 Step Bird Punch, Texture Plate, Ovals Die, Computer Generated Sentiment

Thanks for visiting, I hope your weekend is/was awesome.
                                                   Happy Stampin'                 

Saturday, April 16, 2011

Owl Punchie - Grad Owl

I had a friend and customer request a special graduation card (Hi Lorene!).  I was stumped until I created the Black and Red Owl Card in THIS post.  Then I knew what I wanted to do.  I created a Grad Owl using the 2 Step Owl Punch by Stampin' Up!  This is such a fantabulous punch, every time I make or see an owl using this punch, it is just as cute as all the other ones, and the possibilities are limitless for its use.
Here is the Grad Owl I came up with ......
This picture shows Graddy (cute name huh?) on the card I created.  Come back tomorrow and I will share that card with you.  Meanwhile here is a picture of the "how to" card ...

Most of it is self explanatory, except for the "hat".  For the part that sits on the head, I punched out part of the small star punch (it is now retired, but you can use the small star from the Stars #2 Die), then I used the 3/4" x 15/16" oval punch to punch it out.  Then you cut off the extra pieces on the side, that gives you a pointed hat looking piece for the head.  Then for the square mortar board part I cut out a 3/4" piece of cardstock, drew lines from point to point on both sides, then measured in 1/8" on two opposite points, and 1/4" on the remaining opposite points. Then I hand cut between the marks (I hope that is clear enough for you). 
You can adapt this punch image to any school colour by adjusting the colour of the sash and the tassel.  You could even put glasses on it if you wish.
Back tomorrow with the card Graddy is sitting on ......          

Tuesday, April 12, 2011

Black and Red Owl Birthday Card

This card came to me in the wee hours of the morning.   I had it in my mind using the Swirly Die instead of the branch from the 2 Step Bird Punch, but did not have it with me in the trailer.  So had to make do.
I used Basic Black for the main card, then spritzed some Champagne Mist Shimmer Spritz on it so that it looks like stars in the night sky.  I love every one of the owls I create from the 2 Step Owl Punch by Stampin' Up!  Every one is different, but they are all so cute.  This one makes a great masculine birthday card.
Stamps:  Messages For Mom
Ink:  Basic Black
Paper:  Neutrals Patterns Designer Series Paper
Cardstock:  Basic Black, Cherry Cobbler, Poppy Parade, Whisper White
Other:  2 Step Owl Punch, 2 Step Bird Punch, Wide Oval, Scallop Oval and Large Oval punches, Champagne Mist Shimmer Spritz, Basic Pearls
Thanks for visiting, I am home again and off and running with classses.
Happy Stampin' ................................................................................. 

Monday, April 11, 2011

Magnolia Card - Hello Little Butterfly Spring Card

Yesterday in Tofino, it was a steady downpour. I decided it was time to create my submission for the Magnolia-Licious Spring Extravaganza Contest, and chose Option #1 - Full Size Magnolia Image.  This is what I came up with, remember I am in our trailer, away from home, so don't have all my supplies with me.  But had enough I think ......
This is one of the new images from the 2011 Butterfly Dreams Collection called "Hello Little Butterfly".  And there on the top of her bow on her back is the butterfly.  I used Diamond Stickles over top of it to make it stand out a bit.  Here it is a bit closer ....


Here is a closer view of the Tild image ....
I used Stampin' Up! Watercolour Paper, Stampin' Write Markers, and an Aqua Pen to colour her in.  I used Blush Blossom, Pretty In Pink, Poppy Parade, Daffodil Delight, Peach Parfait, Pumpkin Pie, So Saffron, Crumb Cake and Chocolate Chip.
Now for a closer view of the flowers .....

For the bigger ones, I used the Island Floral Die, and the smaller ones are from the Boho Blossom Punch (both from Stampin' Up!) and both are in Daffodil Delight.  The bigger ones have a glimmer brad in the middle, and the smaller ones have mini brads.  The leaves are by a MS punch and I used Old Olive and Pear Pizzazz cardstock.   I also added flowers on 3 of the corners of the layer under the Tilda image.  I used the now retired Trio Flower punch in Poppy Parade, then added glimmer brads to the middle of them.
The Designer Series Paper is Summer Garden and I layered it with Poppy Parade cardstock.  I used Labels Four Nestabilities to cut out the image and layer it.
Thanks for visiting, and I hope you are having a drier day than I am.  Won't be walking on the beach today!!!!
Happy Stampin'  ...................  

Sunday, April 10, 2011

Owl Birthday Make 'n Take cards

On Saturday, April 16th I will be participating in a Business Fair in Port Alberni, BC with my downline, Shanna.  This is the 3rd one and they are a lot of fun.  We set up a table that has cards for sale, catalogues, scrapbooking, and other great ideas.  We also have a Make 'n Take table where anyone can come and create a quick card.  This year we will be doing a birthday card using the 2 Step Owl Punch and some retired cardstock, DSP and ribbon we have hanging around.  Here is the card I designed for it ....

I am sad that with Sale-A-Bration over, this little owl stamp is gone.  But I will continue to use it because it is just too cute to hide away. 
I would love for you to come to the Business Fair on Saturday, April 16, from 9 am to 4 pm.  It will be held in the brand new Athletic Hall which is up by the arena.  If you would like to come, and need directions, please EMAIL ME and I will send them to you.  There will be approx 50 vendors, the local Bread Of Life Society will have the kitchen open with soup and sandwiches for sale, and there will be draws.  I heard one of the vendors will also be having a silent auction for $1000 worth of their product!
Hope to see you there.  Stop by our table and make one of these happy little cards.
Bye for now, off to the beach again .......      

Saturday, April 9, 2011

Latest batch of Thank You Notes....

I ran out of Thank You notes for the next order I have coming in, so I had to create some more.  I brought some retired DSP, ribbon and cardstock with me to do this with.  Here is what I came up with .....
I recently got this neat-o stamp set called Butterfly Prints.  I just love the three different prints that can be used with the Butterfly Punch, and the sentiment *Love is like a butterfly...it goes where it pleases & pleases where it goes*.
Hope you have a great day.  I am still in Tofino and heading out to the beach for a walk.
Bye for now ......        

Friday, April 8, 2011

Some Tofino, BC Pictures For You

Hello all, I am back in Tofino again for a few days. Tofino is located on the very western side of Vancouver Island, BC, Canada.  It is a major vacation spot for all sorts of people and whale watching is very big here.  There are also houses (yah right not really houses, more like mansions) on beaches that are owned by celebrities such as John Travolta and Sarah McLachlan.  I am truly blessed to be able to stay in this very special part of our country.
My DH and I went out for a very chilly boat ride this morning to see some California Sea Lions that have taken up residence in one of the many, many bays in the area.  I thought I would share a couple of pictures with you.
I really feel sorry for who ever owns this bit of paradise.  There used to be floats, walkways, a dock and a great curvy slide in this bay.  But now the sea lions have taken over, you dare not even go too close to them, let alone try to use this property.  The slide is broken, one of the floating docks has been sunk, and the one the sea lions are on in this picture is slowly disappearing.  That is a lot of weight on that poor structure.
You can see some lighter, smaller ones that are the babies of the year.  Boy do they make a noise, and the smell is definitely not pleasant!
Then a bit further on we ran across this lone wolf....
Hubby says a few days ago there were 2 of them on the beach, so I am sure his (or her) mate is not far away. 
Just a couple of reasons why I love visiting Tofino.  Thanks for visiting, I will be back tomorrow with another card for you.
Happy Stampin' ................ 

Monday, April 4, 2011

Nature Walk Birthday Wishes

This card came together so nice and quick and easy.  I knew what colours I wanted to use and what stamp set.  Then I decided to make the ruffle around the oval with the Eyelette Border punch.
I cut an 11 x 1/2" strip of Blushing Bride cardstock, then punched it with the Eyelette Border punch.  Then I put adhesive along the unpunched edge and cut between each scallop to within 1/8" or so of the punched part starting on the unpunched edge (hope that is clear).  By adhering one scallop, bending the strip at the cut, and adhering the next scallop, you can go around almost any shape you want.  An instant scallop edge!  For the sentiment, I punched out 3 Scallop Oval punches in Blushing Bride and adhered them whole and cut up to fully frame the Wide Oval sentiment.
I also added some Champagne Mist Shimmer Spritz on the whisper white layer, then used a texture plate on that layer while the cardstock was still damp from the spritz.  It sure makes the impression deeper.  And the shimmer from the spritz will brighten anyone's day!
I inked the butterfly in Blushing Bride then used the Perfect Plum marker to add some colour to it.
Stamps:  Nature Walk, Absolutely Fabulous
Ink:  Perfect Plum (for the sentiment but I stamped it off first on scrap paper so it is not so dark), Blushing Bride
Markers:  Pear Pizzazz, Perfect Plum
Cardstock:  Whisper White, Blushing Bride
Other:  Backgrounds 1 Texture Plate, Champagne Mist Shimmer Spritz, Eyelette Border Punch, Wide Oval Punch, Scallop Oval Punch, Ovals die
Thanks for visiting today.  I hope your weekend was great.  I went to visit my Mom on her 84th birthday.  We had Dairy Queen Strawberry Sundaes instead of cake because she loves ice cream!
Happy Stampin'    ......................   

Saturday, April 2, 2011

Card Kits For Sale!

UPDATE:  Kits are SOLD OUT thank you!

As promised I have some left over card kits for sale for you today.  These are left from previous classes and come complete with all cardstock (cut / punched / run through dies), embellishments (ribbon, brads, etc.) needed to complete the projects.  Insides and envelopes are not included.  You just need to do the stamping.
I have different numbers of each one and they are on a first come basis.  I will send you a Pay Pal invoice for the cost of the card kit(s) and actual postage.

Here is the first one ....

Silhouette Sentiments - one kit available - $3.00 plus actual postage cost.
The Framed Tulip embossing has been done, the bow is tied, the flowers are punched.  You need Silhouette Sentiments set (or something similar).


French Foliage Birthday or Anniversary - Three kits available - $2.50 each plus actual postage
All punching is done and rhinestones are included.  You just need to do the stamping.  You could use French Foliage (retired) or a set of your choice.


Priceless in Marina Mist - One kit available - $2.50 plus actual postage.
All the punching except for the sentiment oval, has been done.  the brad is included.  You just need to stamp the images and sentiment and you are done.  The flower is hand cut.


Vintage Notably Ornate - Three kits available - $3.00 each plus actual postage.
This card has a lot of sponging on it and uses two images from the stamp set "Notably Ornate".  The DSP is First Edition.  The Top Note die piece is done for you, the Early Espresso piece behind the sentiment is also done, and the bow is tied, and the rhinestones are included.  You just need to stamp the images, do some sponging and some colouring and assemble.

Remember inside cardstock / stamping and envelopes are NOT included in the price.  If you want them, they would be extra.  I have done as much as I can with punches and Big Shot dies. 

EMAIL ME if you are interested in purchasing any of these kits.  Once they are gone, they are gone and I can't reproduce them.
Thanks in advance for your interest!  Have a great weekend!        

LinkWithin

Related Posts with Thumbnails