Sunday, January 31, 2010

Garden From The Heart Wiper Card

Another weekend creation. This is my first attempt at a wiper card (tutorial HERE at SCS). The finished size of this card is quite large, I was lucky to have an envelope to fit it. The other day a friend, Peggy, dropped by with some spare envelopes and there was one the perfect size in that box. Thanks Peggy!!!
I followed the tutorial and used that size then I added my own papers and embellishments. I loosely followed the Mojo Monday sketch for week 123 (link HERE). Here's my card:
and here's the card open:

and here is the back:

I made this with one of the new stamp sets available in the Occasions Mini catalogue - Garden From The Heart. I love this set, it's very versatile.
I stamped the hanging herbs in a continuing line (so much easier now that the stamps can be ordered in Clear Mount) at the tope of the white section. Both of the hats were stamped in Basic Black then coloured with Stampin' Write markers and cut out. The underneath one on the left is adhered flat on the WW piece, and the left hand one is popped up on dimensionals. I used some new Old Olive Satin Ribbon , a Filigree Brad, and a Black Brad for the embellishmet on the left. I threaded the ribbon through the Filigree Brad after attaching the black brad to it. The sentiment is also from the same set and is stamped in Basic Black. The bird is coloured with Bashful Blue and Brocade Blue, then I punched it out with the curly label punch. I wanted to highlight the frame a bit more, so I just used the side of the Black Marker and ran a thick line around it up to the fram that was stamped (I hope that makes sense to you!).
Here's the complete list of ingredients:
Stamps: Garden From The Heart, On Your Birthday, Pocket Silhouettes
Ink: Basic Black, Old Olive, Melon Mambo
Markers: Pale Plum, Melon Mambo, Old Olive, Always Artichoke, Lavender Lace, Yoyo Yellow, Bashful Blue, Brocade Blue, Basic Black
Paper: Razzleberry Lemondade DSP
Cardstock: Whisper White, Basic Black,
Other: Curly Label Punch, dimensionals, Filigree Brad, Black Brad, Old Olive Satin Ribbon
Thanks for looking, off now to have dinner with DH, then get some ideas for make-n-takes for my open house and a Home Based Business Fair I am invited to participate in..................
************** Glenda Mollet

Saturday, January 30, 2010

Tilda Blowing Hearts - Magnolia Card

Oh my, I've had such fun the past few hours. I should be doing so many other things, and here I sit making a card with my new Magnolia stamps, Copic Markers, and lots of "cute" stuff.
This is the card I made: and the colours I used:


This is an upclose of Tilda:~~ and the embellishment in the top RH corner:~~


I used all SU papers for this card and it measures 5.5 x 5.5 " square. I started with Whisper White for the card, then added a thin layer of Chocolate Chip. The DSP is Sending Love Specialty paper and has bling on it (on every sheet of it, its so luscious)! I cut the Chocolate Chip Scallop Circle with my SU die, then used my 1/16" hole punch to punch out each scallop, then I cut out a W White circle using my nesties, and embossed it with a Cuttlebug EF. Tilda is stamped on WW cardstock using Memento Tuxedo Black then coloured (the third image I have coloured so far, no I see in the picture the face needs some work, oh well, live and learn, and take pictures to check the work!). I popped her up on dimensionals. I added some small flower brads in with the hearts she is blowing, and stamped and coloured one of the images from the "Flower For All Seasons" set from SU and popped it up as well. The heart brads have some Diamond Stickles on them for some more bling. The ribbon is from my stash and has little hearts on it. A Filigree Brad with a pink Rhinestone Brad is added with a Love Heart charm hanging from it. The little red flower thing just above the heart is an eyelette that has been smushed closed and this is the back side. It makes a great flower, don't you think? There are 3 half brads from my Pretties Kit on the top RH corner. This card is my entry for the "Hearts and Flowers" challenge HERE. The challenge was to use Hearts and Flowers on your card with a Magnolia image.
UPDATE: I forgot to mention for the wings I used Crysal Effects then sprinkled some Dazzling Diamonds glitter on them, the hearts (in her hand and blown ones) also have CE on them, just no glitter.

The inside is not too fancy, but here it is. I used more of the Sending Love Sp. DSP and some W White cut out with the Top Note Die. The flower image is from "Of The Earth" a Hostess set available free with your minimum purchase. It is one of my favourite flower images.


Thanks for taking time out of your busy day to visit my blog!!!
Glenda Mollet

Black and White CASEd card.

I totally cased this card from my friend (and regional roomie) MiRan in Victoria. She does not have a blog, and makes awesome cards. Now that we have the Stampin' Connection for SU Demos, she is a member and posted some awesome cards and projects. She is famous (well to me anyways) for her black and white cards. When I saw this one I just had to make it. Thanks MiRan for your inspiration and finally going techy on us. Here's the card I borrowed:
Isn't this a great card? I did not have the swirl that she used, so I had to improvise with what I had. This card uses:
Ink: Basic Black
Cardstock: Whisper White and Basic Black
Stamp: Simple Friendship (swirl) and Family Phrases (sentiment)
Other: Large Star, Small Star, and Modern Label punches, and Black Gingham ribbon
That's it, sweet and simple. Its simple to look at, but quite indepth to make, specially when it took me about 45 mins to get the right swirl, hee hee.
This one could be made with any colour combination at all, just customize it for the person you are giving it to. And its masculine too!
Thanks for taking the time to visit, see you soon............. Glenda Mollet

Friday, January 29, 2010

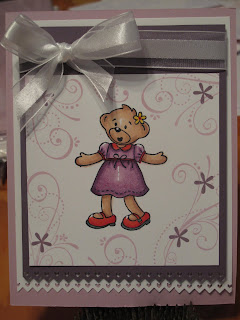
Beary Best Friends Baby Card

I had to make 2 baby girl cards today. So I made 3, just in case! I wanted to do some more colouring with my Copics and this image seemed not too difficult. Each image I tried something different with the shading and the light source. They turned out not too bad. Here' s the picture of the outside and inside of the cards (they were all identical except for the colouring / shading):

I used Pale Plum for the card base, and Whisper White and Perfect Plum for layers that were punched with the new Pinking Hearts Border punch. The image was stamped on Whisper White cardstock and coloured with the Copic markers. I then stamped the swirl from the Priceless set in Pale Plum around the edges, and the flower from Priceless in Perfect Plum in amongst the swirls. I popped up the Perfect Plum from the punched WW layer on dimensionals. On the front I tied Whisper White Organza ribbon on one, Whisper White taffeta layered with Elegant Eggplant 1/4" Grosgrain ribbons on another one, and for the third one I dyed the WW Organza with the Pale Plum marker (then wiped it with a baby wipe to even out the colour which works awesomely - the first time I've tried that). But I forgot to take pictures of those ribbons, they looked ok too. There is no sentiment on the front of these cards as I did not want it to interfere with the coloured image of the bear. Inside I stamped the train from the "Teddy and Train" set in Perfect Plum, and the sentiment from "Full Of Life" set in Pale Plum and Nursery Necessities "It's A Girl" in Pale Plum. The WW piece inside is daubed around the edge with Perfect Plum ink.
These cards were fun to make, but very time consuming. All that colouring and blending and shading..............
Whew, that was a long afternoon. Now on to my next project. Have a great day and I hope you get to spend time In Your Craft Room too!!! .... Glenda Mollet

Thursday, January 28, 2010

Two-Step Bird Punch Card

Today I was inspired by two awesome stampers. First Gretchen (HERE is her link) - and the 3 levels of cards she does her "Takin' It To The Top Tuesday". And Darlene (HERE is her link) - and a card she made. Thanks for your inspiration Ladies.
I did the three "good", "better", "best" steps to these cards. First I started with a basic card:

This one is plain, has no sponging or spritzing on it at all. I did put some faux thread in the buttons. To make it I used:
Paper: Sweet Pea Designer Series Paper
Cardstock: Pretty In Pink, Rose Red, Old Olive, Whisper White
Punches: 2 Step Bird, Modern Label, Word Window
Other: Pretty In Pink Satin Ribbon, Playground Designer Buttons
For the second one I sponged around the DSP, added some spritzing colour on the Whisper White piece behind the bird using the Colour Spritzer Tool (page 192 of the IBC). I spritzed on Pretty In Pink marker ink, then some Rose Red, all over. I spritzed Bashful Blue ink on the top half and Old Olive on the bottom half. I upgraded the buttons as well.

For this one I used:
Paper: Sweet Pea DSP
Cardstock: Pretty In Pink, Rose Red, Old Olive, Whisper White
Punches: 2 Step Bird, Modern Label, Word Window
Ink: Regal Rose
Markers: Pretty In Pink, Rose Red, Bashful Blue, Old Olive
Other: Pretty In Pink Satin Ribbon, Colour Spritzer Tool, Filigree Brads, Rich Regals Brad, white brad (non SU), sponge
Then I did version #3 - the Over The Top one:
For this one I did some brayering on the Whisper White piece behind the bird, it still has sponging around the DSP. The flower on the right hand side is hand made. I made the same type of flower for the Twist Top Box I made in THIS post. I punched two of the big flowers from the Boho Blossom Punch, ran them through the crimper about 5 times, turning them each time. Then I sponged Rose Red ink on the outsides. I shaped the layers, and glued them together with Tombow glue. Then I sponged some Rose Red ink around the outside of the Pretty In Pink Corderoy Button and adhered it to the center of the flower with a glue dot. Each of the birds has a black dot for an eye for which I used the Basic Black Stampin' Write marker. The rest of supplies are the same as for the other cards. Here are pictures of the button embellishments up close:
and this is what the inside looks like:
I plan on using the first version as a demo for Home Workshops, and have the other two on hand to show what you can do with the same basic card. Thanks ever so much for taking the time out of your busy lives to visit my blog. I appreciate it!..............Glenda Mollet

Wednesday, January 27, 2010

Good Neighbors Card

Last night - along with battling a mini-migraine - I managed to put this card together. I bought the Good Neighbor stamp set and Welcome Neighbor DSP Pad from the 2010 SAB Brochure. I just loved this set. It is way too fun! 3D-ing is so easy as the images are very nice to cut out. Here's the picture of the outside: and inside too!


I did not put the sentiment on yet as I don't know what I will use it for, but it will go in the Whisper White word window blank that is on top of the Basic Gray Modern Label punch.
To create this card I used:
Stamps: Good Neighbor
Ink: Bashful Blue, Pumpkin Pie, Old Olive
Paper: Welcome Neighbor DSP Pad
Cardstock: Pumpkin Pie, Basic Gray, Bashful Blue, Whisper White
Other: Dimensionals, Scallop Trim Border, Word Window and Modern Label Punches
I made the little scene on the front using Paper Piecing and dimensionals. I hand cut out the two curvy hills from Old Olive cardstock, then put faux stitching along the curves with the Old Olive marker. I wanted the front hill to be out from the back hill for definition, but I did not want it as high as on a dimensional, so I just cut a smaller piece of Old Olive cardstock and put it behind the front hill and taped it on. It worked like a charm, I just made sure it was s mall enough that you can't see it when you look at the scene up close. The house is actually the taller house as I liked the look of that one, but it was too tall, so I just cut off the top storey and popped up the roof on dimensials. The trees also have their "crowns" up on dimensionals. The images on the white paper underneath are actually the Welcome Neighbor DSP sheet. I stamped and masked the clouds in my little scene as well.
The products in this year's SAB brochure are so darned cute, I just love them all. Isn't it great that we can earn them for FREEEEE!!! How much better can it get than that?
Ok, now off to create another card. Be back soon with the details and pictures!
*.*.*.*.*.*.*.*.*.* Hugs, Glenda Mollet .*.*.*.*.*.*.*.*.*.*.*

Tuesday, January 26, 2010

Twist Top Box

I'm back! DH and I had a "hot and sunny" vacation in Hawaii. We went on the Pride Of America cruise ship for an island hopping cruise. We flew over, stayed a few days, cruised, stayed another day, and flew home. What an awesome time we had. We'd never been to Hawaii so wanted to visit as many islands as we could, and do as many things as our pocket book allowed. And, boy, did we!!!
But now I'm home, classes have started, and I have actually been making some cards and things.

My project for you today is based on the tutorial by Becca for a Twist Top box. I love it when I stumble across free tutorials. This box is time consuming but easy to make. The worst part is getting the top to fold in a twist the first time. Then the paper "remembers" how it is supposed to fold, and its real easy.
Here's a picture of my finished project.......
I used Kraft cardstock for the base then sponged some Bridesmaid Specialty Paper with Bravo Burgundy ink, and a frame for the window made from Bravo Burgundy cardstock. I used my nestabilities to cut out the window and the frame. UPDATE: I used some plastic packaging I got with a "goodie" I purchased for my craft room for the windows, it was good and sturdy and very clear, and it was free!
I made some Paper Lace (using THIS tutorial by Norma) using the new Pinking Hearts border punch, available FREE in the Sale-A-Bration brochure. I added some Bravo Burgundy 1/4" grosgrain ribbon to the lace. Button Latte buttons were added, I put some "faux thread" in each button (idea by Andrea Walford). I put the vanilla ones at the top of each window. Then I created flowers for the bottom of e ach window using my Boho Blossom Punch, the largest flower.
I put some triangles in Bravo Burgundy on the top of the box. Some Bravo Burgundy grosgrain ribbon bows finishes off each side.
Here's a picture of the flowers:
I punched two of the flowers out of Very Vanilla cardstock, then I ran them through the Crimper about 4 times, turning them 180 deg each time to soften the paper. I sponged some Bravo Burgundy ink on them to distress them a bit and adhered one of the Button Latte brown flower buttons with faux thread on top. The colour of these buttons is very close to Bravo Burgundy and with the flower petals inbetween you can't tell the difference. If there is interest, I can do a tutorial on how I made these flowers, they are way easy.

Thanks for visiting today, I am hoping to have more cards posted soon. Now I'm off to get ready for my Punchie Class today. We are making the crab and the owl at this class. Lots of fun and laughter is in my future this afternoon. My Stampin' Ladies make these classes so much fun for me. Have a super day. I know I will because of the class, and because it is not raining here today!
...................................... Glenda Mollet

Wednesday, January 6, 2010

Sending Love Birthday Card

I am continuing with the "cute" card in the bigger size. This card is also 5.5 x 5.5 inches. I really like this bigger size, it gives you so much more room and you can see more of the wonderful Sending Love Specialty DSP that has all the bling bling on it. This layout was cased from
Chat W HERE is her original version of the card. Here is mine............

I will be doing some classes on these bigger cards this year. Now I just have to pop to the local stationery store and pick up some 6x6 envelopes.
The recipe for this card is:
Stamps: Soft Summer, Messages For Mom
Ink: Bravo Burgundy
Markers: Pretty In Pink, Mellow Moss, Close To Cocoa, Summer Sun, Blush Blossom
Paper: Sending Love Specialty DSP
Cardstock: Bravo Burgundy, Old Olive, Whisper White, Pretty In Pink
Other: Mat Pack and Pokey Tool (the unofficial name for this wonderful tool), dimensionals, Scallop Oval and Large Oval punches, Whisper White Satin ribbon, Scallop Edge punch
Thanks, Chat for the inspiration!!! This card is so feminine and pretty.
Have a super day.............. Glenda Mollet

Tuesday, January 5, 2010

My First Magnolia Image Card

I fell in love with Magnolia images about a year ago. I have been fighting the pull ever since then. I knew when I started to stamp and colour these cute little images, I would be obsessed with them. Then the next step would be Copic Markers. Well, I finally took the plunge and made my very first Magnolia card. These cards are 5.5 x 5.5 inches (or 6x6 if you prefer). They have to be larger as the images are quite large. They originate in Sweden, and this is the size of cards they make in Europe. I think the image is called "Tilda With A Pink Heart", but I'm not sure. A friend gave me the stamped image. My colouring is HORRIBBBBLLLEEE, I am very sorry. It is my first attempt and I used Stampin' Write markers to colour her. They do not blend very well, and they were running outside the lines (or it may have been my colouring hahahaha).
Here's what I used:
Stamp: Magnolia Tilda With A Pink Heart and Rowboat
Ink: Memento Black, Regal Rose, Pretty In Pink
Markers: Pretty In Pink, Rose Red, Regal Rose, Creamy Caramel, So Saffron, Blush Blossom, Close To Cocoa
Paper: Sending Love Specialty DSP
Cardstock: Regal Rose, Pretty In Pink, Whisper White
Other: Scallop Square punch, 1-1/4" Square Punch, Nestabilities dies, 1" Regal Rose Double Stitched ribbon, 1" circle punch, Candy Dots, White Signo Pen
I sponged Pretty In Pink ink around the large piece of DSP, then I sponged Regal Rose around both of the nesties diecuts. Tilda is sitting on the Rowboat image and is popped up on dimensionals.
Ok now I am hooked on cute cards. I think I will continue to produce them, and I must say I am now hooked on Magnolias (oh dear!!) This new specialty DSP from the new Occasions Mini catty is so delicious. I will be ordering some more of this luscious paper real soon. Each and every sheet has bling on it, can it get any better? Pink and Bling on the same page, oooohhhhh.

Thanks for looking............... Glenda Mollet

Monday, January 4, 2010

Bashful Blue Thank You card

I cased this card from someone, and I am sorry I deleted the email before I took note of who it was. If it was you, please email me and I will give you proper credit. The card was from way back in March 2009 and used the Wonderful Watercolours stamp set. I used the layout and the colours, but changed the DSP I used and did not put the cut out flowers on the front.
Here is what I used:
Stamps: Matchbox Messages, Much Appreciated
Ink: So Saffron, Basic Black, Bashful Blue
Paper: SAB 2009 DSP
Cardstock: Naturals White, So Saffron
Other: Bashful Blue brads, Trio and 1/4" punches, SAB Certainly Celery ribbon, Eyelette Border Punch, SU Texture Plate
I sponged around the outside of the large piece of DSP with So Saffron ink. The bottom of the medium Nat. White and DSP pieces were punched with the Eyelette Border Punch. I also used the SU texture plate with the big polka dots on it for the So Saffron cardstock piece.
I gave these out as Thank You cards for our Christmas gifts this year.
Bye for now.................. Glenda Mollet

Sunday, January 3, 2010

Scrapbooking - James' Book - 365 Days and The End

I ran across a page for 365 days of the first year of a baby's life. It had a picture from his Birth day, and a picture from his first Birthday. I thought this was a great idea and just had to do it for the end of this album.
I cut the circles out with my Circle Scissors and continued the truck theme around the bottom as it faces the Twelfth Month page. The colour scheme is also the same. The numbers and letters are black bling Thickers. I like the way the circles on the big picture draw your attention to his face, but still allow you to see the rest of the picture.
Then I wanted a final page for the album to end it with love from Gramma and Grampa. I found a super picture of James and my DH reading before bed time. It looks like James is asleep and it really fits the theme. I wrote beneath the picture "Safe In Bapa's Arms". Bapa is what James calls his Grampa, and he calls me Yaya. His other grand parents are Poppa and Babe. I made a note of this on the bottom left hand corner so we will always remember those names.
They grow up so darn fast, its hard to believe he is almost 2 years old. We are truly blessed to have him in our lives, and getting to spend so much time with him. He has sleep overs at Bapa and Yaya's house on a very regular basis. This all fits into our schedule now that I am retired. James is the main reason I retired - I wanted to be able to spend time with him when I wanted, not when my work shedule allowed. I said once and only once, that I could not take him for the day because I had to work, and that was the end of working!
Thanks for visiting my blog and going on the journey of James' first year. I will be back tomorrow with cards..................Glenda Mollet

Saturday, January 2, 2010

Thoughts and Prayers - SC261

I sat down yesterday to make a card just for the fun of it. I had already done the Mojo Monday sketch challenge, so I decided to head on over to Splitcoast Stampers and decided to do their SC261 challenge. I love this week's sketch, simple and fun to create. Just had a bit of a blonde moment when it came to reversing the DSP to use the other side of the striped one. Who knew it would be so challenging. I actually made 2 cards with the same sketch, papers and colours. On the first one I used Flower Soft for the petals on the Thoughts and Prayers Tree - here's my picture:


I used the Fuschia Flower Soft for this project. Then I wanted to do one with just Stampin' Up! products for a future class. This is the picture for that one:

I was blog hopping the other day and came across a video on this super idea for a bow on your card. I am truly sorry, I can't remember whose blog it was on. But you use 2 different ribbons (I used Old Olive 1/4" GG to wrap around the card, and Rich Razzleberry Polka Dot to make the bow). I squished up the bow part in the middle, and tied the Old Olive around the bow in a knot. Then wrapped the OOlive around the card and snipped off the ends of the bow. I love this look. I am always on the lookout for ways to use ribbons as I just "may" have a "few" rolls!!! LOL.
Here's the recipe for this card:
Stamps: Thoughts And Prayers
Ink: Old Olive, Almost Artichoke (for the flower soft version for the tree)
Markers: Old Olive, Rich Razzleberry, Orchid Opulence, Regal Rose, Always Artichoke
Paper: Cottage Wall DSP
Cardstock: Orchid Opulence, Rich Razzleberry, Whisper White
Other: Old Olive 1/4" GG Ribbon, Rich Razzleberry Polka Dot Ribbon, Dimensionals, Brayer
I did a bit of brayering on the WW piece for the tree first. I inked with Old Olive, started rolling just off the WW piece, and pulled the colour up from the bottom. Just to give it a bit of depth and ground the image. Then I used my Old Olive marker to make some grass spears at the bottom of the trunk.
So there it is, my first card of the year. See you soon, In My Craft Room.......
.............. Glenda Mollet

Scrapbooking - James' Book - Twelve Months

This page has 3 photos on it, the two on the outside are narrower than the middle one. This layout was also scraplifted, this time from the CTMH catalogue. Inspiration is out there, everywhere I turn. I love it!
This was Jame's "Family" birthday party. He had a huge one with some of his friends who were also turning one. I think there was over 30 people there, we gave it a miss and then we had a family party for him. This dumptruck has noises when you move it. It has starting noises, backup noises, turning off noises, as well as horn blowing. We keep it at our house for him to play with. Before he was walking he used to push it around and walk behind it. Now he rides it, has us push him on it, as well as walking and running behind it. In the middle picture you can just see the tip of the top of his head, so you can see how much taller he is than Cookie Monster now. Hard to believe how much he has grown in one year. The trucks along the bottom are some clear stamps I picked up somewhere, they are stamped on Whisper White cardstock in Certainly Celery ink. The letters are Thickers. I really like this layout it works real well.
Anyways, thanks for looking. After doing all 12 months, I found a layout for 365 days and decided to do that. I will share that one, and the final page from the album tomorrow.
Bye for now......................... Glenda Mollet

Friday, January 1, 2010

Scrapbooking - James' Book - Ten and Eleven Months


For these two pages, I used a layout I cased from a magazine. The 2 blank squares at the bottom are for the journalling. I stamped a dump truck stamp I have on Whisper White cardstock, using Memento Black ink, then I coloured it with my Copics.
This book is turning out to be so much fun. I can't wait to finish it and get on to other pages. I have so many I want to do for pictures of special days, places, toys, moments, looks, etc. from the past 20 months. Oh I see a lot of scrapbooking in my future. Good thing I really enjoy doing it.
I'll be back tomorrow with the Twelfth Month page. Happy New Year to All!!!
******* Glenda Mollet

LinkWithin

Related Posts with Thumbnails